Turquoise Fan Lace Crochet Table Runner Pattern
Beginner Friendly
Perfect for those just starting their crochet journey, with clear instructions and simple techniques
Single-Day Project
A satisfying project you can complete in a single afternoon or evening.
Handmade Gift
A beautiful keepsake — free forever. Read online or print at home.
About This Turquoise Fan Lace Crochet Table Runner Pattern
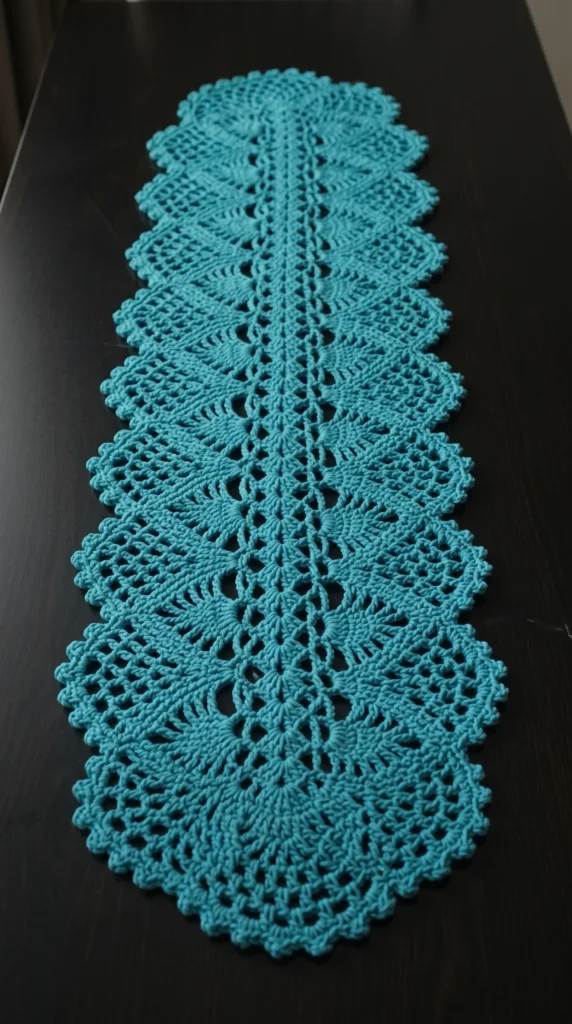
This lace crochet table runner pattern builds a long, graceful runner in turquoise cotton from a lace spine down the center and twelve picot-edged fans. The fans open outward like pineapple fans on either side of the spine. The whole piece reads as one continuous scalloped design, even though every part is crocheted separately.
Because the runner is made from small pieces, you can work it one unit at a time. Each fan follows the same ten-row formula: nine spokes of double crochet with chain spaces that grow by one chain every row, then a row of single crochet and a picot edge. The spine is a short strip of mesh worked in five rows. You will crochet five spine segments, ten side fans and two end fans. Plan on 25 to 30 hours in total. This pattern suits confident crocheters who are comfortable with turned rows, counting chain spaces and sewing motifs together.
Blocking does most of the work in this pattern. Cotton lace that is pinned out and dried flat opens into crisp fans and lies smoothly on a dining table or sideboard. If you prefer a shorter piece, three units with the two end fans make a lovely dresser scarf.
Materials
- Mercerized cotton, DK weight, turquoise about 320 m / 350 yd (3 x 50 g balls); buy all balls in the same dye lot
- 3.0 mm crochet hook go down a size if your lace looks loose
- Stitch markers at least 2
- Tapestry needle
- Blocking mat and rustproof pins
- Measuring tape
- Fabric stiffener or sugar starch optional, helps the fans hold their shape
Abbreviations
chchainsl stslip stitchscsingle crochetdcdouble crochetpicotch 3, then sl st in the first of those 3 chainsst(s)stitch(es)sp(s)space(s)reprepeatRS / WSright side / wrong sideSpine Segment (make 5)
Each segment is a short strip of mesh, about 20 cm long and 4 cm wide, with a row of 39 sc on each long edge. The fans are sewn to these two edges.
- Foundation: ch 40.
- Row 1: sc in the 2nd ch from the hook and in each ch across. Turn. (39 sc)
- Row 2: ch 3 (counts as dc). *Ch 1, skip next st, dc in next st; rep from * 18 more times. Turn. (20 dc, 19 ch-1 sps)
- Row 3: ch 3 (counts as dc). *Ch 1, dc in next dc; rep from * 17 more times. Ch 1, dc in the 3rd ch of the beginning ch. Turn. (20 dc, 19 ch-1 sps)
- Row 4: repeat Row 3. (20 dc, 19 ch-1 sps)
- Row 5: ch 1 (does not count as a st). Sc in the first dc. *Sc in next ch-1 sp, sc in next dc; rep from * 17 more times. Sc in the last ch-1 sp, sc in the 3rd ch of the beginning ch. (39 sc) Fasten off, leaving a 30 cm tail.
Lace Fan (make 12: 10 side fans and 2 end fans)
Each fan is worked flat in turned rows, starting from a small ring. Every row from 1 to 10 has 9 dc, which are the spokes. The 8 chain spaces between them grow by 1 chain each row, which opens the piece into a fan. Always work each dc into the previous row’s dc and skip over the chain space beneath. Count your 9 dc at the end of every row.
- Row 1: ch 4, sl st in the first ch to form a ring. Ch 3 (counts as dc), 8 dc in the ring. Turn. (9 dc)
- Row 2: ch 4 (counts as dc + ch 1). *Dc in next dc, ch 1; rep from * 6 more times. Dc in the 3rd ch of the beginning ch. Turn. (9 dc, 8 ch-1 sps)
- Row 3: ch 5 (counts as dc + ch 2). *Dc in next dc, ch 2; rep from * 6 more times. Dc in the 3rd ch of the beginning ch. Turn. (9 dc, 8 ch-2 sps)
- Row 4: ch 6 (counts as dc + ch 3). *Dc in next dc, ch 3; rep from * 6 more times. Dc in the 3rd ch of the beginning ch. Turn. (9 dc, 8 ch-3 sps)
- Row 5: ch 7 (counts as dc + ch 4). *Dc in next dc, ch 4; rep from * 6 more times. Dc in the 3rd ch of the beginning ch. Turn. (9 dc, 8 ch-4 sps)
- Row 6: ch 8 (counts as dc + ch 5). *Dc in next dc, ch 5; rep from * 6 more times. Dc in the 3rd ch of the beginning ch. Turn. (9 dc, 8 ch-5 sps)
- Row 7: ch 9 (counts as dc + ch 6). *Dc in next dc, ch 6; rep from * 6 more times. Dc in the 3rd ch of the beginning ch. Turn. (9 dc, 8 ch-6 sps)
- Row 8: ch 10 (counts as dc + ch 7). *Dc in next dc, ch 7; rep from * 6 more times. Dc in the 3rd ch of the beginning ch. Turn. (9 dc, 8 ch-7 sps)
- Row 9: ch 11 (counts as dc + ch 8). *Dc in next dc, ch 8; rep from * 6 more times. Dc in the 3rd ch of the beginning ch. Turn. (9 dc, 8 ch-8 sps)
- Row 10: ch 12 (counts as dc + ch 9). *Dc in next dc, ch 9; rep from * 6 more times. Dc in the 3rd ch of the beginning ch. Turn. (9 dc, 8 ch-9 sps)
- Row 11: ch 1 (does not count as a st). Sc in the first dc. *9 sc in next ch-9 sp, sc in next dc; rep from * 6 more times. 9 sc in the last ch-9 sp, sc in the 3rd ch of the beginning ch. Turn. (81 sc)
- Row 12 (picot edge): ch 1. *Sc in each of the next 2 sts, picot, sc in next st; rep from * 26 more times. (27 picots, 81 sc) Fasten off, leaving a 30 cm tail. Do not edge the two straight sides, because they will be sewn to the spine.
Finishing
Weave in the ends that you will not use for sewing, then block every piece before you join anything. Pin each fan out flat in a half circle with the picots fully opened, and pin each spine segment straight. Spray with water or dip in stiffener and let everything dry completely. Blocked pieces line up cleanly, and unblocked lace never quite does.
Lay the five spine segments end to end and whip stitch the short ends together with the tails, matching row to row so the mesh lines up. Next, attach the fans. Find the middle of one long edge of a segment, which is the 20th sc of the 39. Pin the center of a fan’s straight side there. The straight side is made of the row ends, with about 10 on each side of the ring. Ease them evenly along the edge and whip stitch, catching about two sc of the spine for every row end. Sew one fan to the Row 1 edge and another to the Row 5 edge of each segment, so you have a fan on each side of the spine for every unit. Adjacent fans on the same side will meet at their tips. Tack them together with 2 or 3 small stitches at each valley.
Finish the ends with the two remaining fans. Sew the flat side of each end fan across the short end of the spine, with the picot edge facing out. The end fan is slightly wider than the spine, so tack its outer corners to the tips of the first side fans below it. Take your time with this join so the end reads as one rounded lobe. Give the finished runner a last steam or starch and pin it flat to dry. It should measure about 120 x 24 cm.
Tips for Success
- Use a stitch marker in the center of the last dc each fan row, so you can find the spokes quickly and count to 9 at a glance.
- Chain loosely in the later rows. If the fan starts to cup, use a hook 0.25 mm larger for the chains only.
- Buy all your cotton from the same dye lot. A lighter ball in the middle of a pale turquoise runner shows up clearly once the pieces are joined.
- Make a card template cut to a half circle with a 10 cm radius, and pin each fan to it while it dries. All twelve fans will come out the same size.
- Make the spine segments and fans in batches while you watch something. Having all 17 pieces done makes the assembly feel quick.
Common Mistakes to Avoid
- Working a dc into a chain space instead of the dc below adds extra spokes. If a row has more than 9 dc, rip back to the last row that counted 9.
- If Row 11 has fewer than 81 sc, you probably missed sts in the chain spaces. Each ch-9 space needs exactly 9 sc, and each of the 9 dc gets 1 sc.
- Picots that curl or look uneven usually come from chaining 4 or slipping into the wrong ch. Chain exactly 3 and slip into the first of those chains.
- If a spine segment does not have 39 sc on both long edges, the fan centers will not line up. Recount Row 1 and Row 5 before you move on.
- Sewing before blocking makes the fans fight the spine. Block every piece first so the straight sides meet the spine edge without puckering.
Ways to Customize This Pattern
- Change the length: each unit (one spine segment and two fans) adds about 20 cm. Three units plus the two end fans give a runner of about 80 cm.
- Use a contrasting spine, such as cream or white, with turquoise fans for a more striking look.
- Widen the spine to about 6 cm by repeating Row 3 twice more before the final sc row. The 39 sc edges stay the same.
- Work the same counts in size 10 crochet cotton with a 1.5 mm hook for a finer heirloom runner. It will come out roughly half the size, so make more units to compensate.
- Make a single fan in stiffened cotton and use it as a coaster or small lace mat.
Frequently asked questions
Separate fans are easier to count, block and fix. If one fan goes wrong you only redo that fan, and you can pin every one to the same template so they match. You can also join them with a slip stitch seam, but sewing keeps the join flat and flexible.
The 9 spokes set how wide the fan opens, so changing them changes the curve and the size. If you change the spoke count, work a test fan and check that its straight side is still close to 20 cm so it fits the spine segment.
A mercerized DK cotton gives crisp stitches and blocks well. Acrylic will look softer and may not hold the open lace. If you do use acrylic, steam block lightly and use a hook one size smaller.
Hand wash in cool water with a mild soap and do not wring it. Press it in a towel, then pin it flat to dry. If you used stiffener, you will need to re-apply it after washing.
The finished Turquoise Fan Lace Crochet Table Runner Pattern