Tree Table Runner Crochet Pattern
Beginner Friendly
Perfect for those just starting their crochet journey, with clear instructions and simple techniques
Single-Day Project
A satisfying project you can complete in a single afternoon or evening.
Handmade Gift
A beautiful keepsake — free forever. Read online or print at home.
About This Tree Table Runner Crochet Pattern
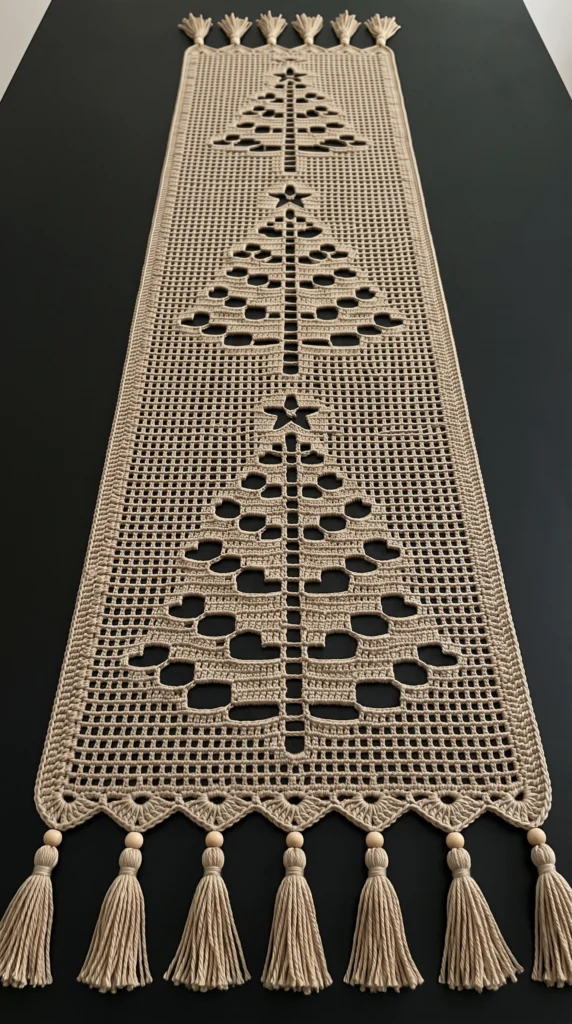
This tree table runner crochet pattern builds three filet trees into one long beige runner. Each tree is topped with a star and gets smaller toward the far end, so the runner looks like a row of trees receding down the table. The trees are solid foliage tiers with a single open spine running down the centre, and the open squares inside each tier add texture and depth.
The runner is worked flat in one piece from a foundation chain, then finished with a two-round border, a shell-scalloped edge on both short ends, and hand-wrapped tassels with wooden beads. Seven large tassels hang from one end and six small ones from the other. The chart is perfectly symmetrical, so you read every row the same way from either side and never have to flip it.
Plan on 30 to 40 hours. This is a project for crocheters who are already comfortable with filet and want to practice reading a chart, keeping edges straight over 77 rows, and blocking open mesh into shape. It makes a lovely gift, and the neutral colour suits almost any table.
Materials
- DK mercerized cotton yarn, beige about 750 m / 350 g total
- Crochet hook 3.0 mm
- Large wooden beads, natural 7 pieces, 20 mm, hole large enough for 6 strands of yarn
- Small wooden beads, natural 6 pieces, 12 mm
- Stiff cardboard one piece 15 cm wide and one piece 8 cm wide, for wrapping tassels
- Yarn needle
- Scissors
- Rustproof pins and blocking mats a lot of pins
- Fabric stiffener or spray starch optional
Abbreviations
chchainsl stslip stitchscsingle crochetsc2togsingle crochet 2 togetherdcdouble crochetst(s)stitch(es)Oopen square: ch 2, skip 2 sts, dc in next stSsolid square: dc in each of the next 3 stsHow to Read the Chart
- The runner is 41 squares wide and 77 rows long. Every row has 124 stitches counting the turning chain, which acts as the first dc of the row.
- Every row after Row 1 begins with ch 3 (counts as the first dc), turn. Then work the squares in the row listing. The last dc of every row goes into the top of the turning chain of the row below.
- An open square (O) is: ch 2, skip the next 2 sts (or the ch-2 space), dc in the next dc.
- A solid square (S) is: dc in each of the next 3 sts, working one dc into each chain of a ch-2 space and the third dc into the dc.
- Each chart row below is written as left half, centre square, right half. The right half is a mirror of the left, so the rows work out the same from either side. Every row adds up to 41 squares: 20 + 1 + 20.
- Count your dc stitches (42 per row) after any row with a lot of changes. If a count is off, fix it before moving on.
Foundation and Plain Mesh Rows (Rows 1-6)
- Row 1: ch 126. Dc in the 6th ch from the hook (the first 5 chains count as a dc and a ch-2 space). *Skip 2 ch, dc in the next ch*, repeat from * 40 more times. You have 41 open squares.
- Rows 2-6: ch 3, turn. *Ch 2, skip 2 sts, dc in the next dc*, repeat from * 41 times, with the last dc in the top of the turning chain. 41 open squares.
Large Tree and Star (Rows 7-33)
- Row 7: ch 3, turn. O7 S13 | O | S13 O7.
- Row 8: ch 3, turn. O7 S2 O1 S10 | O | S10 O1 S2 O7.
- Row 9: ch 3, turn. O9 S11 | O | S11 O9.
- Row 10: ch 3, turn. O9 S2 O1 S8 | O | S8 O1 S2 O9.
- Row 11: ch 3, turn. O11 S9 | O | S9 O11.
- Row 12: ch 3, turn. O11 S2 O1 S6 | O | S6 O1 S2 O11.
- Row 13: ch 3, turn. O13 S7 | O | S7 O13.
- Row 14: ch 3, turn. O13 S2 O1 S4 | O | S4 O1 S2 O13.
- Row 15: ch 3, turn. O15 S5 | O | S5 O15.
- Row 16: ch 3, turn. O15 S2 O1 S2 | O | S2 O1 S2 O15.
- Rows 17-18: ch 3, turn. O17 S3 | O | S3 O17.
- Rows 19-20: ch 3, turn. All 41 squares open.
- Row 21 (star base): ch 3, turn. O16 S4 | S | S4 O16.
- Row 22: ch 3, turn. O16 S3 O1 | S | O1 S3 O16.
- Row 23: ch 3, turn. O16 S3 O1 | O | O1 S3 O16.
- Row 24: ch 3, turn. O16 S2 O2 | O | O2 S2 O16.
- Row 25: ch 3, turn. O16 S3 O1 | O | O1 S3 O16.
- Row 26: ch 3, turn. O16 S4 | O | S4 O16.
- Row 27 (star top): ch 3, turn. O16 S4 | S | S4 O16.
- Rows 28-33: ch 3, turn. All 41 squares open.
Medium Tree and Star (Rows 34-56)
- Row 34: ch 3, turn. O11 S9 | O | S9 O11.
- Row 35: ch 3, turn. O11 S2 O1 S6 | O | S6 O1 S2 O11.
- Row 36: ch 3, turn. O13 S7 | O | S7 O13.
- Row 37: ch 3, turn. O13 S2 O1 S4 | O | S4 O1 S2 O13.
- Row 38: ch 3, turn. O15 S5 | O | S5 O15.
- Row 39: ch 3, turn. O15 S2 O1 S2 | O | S2 O1 S2 O15.
- Rows 40-41: ch 3, turn. O17 S3 | O | S3 O17.
- Rows 42-43: ch 3, turn. All 41 squares open.
- Rows 44-50 (star): work the same seven star rows as Rows 21-27, in the same order.
- Rows 51-56: ch 3, turn. All 41 squares open.
Small Tree and Star (Rows 57-77)
- Row 57: ch 3, turn. O13 S7 | O | S7 O13.
- Row 58: ch 3, turn. O13 S2 O1 S4 | O | S4 O1 S2 O13.
- Row 59: ch 3, turn. O15 S5 | O | S5 O15.
- Row 60: ch 3, turn. O15 S2 O1 S2 | O | S2 O1 S2 O15.
- Rows 61-62: ch 3, turn. O17 S3 | O | S3 O17.
- Rows 63-64: ch 3, turn. All 41 squares open.
- Rows 65-71 (star): work the same seven star rows as Rows 21-27, in the same order.
- Rows 72-77: ch 3, turn. All 41 squares open. Do not fasten off; go straight into the border.
Border (2 Rounds)
- Round 1: With the right side facing and working from the last stitch of Row 77, ch 1 and work 3 sc in that corner stitch. Work 122 sc evenly across the end (1 sc in each dc and each chain). Work 3 sc in the next corner stitch.
- Down the long side, work 2 sc in each row end of Rows 76 down to 2 (150 sc). Work 3 sc in the foundation corner. Work 122 sc evenly across the foundation chain. Work 3 sc in the next corner. Work 150 sc up the second side. Join with sl st to the first sc. 556 sc.
- Round 2: Ch 1, sc in each sc around, working 3 sc in the centre sc of every 3-sc corner group. Join with sl st. 564 sc. Fasten off.
Scalloped End Edging (Make 2)
- Find the 124 sc along one short end: these are the sc between the two corner 3-sc groups, including the single sc next to each group. Attach yarn with the right side facing in the first of these 124 sc.
- Row 1: Ch 1, sc in the same sc and in the next 18 sc (19 sc). *Sc2tog, sc in each of the next 40 sc*, then sc2tog, sc in each of the next 40 sc, then sc2tog, sc in each of the last 19 sc. 121 sc. Turn.
- Row 2: Ch 1, sc in the first sc. *Skip 2 sc, 5 dc in the next sc, skip 2 sc, sc in the next sc*, repeat from * 20 times total. You have 20 shells and 21 sc (1 + 20 x 6 = 121). Fasten off.
- Repeat on the opposite short end.
Large Tassels (Make 7)
- Wrap yarn 40 times around the 15 cm card. Slide a length of yarn under the wraps at the top and tie tightly. Cut the loops at the bottom of the card.
- Wrap a length of yarn around the bundle about 2 cm below the top and tie it off. Hide the tail inside. Trim the bottom ends even.
- Thread the top tie strands through a 20 mm bead.
- On one scalloped end, count the 21 sc between and beside the shells. Attach large tassels at sc 2, 5, 8, 11, 14, 17, and 20, pulling the tie strands through the sc from the front with a hook and tying them off firmly on the back.
Small Tassels (Make 6)
- Wrap yarn 20 times around the 8 cm card, tie the top, cut the bottom, and wrap the neck about 1 cm below the top, as for the large tassels.
- Thread the top tie strands through a 12 mm bead.
- On the other scalloped end, attach small tassels at sc 1, 5, 9, 13, 17, and 21.
Finishing
Weave in all ends along the dc rows. Wet block the runner by soaking it, pressing out the water in a towel, and pinning it flat. Pin every square along the long edges so the sides stay straight, and pull out each shell on the short ends. Let it dry completely. If you like a crisper drape, spray with starch or fabric stiffener before pinning. When dry, trim any stray tassel ends. Blocked, the runner should measure about 32 x 58 cm, and about 80 cm with the tassels hanging.
Tips for Success
- Stitch markers on every tenth square along the row make it much easier to keep the chart aligned.
- Count the 42 dc after each solid row, especially in the star and widest tier rows.
- Use mercerized cotton. Wool or acrylic will not hold the crisp edges of the squares and open spine.
- Keep your turning chain loose enough that it does not pull the side edge in.
- Block firmly. The open mesh looks uneven until you pin it flat.
Common Mistakes to Avoid
- A runner that narrows toward the middle: the first and last stitch of the row are often missed. Always work the last dc into the top of the turning chain.
- Solid squares that look different from each other: dc into every chain of a ch-2 space, not around it.
- A tree that drifts off-centre: count to the centre square and make sure the open spine sits in the 21st square.
- Crooked end edging: if the 124 sc along an end are miscounted, the shell count will not come out evenly. Recount before you start.
- Tassels that fall apart: tie the top wrap tightly and knot the bead strands firmly on the back of the runner.
Ways to Customize This Pattern
- Make the runner longer by adding another tree and more open rows between motifs.
- Work it in sage green, charcoal, or cream cotton to match your table.
- Use fewer, larger tassels or skip the beads entirely for a simpler finish.
- Swap the star for a small solid square for a more minimal tree.
- Turn one tree into a wall hanging by adding a ch-loop hanging row to the top.
Frequently asked questions
Yes, but keep the number of squares odd so the open spine stays centred. Change the chain by 6 for each pair of squares you add or remove. If the width changes, the border and end edging counts will change as well.
Mercerized DK cotton gives clean, defined squares and holds its shape after blocking. Soft or fuzzy yarns blur the chart.
Expect it to open up and lengthen noticeably, because the mesh relaxes when wet. Pin it to the measurements given in the finishing section.
No. They are decorative and also add a little weight so the tassels hang straight. You can leave them off without changing any other step.
The finished Tree Table Runner Crochet Pattern