The Best Sage and Cream Lace Crochet Table Runner
Beginner Friendly
Perfect for those just starting their crochet journey, with clear instructions and simple techniques
Single-Day Project
A satisfying project you can complete in a single afternoon or evening.
Handmade Gift
A beautiful keepsake — free forever. Read online or print at home.
About This The Best Sage and Cream Lace Crochet Table Runner
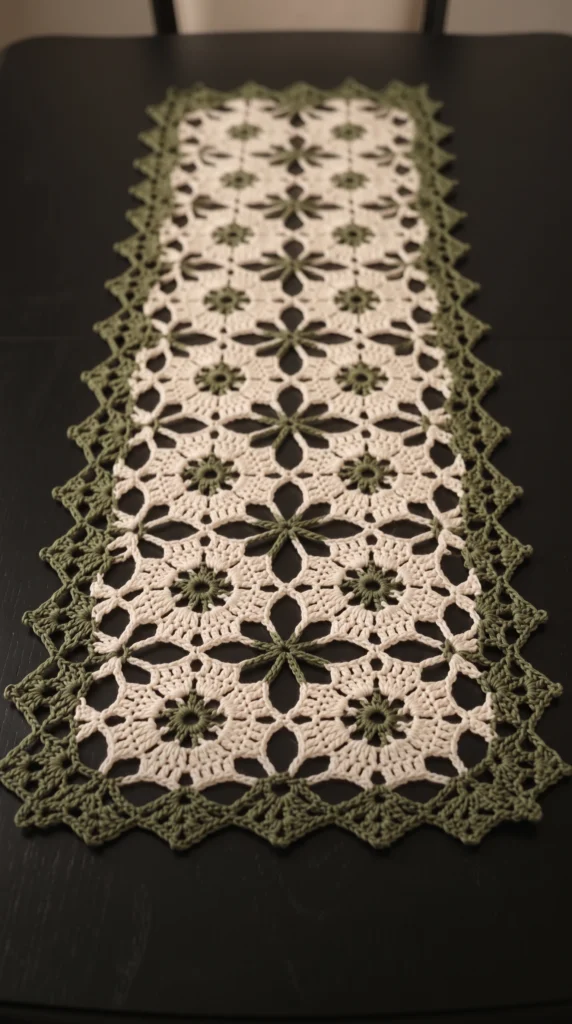
This crochet table runner pattern turns ten cream lace medallions, four sage green stars and a pointed green border into one long, airy piece. Each medallion has a small green flower at its center. The stars fill the open gaps where four medallions meet, so the green carries through the whole design.
The runner is built from three kinds of pieces: medallions, stars and a border. The medallions are joined as you go, so there is very little sewing at the end. Plan on 20 to 25 hours of work, most of it in the medallions. It suits crocheters who are comfortable with thread, reading stitch counts and blocking lace, and it makes a good heirloom gift.
The finished runner measures about 21 x 44 cm (8 x 17 in) after blocking. It is worked in two columns of five medallions, but you can lengthen it by adding rows, as described in the customization section below.
Materials
- Size 10 crochet cotton thread, cream about 350 m (380 yd)
- Size 10 crochet cotton thread, sage green about 180 m (200 yd)
- Steel crochet hook 1.75 mm
- Tapestry needle for weaving in ends
- Blocking mats and rustproof pins at least 40 pins
- Fabric stiffener or spray starch optional, for crisp lace
Abbreviations
chchainsl stslip stitchscsingle crochetdcdouble crochetMRmagic ringst(s)stitch(es)spspacereprepeatMedallion (make 10)
- Round 1 (green): Make an MR. Ch 3 (counts as first dc), work 11 dc in the ring. Join with a sl st to the top of the ch 3. (12 sts)
- Round 2 (green): Ch 1, 2 sc in each st around. Join with a sl st to the first sc. Fasten off green. (24 sts)
- Round 3 (cream): Join cream in any st. Ch 3 (counts as first dc), dc in the same st, dc in the next st, [2 dc in the next st, dc in the next st] 11 times. Join with a sl st to the top of the ch 3. (36 dc)
- Round 4 (cream): Ch 3 (counts as first dc), dc in each st around. Join with a sl st to the top of the ch 3. (36 dc)
- Round 5 (cream): Ch 1, sc in the same st, [ch 5, skip 2 sts, sc in the next st] 11 times, ch 5, skip the last 2 sts. Join with a sl st to the first sc. (12 sc, 12 ch-5 sps)
- Round 6 (cream): Sl st into the first ch-5 sp. Ch 3 (counts as first dc), work 6 more dc in the same sp. Work 7 dc in each remaining ch-5 sp. Join with a sl st to the top of the ch 3. (12 shells, 84 dc)
- Round 7 (cream, joining round): Ch 1, sc in the 4th dc of the first shell. [Ch 6, sc in the 4th dc of the next shell] 11 times, ch 6. Join with a sl st to the first sc. (12 sc, 12 ch-6 loops) Number the loops 1 to 12 from the first sc. Loops 1, 4, 7 and 10 are your joining points: 1 is the top, 4 the right side, 7 the bottom and 10 the left side.
- Joining: On the first medallion, work all 12 loops as ch 6. On every later medallion, replace the ch 6 at a joining point with ch 3, sl st into the center of the matching ch-6 loop on the neighboring medallion, ch 3. Join loop 10 to loop 4 of the medallion on the left, and loop 1 to loop 7 of the medallion above. The loop keeps the same size, so the stitch count does not change.
- Layout: Work in two columns of five medallions. Join each new medallion to its left and upper neighbors as you finish Round 7. Fasten off and weave in ends once the grid is complete.
Star Accent (make 4)
- Round 1 (green): Make an MR. Ch 1, work 8 sc in the ring. Join with a sl st to the first sc. (8 sc)
- Round 2 (green): Ch 1, sc in the same st, [ch 8, sc in the next st] 7 times, ch 8. Join with a sl st to the first sc. (8 sc, 8 ch-8 loops, the spokes)
- Round 3 (joining round): Center the star in the diamond-shaped gap where four medallions meet. Work 4 sc, sl st into the target point, then 4 sc in each ch-8 spoke. Four spokes point diagonally. Attach each of these to the nearest diagonal sc of Round 7 on a surrounding medallion: the 3rd, 6th, 9th or 12th sc. The other four spokes point toward the joins. Attach each of these to the middle of the nearest ch-3 joining chain. Fasten off and weave in ends. (64 sc)
Border
- Round 1 (green): Join green in any outer ch-6 loop on a long side. Ch 1. Work 6 sc in each outer ch-6 loop, and 1 sc in each sc of Round 7 between loops. Work 1 sc in each joining chain. Work 3 sc in each of the four corner sc to turn the corners. Join with a sl st to the first sc.
- Round 2 (green): Ch 1, sc in the same st, [ch 5, skip 3 sts, sc in the next st] around. At each corner work (sc, ch 5, sc) in the center corner st. Adjust the last skip by one stitch if needed so the final repeat lands evenly. Join with a sl st to the first sc.
- Round 3 (green): Sl st into the first ch-5 sp. In each ch-5 sp work (sc, 2 dc, ch 3, 2 dc, sc). Join with a sl st to the first sc. Each group forms one pointed peak with a ch-3 tip.
- Round 4 (green): Sl st across to the ch-3 tip of the first peak. Ch 1, work (sc, ch 5, sc) in the tip. Ch 3, sl st between the last sc of this peak and the first sc of the next peak. Repeat around, ending with a sl st to the first sc. Fasten off and weave in ends.
Finishing
Weave in all ends along the thread paths, not straight across open lace, so they do not show. Soak the runner in cool water for 15 minutes, press out the water in a towel without wringing, and lay it flat on blocking mats. Pin out the outer corners first, then pin every border peak so the points are sharp. Check that the medallion grid is square and the stars sit flat. Let it dry completely, which usually takes a full day. For a crisper finish, apply fabric stiffener or spray starch before pinning.
Tips for Success
- Use the same thread tension on the cream and green. Green thread often feels slightly thicker, so check your gauge on a swatch.
- Keep Round 7 loops consistent. Even loops make the joins sit flat and keep the grid square.
- Block one medallion before committing to the full runner. Lace changes size noticeably after blocking.
- Join the medallions as you go. It is faster than sewing, and the ch-3 / sl st / ch-3 joins keep the open look.
- Pin each star’s spoke tips before you work Round 3. This keeps the spokes straight and the star centered in its gap.
Common Mistakes to Avoid
- Miscounting Round 3. You should end with exactly 36 dc, and the pattern is two dc, then one dc, repeated 12 times. If you finish short, check that you worked 2 dc in the first stitch.
- Joining at the wrong loops. Count loops from the first sc and join only at loops 1, 4, 7 and 10, or the grid will twist.
- Pulling join chains too tight. Keep each ch 3 relaxed or the medallions will buckle.
- Skipping blocking. The border peaks and star spokes only open up properly once pinned and dried.
- Starting the border without checking the corners. Work exactly 3 sc in each corner sc, or the corners will cup instead of lying flat.
Ways to Customize This Pattern
- Swap the sage green and cream for navy and white, or rust and ivory, for a different seasonal look.
- Make the runner longer by adding more rows of medallions. Each extra row needs 2 medallions and 2 stars.
- Turn it into a square doily or placemat by joining medallions in a 2 x 2 or 3 x 3 grid and adding the border.
- Make the border solid cream, or use a contrasting third color for the last round only.
- Use thicker cotton and a 2.5 mm hook for larger medallions and a quicker project. The result will be larger, so measure your table first.
Frequently asked questions
Most crocheters need 20 to 25 hours. The ten medallions take the longest, at about 1.5 to 2 hours each, followed by the border.
Yes. Thicker thread gives larger medallions and a shorter, wider runner, so check your gauge and adjust the number of rows. Keep a hook that makes a firm but not stiff fabric.
Yes. Blocking opens the lace, flattens the joins and sharpens the border peaks. Unblocked, the runner will curl and look uneven.
Add a third column or more rows of medallions. Each new 2 x 2 block of medallions creates one more star gap, so make one extra star for each.
The finished The Best Sage and Cream Lace Crochet Table Runner