Strawberry Blossom Crochet Table Runner Pattern
Beginner Friendly
Perfect for those just starting their crochet journey, with clear instructions and simple techniques
Single-Day Project
A satisfying project you can complete in a single afternoon or evening.
Handmade Gift
A beautiful keepsake — free forever. Read online or print at home.
About This Strawberry Blossom Crochet Table Runner Pattern
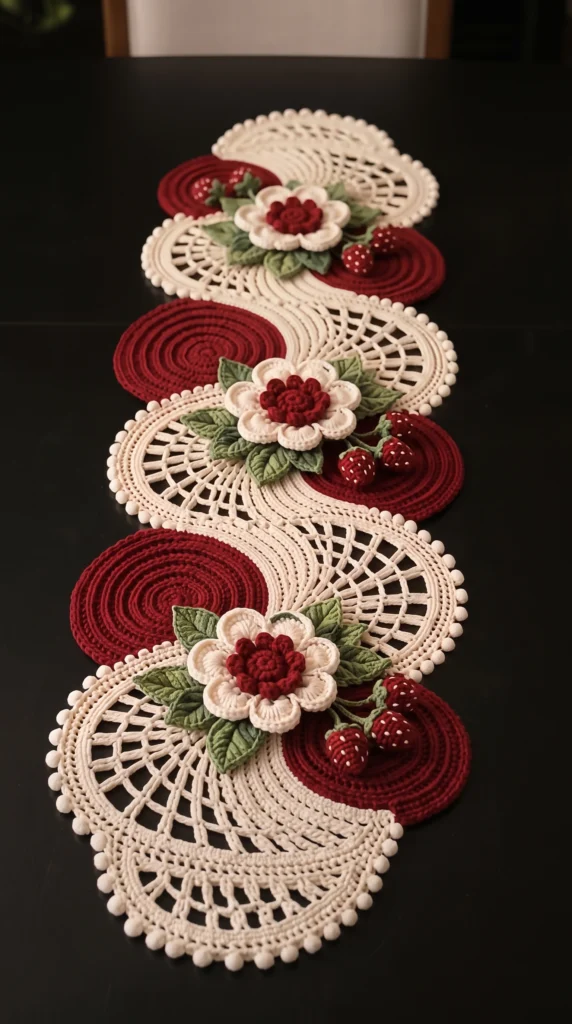
This strawberry crochet table runner pattern turns a long table into a small garden. Solid red spiral discs alternate with cream lace fans, and each pair is topped with a layered white flower, a cluster of green leaves and three stuffed strawberries on curling stems. The fans are finished with a row of soft pompoms that gives the whole runner a vintage, bakery-window look.
The runner is built from separate pieces: three red discs, three lace fans, three two-layer flowers, nine leaves, nine strawberries and about seventy-five pompoms. You work each piece on its own, then overlap the discs and fans in a gentle S-curve and sew everything down. Plan on 25 to 35 hours spread over a few weeks. Making one module (disc, fan, flower, leaves and berries) at a time keeps the project from feeling endless.
This is an advanced pattern. You should be comfortable with magic rings, working into chain spaces, turning rows of lace, making bobbles and stuffing very small shapes. It suits crocheters who want a showpiece for a holiday table, a wedding or a gift they will not forget.
Materials
- DK mercerized cotton, cream about 450 m / 500 yd
- DK mercerized cotton, deep red about 300 m / 330 yd
- DK mercerized cotton, leaf green about 60 m / 65 yd
- Scrap of white cotton or embroidery floss for strawberry seeds
- 3.25 mm crochet hook
- Polyester fiberfill small amount, for the strawberries
- Pompom maker or cardboard about 1.5 cm wide
- Stitch markers
- Tapestry needle
- Sewing needle and cream thread for securing the flowers
- Blocking mats, pins and spray bottle
Abbreviations
MRmagic ringchchainslstslip stitchscsingle crochethdchalf double crochetdcdouble crochetinc2 sc in the same stitchdecsingle crochet 2 togetherbobble3 dc worked into the same stitch, each left with its last loop on the hook, then yarn over and pull through all 4 loopsrndroundspspacest(s)stitch(es)FOfasten off( )stitch count at the end of the round or rowRed Spiral Disc (make 3)
- Work in a continuous spiral with red. Do not join rounds. Mark the first stitch of each round.
- Rnd 1: 6 sc in MR (6)
- Rnd 2: inc x 6 (12)
- Rnd 3: (sc, inc) x 6 (18)
- Rnd 4: (2 sc, inc) x 6 (24)
- Rnd 5: (3 sc, inc) x 6 (30)
- Rnd 6: (4 sc, inc) x 6 (36)
- Rnd 7: (5 sc, inc) x 6 (42)
- Rnd 8: (6 sc, inc) x 6 (48)
- Rnd 9: (7 sc, inc) x 6 (54)
- Rnd 10: (8 sc, inc) x 6 (60)
- Rnd 11: (9 sc, inc) x 6 (66)
- Rnd 12: (10 sc, inc) x 6 (72)
- Rnd 13: (11 sc, inc) x 6 (78)
- Rnd 14: (12 sc, inc) x 6 (84)
- Rnd 15: (13 sc, inc) x 6 (90)
- Rnd 16: (14 sc, inc) x 6 (96)
- Rnd 17: sc in each st around (96). Slst into the next st, FO and leave a 30 cm tail for sewing.
Cream Lace Fan (make 3)
- With cream, ch 6 and slst into the first ch to form a ring.
- Row 1: ch 3 (counts as dc), 15 dc in the ring. Turn. (16 dc)
- Row 2: ch 1, sc in the first dc. *Ch 5, skip 1 dc, sc in the next dc.* Repeat from * to * 6 more times (7 arches). Ch 5, sc in the last dc. Turn. (9 sc, 8 arches)
- Row 3: ch 1, sc in the first sc. *7 dc in the next arch, sc in the next sc.* Repeat from * to * across (8 fans of 7 dc, 9 sc). Turn.
- Row 4: ch 1, sc in the first sc. *Ch 6, sc in the center (4th) dc of the next fan, ch 6, sc in the next sc.* Repeat from * to * across. Turn. (17 sc, 16 arches)
- Row 5: ch 1, sc in the first sc. *Ch 7, sc in the next sc.* Repeat from * to * 15 more times. Turn. (17 sc, 16 arches)
- Row 6: ch 1, sc in the first sc. *(3 dc, ch 2, 3 dc) in the next arch, sc in the next sc.* Repeat from * to * across. Turn. (16 shells, 17 sc)
- Row 7: ch 1, sc in the first sc. *Ch 4, sc in the ch-2 sp of the next shell, ch 4, sc in the next sc.* Repeat from * to * across. Turn. (33 sc, 32 arches)
- Row 8 (edge): ch 1, sc in the first sc. *3 sc in the next ch-4 arch, sc in the next sc.* Repeat from * to * across. (129 sc) FO and weave in the end.
- Pin the fan out flat so the ring side is straight and the outer edge forms a smooth half-circle. Spray lightly with water and let it dry fully.
Pompom Edging (about 25 per fan)
- Make about 75 cream pompoms, each about 1.5 cm across. Do not trim the tie strands.
- Use the tie strands to attach a pompom to the outer edge of Row 8, in every 5th stitch. Start and finish 5 stitches in from each end so the straight edge stays clean.
- Knot each pompom on the wrong side and weave the ends in.
Flower Center (make 3)
- With red, work in a closed round.
- Rnd 1: 6 sc in MR (6)
- Rnd 2: inc x 6 (12)
- Rnd 3: (sc, bobble) x 6 (12)
- Rnd 4: sc in each st around (12). Slst into the next st. FO and leave a long tail for sewing.
Flower Front Layer (make 3)
- With cream, work in a closed round.
- Rnd 1: 6 sc in MR (6)
- Rnd 2: inc x 6 (12)
- Rnd 3: (sc, inc) x 6 (18)
- Rnd 4 (petals): *sc in the next st, (hdc, 3 dc, hdc) in the next st, sc in the next st.* Repeat from * to * 5 more times (6 petals, 18 sts worked into). Slst into the first sc, FO and weave in the end.
Flower Back Layer (make 3)
- With cream, work in a closed round.
- Rnd 1: 6 sc in MR (6)
- Rnd 2: inc x 6 (12)
- Rnd 3: (sc, inc) x 6 (18)
- Rnd 4: (2 sc, inc) x 6 (24)
- Rnd 5 (petals): *sc in the next st, 3 dc in each of the next 2 sts, sc in the next st.* Repeat from * to * 5 more times (6 petals, 24 sts worked into). Slst into the first sc, FO and leave a 20 cm tail.
Leaves (make 9)
- With green, ch 11.
- Side 1: starting in the 2nd ch from the hook, sc in the next 2 chs, hdc in the next 2 chs, dc in the next 2 chs, hdc in the next ch, sc in the next 2 chs (9 sts).
- Tip: 3 sc in the last ch.
- Side 2: working into the other side of the foundation chain, sc in the next 2 chs, hdc in the next ch, dc in the next 2 chs, hdc in the next 2 chs, sc in the next 2 chs (9 sts). Slst into the first sc. (21 sts)
- FO, leaving a 15 cm tail for sewing. With a single strand of darker green or the same green, embroider one straight center vein from the base to about two-thirds up.
Strawberries (make 9)
- With red, work in a continuous spiral. Insert the stitch marker in the first st of each round.
- Rnd 1: 6 sc in MR (6)
- Rnd 2: inc x 6 (12)
- Rnd 3: (sc, inc) x 6 (18)
- Rnds 4-6: sc in each st around (18)
- Rnd 7: (sc, dec) x 6 (12)
- Stuff firmly with a small amount of fiberfill.
- Rnd 8: dec x 6 (6). FO, thread the tail through the front loops of the remaining 6 sts and pull closed. Weave in the end.
- With white, embroider 8-10 tiny straight stitches over the surface as seeds, spacing them evenly and pulling each end through to the inside.
Strawberry Calyx and Stem (make 9)
- With green, Rnd 1: 6 sc in MR (6). Do not join.
- Rnd 2 (leaflets): *ch 4, slst in the 2nd ch from the hook, sc in the next ch, hdc in the next ch, slst into the next st of Rnd 1.* Repeat from * to * 5 more times (6 leaflets).
- Stem: ch 13, slst in the 2nd ch from the hook and in each ch across (12 slst). FO, leaving a long tail.
- Sew the calyx to the top of a strawberry with the tail, sewing around the opening of Rnd 1.
Finishing
Block each disc and fan separately before assembly. Pin the fans flat, spray with water and let them dry completely, since lace relaxes and opens up as it dries. Overlap the discs and fans in a loose S-curve, with each disc tucked about 4 cm under the neighboring fan, and pin them in place. Check the shape on a table before you sew. Use a tapestry needle and the matching color to whipstitch the overlapping edges, working through only the outer loops so the stitches stay invisible from above.
Next, assemble the flowers. Stack the front layer on the back layer so the petals are staggered, then sew the red center on top with its long tail, passing through all layers. Tuck three leaves behind each flower, with the tips fanning out, and sew the flower and leaves to the point where a disc and fan overlap, using the cream thread. Sew three strawberries, with their stems curling over the red disc, beside each flower. Weave in all remaining ends and give the finished runner a last light steam to settle the shapes.
Tips for Success
- Use mercerized cotton. It keeps the lace crisp, and the discs lie flat. Soft acrylic will droop in the arches.
- Place a stitch marker in the first sc of every lace row. It is easy to lose that stitch when you turn, and every arch count depends on it.
- Block the fans with rust-proof pins at each pompom position. This keeps the half-circle even and lets the arches open fully.
- Stuff the strawberries firmly but evenly. Use small pinches of fiberfill so the shape stays conical rather than lumpy.
- Make the pompoms in a batch of 25 per evening. Check them against each other so the sizes match before you attach them.
Common Mistakes to Avoid
- Skipping the center dc of each 7-dc fan in Row 4. If the arches are uneven, the count on the next row will be off. Count the 16 arches before you move on.
- Working the discs with a loose tension. Large holes between rounds make the disc ripple. Go down a hook size if needed.
- Pulling the arch chains too tight. The fan will cup instead of lying flat. Keep the chains relaxed and rely on blocking to shape them.
- Sewing the flower down before blocking the fan. The flower pulls the lace out of shape. Always block first and attach the 3D pieces last.
- Leaving the strawberry stuffing for the end. After closing Rnd 8 the opening is too small to stuff well, so stuff after Rnd 7.
Ways to Customize This Pattern
- Swap the strawberries for cherries by making a smaller sphere (stop at Rnd 3, work 2 even rounds, then decrease) and adding a long green stem.
- Make a longer runner by adding a fourth disc and fan, or a shorter one by using only two modules for a centerpiece mat.
- Change the colorway to navy and cream with yellow flowers for a summer table, or green and gold for the holidays.
- Leave off the pompoms and finish the fan edge with a picot row (ch 3, slst in the first ch, skip 1 st) for a flatter, easier-to-wash edge.
- Use the discs, fans and flowers on their own to make coasters, placemats or a wall hanging.
Frequently asked questions
Yes, if you use cotton. Remove or carefully hand-wash the strawberries, since they are stuffed, and wash the runner by hand in cool water. Lay it flat on a towel and pin the fans to shape while it dries.
Each module of disc, fan, flower and berries adds about 25 cm. Add one more module for a longer runner, or leave one out for a shorter one. The amount of yarn changes in proportion, so buy extra cream if you add a fan.
You can, but the lace is designed for DK cotton. Worsted weight with a 4 mm hook will give a larger, heavier runner and about 40 percent more yarn. Check the arch lengths on a test fan first.
The strawberries are sewn on with a stem, but they are decorative and not toys. If children will be around, sew each one on with two passes of strong thread or skip the stuffing and make them flat.
The finished Strawberry Blossom Crochet Table Runner Pattern