Sage Garden Table Runner Crochet Pattern
Beginner Friendly
Perfect for those just starting their crochet journey, with clear instructions and simple techniques
Single-Day Project
A satisfying project you can complete in a single afternoon or evening.
Handmade Gift
A beautiful keepsake — free forever. Read online or print at home.
About This Sage Garden Table Runner Crochet Pattern
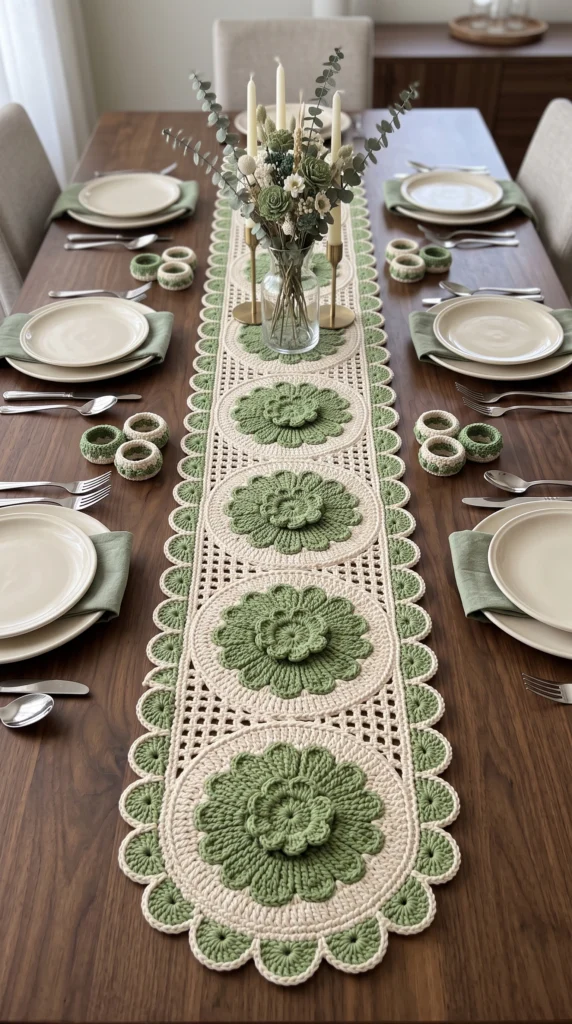
This crochet table runner pattern builds a long, lacy centerpiece from a cream mesh base, five layered sage-green flower medallions and a scalloped border with a green center and cream rim. It sits down the middle of a dining table and looks best against dark wood, where the cream and sage stand out.
The design is made of separate pieces that come together at the end: one long filet mesh strip, a scalloped edging, five three-layer flowers with cream discs, and a set of marled napkin rings to match. Each flower has a wide petal layer, a smaller middle layer and a domed button center. Working them as layers gives the raised, sculpted look you see in the photo.
Expect roughly 25 to 35 hours from start to finish. The stitches are simple, but the counting is not, so this suits crocheters who are comfortable with filet mesh, working in the round from a magic ring, and sewing pieces together neatly. The medallions are small projects you can do in front of the television, which makes the long mesh strip much easier to finish.
Materials
- Cream DK mercerized cotton yarn about 300 g / 600 m
- Sage green DK mercerized cotton yarn about 150 g / 300 m
- 3.5 mm crochet hook
- Yarn needle
- Stitch markers at least 6
- Small amount of polyester fiberfill for the flower buttons
- Blocking mats and rustproof pins
- Scissors
- Gauge 20 sc and 22 rows = 10 cm; 22 mesh dc = about 17 cm wide
Abbreviations
chchainsl stslip stitchscsingle crochethdchalf double crochetdcdouble crochetinc2 sc in the same stitchdecsc 2 stitches togetherMRmagic ringskskipspspacest(s)stitch(es)BLOback loop onlyreprepeatMesh Base (cream)
- Ch 45.
- Row 1: Dc in 5th ch from hook (the skipped chains count as the first dc and first ch-1 sp). *Ch 1, sk 1 ch, dc in next ch; rep from * 19 more times (22 dc, 21 ch-1 sps).
- Row 2: Ch 3 (counts as dc), turn. Sk the first dc. *Ch 1, sk next ch-1 sp, dc in next dc; rep from * 21 times total, working the last dc in the top of the turning ch (22 dc, 21 ch-1 sps).
- Rows 3-110: Rep Row 2 (110 rows total). The strip should measure about 17 cm wide and 100-105 cm long.
- Mark the centers of the medallions with a contrasting thread at rows 12, 34, 56, 78 and 100, between dc 11 and dc 12. Fasten off and weave in ends. Block the strip flat to size before continuing.
Scalloped Border
- Round 1 (cream): Join cream in a corner dc of the mesh. Work 3 sc in the corner dc and mark the middle sc. Along the short end, sc in each of the next 41 sts (the dc and ch-1 sps), working 2 sc in ch-1 sps 5, 10, 15 and 20 (45 sc). Work 3 sc in the next corner dc.
- Along the long side, work 2 sc in each of the 108 row-ends between the corners, working 3 sc in row-ends 27, 54 and 81 (219 sc). Work 3 sc in the next corner dc, then the second short end as before (45 sc), 3 sc in the last corner, and the second long side as before (219 sc). Join with sl st (540 sc).
- Round 2 (sage): Join sage in the marked middle sc of any corner. Ch 3 (counts as dc), 6 dc in the same st. *Sk 2 sts, sl st in next st, sk 2 sts, 7 dc in next st; rep from * around, ending with sk 2, sl st in next st, sk 2. Join with sl st to top of the beginning ch-3 (90 fans of 7 dc). Each corner should land in the middle of a fan.
- Round 3 (cream): Join cream with sc in the first dc of any fan. Sc in each of the next 6 dc, sl st in the sl st between fans. *Sc in each of the 7 dc of the next fan, sl st in the sl st between fans; rep from * around. Join, fasten off (630 sc, 90 sl st).
Large Flower: Outer Layer (sage, make 5)
- Rnd 1: 6 sc in MR (6). Work in a continuous spiral and mark the first stitch.
- Rnd 2: Inc in each st (12).
- Rnd 3: (Sc, inc) x 6 (18).
- Rnd 4: (2 sc, inc) x 6 (24).
- Rnd 5: (3 sc, inc) x 6 (30).
- Rnd 6: (4 sc, inc) x 6 (36). Sl st in next st.
- Rnd 7 (petals, BLO): *In next st work (sc, hdc, 3 dc, hdc, sc), sl st in each of the next 2 sts; rep from * 12 times (12 petals, 36 sts used). Join, fasten off and leave a long tail.
Large Flower: Middle Layer (sage, make 5)
- Rnd 1: 6 sc in MR (6).
- Rnd 2: Inc in each st (12).
- Rnd 3: (Sc, inc) x 6 (18).
- Rnd 4: (2 sc, inc) x 6 (24). Sl st in next st.
- Rnd 5 (petals, BLO): *In next st work (sc, hdc, 2 dc, hdc, sc), sl st in each of the next 2 sts; rep from * 8 times (8 petals, 24 sts used). Join, fasten off and leave a long tail.
Flower Button (sage, make 5)
- Rnd 1: 6 sc in MR (6).
- Rnd 2: Inc in each st (12).
- Rnd 3: Sc in each st (12).
- Rnd 4: (Sc, dec) x 4 (8). Stuff lightly with fiberfill.
- Rnd 5: Dec x 4 (4). Fasten off, close the hole and leave a tail for sewing.
Cream Medallion Disc (make 5)
- Rnd 1: 6 sc in MR (6). Work in a continuous spiral.
- Rnd 2: Inc in each st (12).
- Rnd 3: (Sc, inc) x 6 (18).
- Rnd 4: (2 sc, inc) x 6 (24).
- Rnd 5: (3 sc, inc) x 6 (30).
- Rnd 6: (4 sc, inc) x 6 (36).
- Rnd 7: (5 sc, inc) x 6 (42).
- Rnd 8: (6 sc, inc) x 6 (48).
- Rnd 9: (7 sc, inc) x 6 (54).
- Rnd 10: (8 sc, inc) x 6 (60).
- Rnd 11: (9 sc, inc) x 6 (66).
- Rnd 12: (10 sc, inc) x 6 (72).
- Rnd 13: (11 sc, inc) x 6 (78).
- Rnd 14: (12 sc, inc) x 6 (84).
- Rnd 15: (13 sc, inc) x 6 (90).
- Rnd 16: (14 sc, inc) x 6 (96).
- Rnd 17: (15 sc, inc) x 6 (102).
- Rnd 18: (16 sc, inc) x 6 (108).
- Rnd 19 (BLO): Sc in each st around to make the raised outer ridge (108). Sl st in next st, fasten off and weave in the end.
Napkin Rings (marled, make 4)
- Hold one strand of cream and one strand of sage together throughout. Ch 32 and join with a sl st in the first ch, being careful not to twist the chain.
- Rnd 1: Ch 1, sc in each ch around, join (32).
- Rnd 2: Ch 1, sc in the back loop of each st around, join (32).
- Rnd 3: Ch 1, sc in each st around, join (32).
- Rnd 4 (shell edge): Ch 1. *Sk 1, 3 dc in next st, sk 1, sl st in next st; rep from * 8 times (8 shells). Fasten off.
- Turn the ring over and join a single strand of cream in the unworked loops of the foundation chain (32 loops). Work Rnd 4 again to match the first edge. Fasten off and weave in ends.
Finishing
Block the mesh strip with its border, and each disc, to size before you sew anything. Pin the strip flat on mats, spray it well and let it dry completely. Then place each cream disc over its thread marker, centered across the width of the mesh, and whipstitch around the ridge from Rnd 19 with cream yarn. Sew through the mesh itself so the disc lies flat and the strip does not pucker.
Now layer each flower. Sew the outer sage layer to the middle of the cream disc using its tail. Turn the middle layer half a petal so its petals sit between the outer petals, then sew it on. Finish with the stuffed button in the center. Weave in all remaining ends, give the flowers a final steam to plump the petals, and press the border scallops flat with your fingers while they are still damp.
Tips for Success
- Count your dc at the end of every 10th mesh row. It should always be 22, and a strip that quietly narrows will not line up with the border counts.
- Use mercerized cotton. It keeps the mesh crisp, shows the petal texture and wears well when washed.
- Block the mesh before you work the border. Dc rows stretch, and the 540-stitch first round is based on the blocked length.
- Sew a medallion on and check the fit before you make all five. Change the disc size to match your mesh width, not the other way around.
- Use a marker in the first stitch of every disc and flower round. Spiral rounds make it easy to lose your place.
Common Mistakes to Avoid
- Turning the napkin-ring chain before joining. A twisted foundation gives a twisted band, so lay the chain flat and untwisted before you sl st.
- Working too tightly in the first mesh row. A tight foundation chain pulls the strip in at one end, so use a hook one size up for the chain.
- Skipping a ch-1 sp in the mesh. Look at the row below as you work; each ch-1 sp should sit directly above a ch-1 sp.
- Losing stitches in the disc. A ruffled edge means too many increases and a cupped disc means too few, so recount at every 6th round.
- Letting the border corners drift. Each corner must land on the middle sc of a 3-sc corner, so mark those three stitches before you start the fans.
Ways to Customize This Pattern
- Change the palette. Dusty rose on cream, or navy on white, keeps the same design in a completely different room.
- Shorten the runner. Use 22 rows per medallion (3 medallions = 66 rows), and recalculate the long-side stitches so the count plus 3 is divisible by 6.
- Make matching placemats from one cream disc and one flower, adding a round of the scalloped border in place of Rnd 19.
- Turn the flowers into coasters by using only the cream disc and the outer sage layer, with no mesh.
- Use variegated sage yarn for the flower petals so no two medallions look quite alike.
Frequently asked questions
Yes, but the counts will change. A thicker yarn makes a wider strip and bigger discs, so check the mesh width and disc size against each other before committing. Keep cotton, since acrylic will not hold the flat shape of the mesh or the scallops.
Hand wash in cool water, roll it in a towel to remove the water, and pin it flat to dry. A little spray starch will keep the mesh crisp. Store it flat or loosely rolled, not folded across the flowers.
Hand sewing is best. Use a yarn needle and matching yarn so the stitches disappear into the ridge of the disc and the petals stay free.
Add 22 mesh rows and one more medallion. Then adjust the border so that the extra long-side stitches plus 3 divide evenly by 6, which keeps a fan at every corner.
The finished Sage Garden Table Runner Crochet Pattern