Sage Garden Crochet Table Runner Pattern
Beginner Friendly
Perfect for those just starting their crochet journey, with clear instructions and simple techniques
Single-Day Project
A satisfying project you can complete in a single afternoon or evening.
Handmade Gift
A beautiful keepsake — free forever. Read online or print at home.
About This Sage Garden Crochet Table Runner Pattern
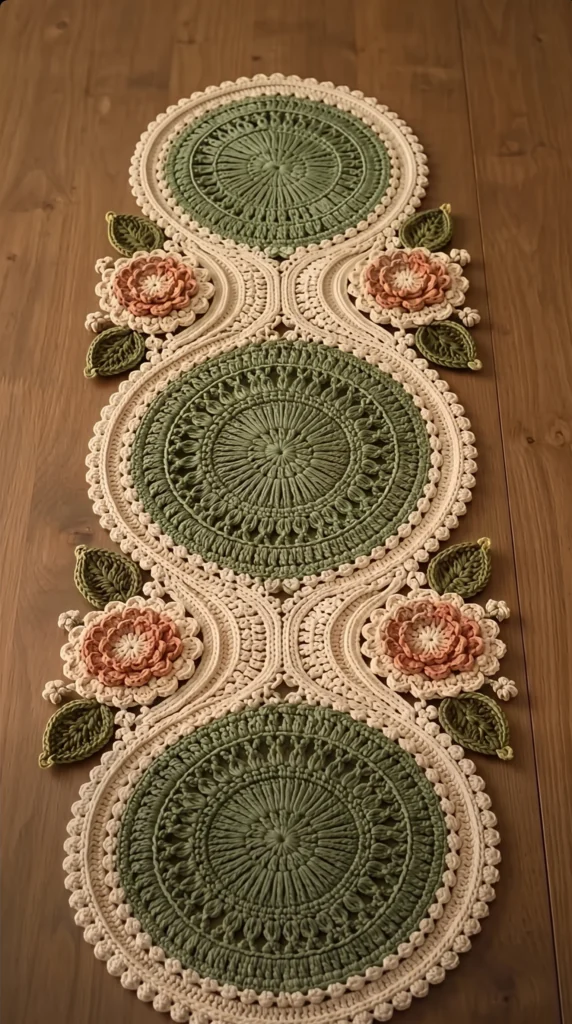
This crochet table runner pattern joins three sage green medallions with two hourglass bridge panels, then dresses the waists with layered peach roses, olive leaves and tiny cream buds. Each medallion has a raised, spoked center made with front post stitches, and a cream border of ridged rounds finished with a row of bobbles. The mix of textures is what gives the runner its carved, heirloom look.
Every piece is made separately and sewn together at the end, so you can work in small sessions and see steady progress. Expect roughly 18 to 24 hours in total. The medallions take the most time. The roses and leaves are quick, and they are also the most fun to make.
This is an advanced pattern. You should be comfortable working in rounds from a magic ring, making post stitches and bobbles, shaping flat panels with increases and decreases, and sewing pieces together neatly. If you have made a few doilies or mandalas, you have the skills you need.
Materials
- Worsted mercerized cotton, sage green about 150 g
- Worsted mercerized cotton, cream about 250 g
- Worsted mercerized cotton, peach or coral about 50 g
- Worsted mercerized cotton, olive green about 30 g
- 3.5 mm crochet hook
- Tapestry needle
- Stitch markers at least 2
- Blocking mats and rustproof pins
- Scissors
Abbreviations
MRmagic ringchchainsl stslip stitchscsingle crochethdchalf double crochetdcdouble crochetfpdcfront post double crochetBLOback loop onlyFLOfront loop onlysc2togsingle crochet 2 together (decrease)bobble5 dc in the same stitch, drop the loop, insert the hook in the first dc, pick up the dropped loop and pull throughst(s)stitch(es)Sage Medallion Center (make 3)
- Round 1: With sage, 12 dc in MR. Join with a sl st to the top of the first dc. [12]
- Round 2: Ch 3 (counts as dc), dc in the same st, 2 dc in each remaining st. Join to the top of the ch-3. [24]
- Round 3: Ch 3 (counts as dc), 2 dc in next st, (dc in next st, 2 dc in next st) 11 times. Join. [36]
- Round 4: Ch 3, dc in next st, 2 dc in next st, (dc in next 2 sts, 2 dc in next st) 11 times. Join. [48]
- Round 5: Ch 3, dc in next 2 sts, 2 dc in next st, (dc in next 3 sts, 2 dc in next st) 11 times. Join. [60]
- Round 6: Ch 3, fpdc around each remaining st. Join. This round creates the raised spokes. [60]
- Round 7: Ch 3, dc in next 3 sts, 2 dc in next st, (dc in next 4 sts, 2 dc in next st) 11 times. Join. [72]
- Round 8: Ch 3, dc in next 4 sts, 2 dc in next st, (dc in next 5 sts, 2 dc in next st) 11 times. Join. [84]
- Round 9: Ch 3, fpdc around each remaining st. Join. [84]
- Round 10: Ch 3, dc in next 5 sts, 2 dc in next st, (dc in next 6 sts, 2 dc in next st) 11 times. Join. [96]
- Round 11: Ch 1, sc BLO in each st around. Join, then fasten off and weave in the end. Leave the front loops free for the border. [96]
Cream Border (make 3)
- Round 1: Join cream with a sl st in any front loop of Round 11. Ch 1, sc FLO in each st around. Join. [96]
- Round 2: Ch 1, (sc in next 7 sts, 2 sc in next st) 12 times. Join. [108]
- Round 3: Ch 1, sc BLO in each st around. Join. This makes a raised ridge. [108]
- Round 4: Ch 1, (sc in next 8 sts, 2 sc in next st) 12 times. Join. [120]
- Round 5: Ch 1, (sc in next st, bobble in next st) 60 times. Join, fasten off and weave in the ends. [120]
- Block each finished medallion flat before joining.
Hourglass Bridge Panel (make 2)
- Row 1: With cream, ch 31. Sc in the 2nd ch from the hook and in each ch across. Turn. [30]
- Row 2: Ch 1, sc2tog, sc BLO in next 26 sts, sc2tog. Turn. [28]
- Row 3: Ch 1, sc2tog, sc BLO in next 24 sts, sc2tog. Turn. [26]
- Row 4: Ch 1, sc2tog, sc BLO in next 22 sts, sc2tog. Turn. [24]
- Row 5: Ch 1, sc2tog, sc BLO in next 20 sts, sc2tog. Turn. [22]
- Row 6: Ch 1, sc2tog, sc BLO in next 18 sts, sc2tog. Turn. [20]
- Row 7: Ch 1, sc2tog, sc BLO in next 16 sts, sc2tog. Turn. [18]
- Rows 8-9: Ch 1, sc BLO in each st across. Turn. [18]
- Row 10: Ch 1, 2 sc BLO in first st, sc BLO in next 16 sts, 2 sc BLO in last st. Turn. [20]
- Row 11: Ch 1, 2 sc BLO in first st, sc BLO in next 18 sts, 2 sc BLO in last st. Turn. [22]
- Row 12: Ch 1, 2 sc BLO in first st, sc BLO in next 20 sts, 2 sc BLO in last st. Turn. [24]
- Row 13: Ch 1, 2 sc BLO in first st, sc BLO in next 22 sts, 2 sc BLO in last st. Turn. [26]
- Row 14: Ch 1, 2 sc BLO in first st, sc BLO in next 24 sts, 2 sc BLO in last st. Turn. [28]
- Row 15: Ch 1, 2 sc BLO in first st, sc BLO in next 26 sts, 2 sc BLO in last st. Do not turn. [30]
- Work 1 sc in each row-end down the long edge, 3 sc in the corner, sc across the foundation edge, 3 sc in the corner, and sc up the second long edge. Join, fasten off and leave a long tail. Block to shape.
Rose Base Layer (make 4)
- Round 1: With cream, 10 sc in MR. Join. [10]
- Round 2: Ch 1, 2 sc in each st around. Join. [20]
- Round 3: Ch 1, (sc in next st, 2 sc in next st) 10 times. Join. [30]
- Round 4 (petals): *In the next st work (sc, hdc, 2 dc, hdc, sc), then sl st in each of the next 2 sts. Repeat from * 10 times total. Join, fasten off and leave a tail. [10 petals]
Rose Middle Layer (make 4)
- Round 1: With peach, 8 sc in MR. Join. [8]
- Round 2: Ch 1, 2 sc in each st around. Join. [16]
- Round 3: Ch 1, (sc in next st, 2 sc in next st) 8 times. Join. [24]
- Round 4 (petals): *In the next st work (sc, hdc, 2 dc, hdc, sc), then sl st in each of the next 2 sts. Repeat from * 8 times total. Join, fasten off and leave a tail. [8 petals]
Rose Center Layer (make 4)
- Round 1: With peach, 6 sc in MR. Join. [6]
- Round 2: Ch 1, 2 sc in each st around. Join. [12]
- Round 3: Ch 1, (sc in next st, 2 sc in next st) 6 times. Join. [18]
- Round 4 (petals): *In the next st work (sc, hdc, 2 dc, hdc, sc), then sl st in each of the next 2 sts. Repeat from * 6 times total. Join, fasten off and leave a tail. [6 petals]
Leaf (make 8)
- With olive, ch 13.
- Side 1: Sc in the 2nd ch from the hook and in the next ch, hdc in next 2 chs, dc in next 3 chs, hdc in next 2 chs, sc in next 2 chs. [11]
- Tip: Work 3 sc in the last ch. [3]
- Side 2: Working in the free loops on the other side of the chain, sc in next 2, hdc in next 2, dc in next 3, hdc in next 2, sc in next 2. [11]
- Join with a sl st to the first sc, fasten off and leave a tail. Work a line of surface sl sts up the center to make the vein. [25]
Bud (make 8)
- Round 1: With cream, 6 sc in MR. Join. [6]
- Round 2: Ch 1, bobble in each st around. Join. [6]
- Fasten off, leaving a tail. Thread the tail through the back of the round and pull gently so the bobbles cluster together.
Finishing
Weave in all ends and wet-block every piece. Pin the medallions into circles and the bridges into their hourglass shape, then let them dry completely. Blocking is what opens up the spokes and makes the bobbles sit evenly.
Lay the three medallions in a column with a bridge between each pair. Use the tail and a tapestry needle to whipstitch the 30 stitches at each end of a bridge to 30 border stitches, centered at the point where the medallions meet. Stitch through both loops of the bobble round so the seam stays flat.
Make each rose by stacking the base, middle and center layers with their petals offset, and sew them together through the centers. Add a few cream French knots in the middle. Sew two roses to each bridge, one on each side of the waist. Tuck two leaves under each rose and add a bud on each side. Stitch everything down with small, hidden stitches.
Tips for Success
- Use a mercerized cotton with some sheen. It shows off the post stitches and holds the medallion flat.
- Mark the first stitch of every round with a stitch marker. Post-stitch rounds are hard to read once you are past the first few stitches.
- Work the fpdc rounds a little loosely so the spokes stand out without cupping the disc.
- Wash and dry your swatch before choosing colors. Some peach and olive dyes bleed against cream on the first wash.
- Block the medallions before joining so they are all the same size and the seams line up.
Common Mistakes to Avoid
- The medallion ruffles at the edge. You probably added an extra increase somewhere. Count after Rounds 5, 8 and 10 and frog back to the last correct round.
- The center dishes or cups. Your post rounds are too tight, so relax your tension or go up a hook size for Rounds 6 and 9.
- Bobbles look flat or loose. Pull each one through firmly and keep the same tension on every bobble.
- The bridge ends look uneven. Count your stitches after each decrease and increase row, because a single missed sc2tog will throw off the shape.
- The roses look messy. Offset the petals of each layer so the peach shows between the cream petals, and sew from the center outward.
Ways to Customize This Pattern
- Make a single medallion for a doily, or stop at two medallions and one bridge for a shorter runner.
- Swap the palette: navy centers with white borders and gold roses, or dusty blue centers with blush flowers.
- Add a fourth medallion and a third bridge for a longer runner.
- Skip the roses and leaves and use the medallions as coasters or trivets.
- Use a cotton blend and add a fringe or a picot edge along the bridge sides.
Frequently asked questions
A worsted-weight mercerized cotton is the best choice. It has good stitch definition, holds its shape when blocked and can be washed. Acrylic will work, but the post stitches will look softer and the runner will not block as crisply.
Yes. One sage medallion with its cream border makes a doily or centerpiece about 30 cm across. You can skip the bridges and add one rose and two leaves for a simple accent.
Check your stitch counts at the end of every round and keep your tension even in the post-stitch rounds. Then wet-block the medallion flat, pinned into a circle, and let it dry completely before joining.
If you used cotton, wash it by hand in cool water and reshape it on a flat surface to dry. Wash a test swatch first, because peach and olive dyes can bleed onto the cream.
The finished Sage Garden Crochet Table Runner Pattern