Rose Fan Crochet Table Runner Pattern
Beginner Friendly
Perfect for those just starting their crochet journey, with clear instructions and simple techniques
Single-Day Project
A satisfying project you can complete in a single afternoon or evening.
Handmade Gift
A beautiful keepsake — free forever. Read online or print at home.
About This Rose Fan Crochet Table Runner Pattern
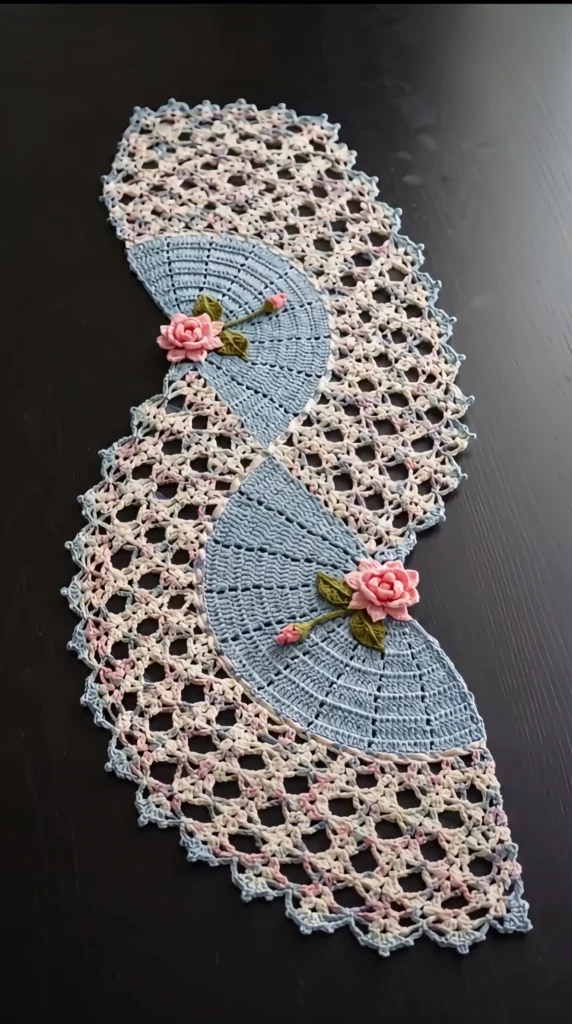
This crochet fan table runner pattern combines a soft, airy lace panel in variegated cream, pink and blue thread with two solid blue fans, each decorated with a three-dimensional rose, a rosebud and olive-green leaves. The contrast between the dense fans and the open mesh is what makes it look like a vintage heirloom.
The lace is a simple two-row repeat of shells and arches, so once you learn it you can work it almost without looking. The real work is in the fans, which grow from a small ring by six evenly spaced increases per row, and in the small flowers, which are made separately and sewn on at the end. Expect roughly 25 to 35 hours in total, depending on how tightly you crochet.
This is an advanced project because it uses fine thread and a 1.75 mm hook, and because it has many separate pieces: the lace panel, two fans, two roses, two buds, four leaves, two stems and an edging. It suits crocheters who are comfortable with thread, reading stitch counts and blocking finished lace.
Materials
- Size 10 crochet cotton thread, variegated cream / pink / blue about 450 m (500 yd)
- Size 10 crochet cotton thread, solid dusty blue about 200 m (220 yd), for fans and edging
- Size 10 crochet cotton thread, solid pink small amount, for roses and buds
- Size 10 crochet cotton thread, solid olive green small amount, for leaves and stems
- Steel crochet hook 1.75 mm
- Tapestry needle with a fine eye
- Stitch markers and rustproof pins
- Fabric stiffener or spray starch, blocking mats
Abbreviations
chchainsl stslip stitchscsingle crochethdchalf double crochetdcdouble crochetst(s)stitch(es)spspace*...*repeat the instructions between the asterisksFan (make 2, solid blue)
- Ch 6 and join with a sl st to the first ch to form a ring.
- Row 1: ch 3 (counts as a dc here and on every row), work 17 dc into the ring, turn. (18 dc)
- Row 2: ch 3, *dc in each of the next 2 sts (the ch 3 counts as the first of these on the first repeat), 2 dc in the next st*, repeat 6 times in total across the row, turn. (24 dc)
- Row 3: ch 3, *dc in each of the next 3 sts (the ch 3 counts as the first of these on the first repeat), 2 dc in the next st*, repeat 6 times in total, turn. (30 dc)
- Row 4: ch 3, *dc in each of the next 4 sts (the ch 3 counts as the first of these on the first repeat), 2 dc in the next st*, repeat 6 times in total, turn. (36 dc)
- Row 5: ch 3, *dc in each of the next 5 sts (the ch 3 counts as the first of these on the first repeat), 2 dc in the next st*, repeat 6 times in total, turn. (42 dc)
- Row 6: ch 3, *dc in each of the next 6 sts (the ch 3 counts as the first of these on the first repeat), 2 dc in the next st*, repeat 6 times in total, turn. (48 dc)
- Row 7: ch 3, *dc in each of the next 7 sts (the ch 3 counts as the first of these on the first repeat), 2 dc in the next st*, repeat 6 times in total, turn. (54 dc)
- Row 8: ch 3, *dc in each of the next 8 sts (the ch 3 counts as the first of these on the first repeat), 2 dc in the next st*, repeat 6 times in total, turn. (60 dc)
- Row 9: ch 1, sc in each of the 60 sts. Fasten off, leaving a 50 cm (20 in) tail for sewing.
Lace panel (variegated thread)
- Foundation: ch 290.
- Row 1: sc in the 2nd ch from the hook. *Ch 5, skip 5 chs, sc in the next ch*, repeat across. (48 arches, 49 sc)
- Row 2: ch 1, turn. Sc in the first sc. *5 dc in the next arch, sc in the next sc*, repeat across. (48 shells, 49 sc)
- Row 3: ch 1, turn. Sc in the first sc. *Ch 5, sc in the 3rd dc of the next shell*, repeat across. (48 arches, 49 sc). The final sc of the previous row is left unworked; this is what gives the scalloped edge.
- Repeat Rows 2 and 3 a total of 24 times (48 rows), ending after a Row 3 repeat.
- Do not fasten off. Continue straight into the edging below.
Rose (make 2, pink)
- Ch 38.
- Row 1: sc in the 2nd ch from the hook and in each ch across. (37 sc)
- Row 2: do not turn. Sl st in the first sc. *Skip 1 st, 5 dc in the next st, skip 1 st, sl st in the next st*, repeat 9 times in total. (9 petals; 37 sts used)
- Fasten off, leaving a 30 cm (12 in) tail. Roll the strip tightly from the starting end with the petals facing outward, and stitch through the base to hold the rose in shape.
Rosebud (make 2, pink)
- Ch 10.
- Row 1: sc in the 2nd ch from the hook and in each ch across. (9 sc)
- Row 2: do not turn. Sl st in the first sc. *Skip 1 st, 5 dc in the next st, skip 1 st, sl st in the next st*, repeat 2 times in total. (2 petals; 9 sts used)
- Fasten off, leaving a tail. Roll up tightly and stitch the base closed.
Leaves (make 4, olive green)
- Ch 10.
- Sl st in the 2nd ch from the hook, sc in the next ch, hdc in the next ch, dc in each of the next 3 chs, hdc in the next ch, sc in the next ch. (8 sts)
- Work 3 sc in the last ch to turn the tip.
- Working along the other side of the foundation chain: sc in the next ch, hdc in the next ch, dc in each of the next 3 chs, hdc in the next ch, sc in the next ch, sl st in the next ch. (8 sts)
- Fasten off and leave a tail for sewing.
Stems (make 2, olive green)
- Ch 26.
- Sc in the 2nd ch from the hook and in each ch across. (25 sc)
- Fasten off, leaving a tail at each end.
Edging (solid blue)
- Join blue with a sl st in any corner of the lace panel.
- Round 1: ch 1, 3 sc in the corner. Work sc evenly around, with 1 sc in each sc and 5 sc in each arch or shell space along the long edges, and 3 sc in each corner. Join with a sl st to the first sc.
- Round 2: ch 1, sc in the same st. *Sc in each of the next 3 sts, ch 3, sl st in the first ch of this ch-3 (picot made)*, repeat around, adjusting the last repeat so the picots stay evenly spaced. Join with a sl st and fasten off.
Finishing
Weave in all ends on the lace panel and the edging. Wet-block the panel on a blocking mat, pinning every picot and arch so the mesh opens up, and let it dry completely. Pin the two fans to the dry panel in opposite directions, with the curved edges facing outward and the points meeting at the center of the runner as shown in the photo. Sew the fans down with the blue tails, going through the straight edge and the curved edge so they stay flat.
Sew a stem to each fan, sew a rose to one end of the stem and a rosebud to the other end. Sew two leaves under each rose. Stiffen the roses and leaves lightly with fabric stiffener so the petals keep their shape.
Tips for Success
- Work a gauge swatch of Row 1 to Row 3; six stitches of the repeat should measure about 1.5 cm, and a much looser tension will make the runner too wide for the fans.
- Use a stitch marker in the first stitch of each fan row so you can find the six increase points quickly.
- Count the arches at the end of every Row 3; it is much easier to fix a miscount straight away than after the panel has grown.
- Make the roses with a slightly tighter tension than the rest of the pattern so the petals stand up.
- Block each fan flat before sewing it on; blocking evens out the spokes and keeps the curve smooth.
Common Mistakes to Avoid
- Working into the last sc of Row 2 when making Row 3 adds an extra arch to the row; skip that stitch as written so the edge stays straight.
- Treating the turning ch 3 on the fan rows as an extra stitch will change the section sizes; it counts as the first dc of each row.
- Sewing the fans on before blocking can pucker the lace; block the panel first, then attach them.
- Rolling the rose with the petals facing inward hides the ruffles; roll with the petal edge on the outside.
- Leaving the leaves unstiffened makes them curl; a light coat of stiffener fixes this.
Ways to Customize This Pattern
- Work the lace in a single solid color for a more formal look, or in solid cream with the fans in a contrasting pastel.
- Add a third fan at the center and shorten the panel for a square table topper.
- Use a bigger hook and size 3 thread for a runner that works up faster and needs fewer repeats.
- Replace the roses with small daisies or leave the fans undecorated for a simpler version.
- Change the number of Row 2 and 3 repeats to make the runner longer or shorter; each repeat adds about 1.2 cm to the width.
Frequently asked questions
Yes. Use any weight you like, but the finished size will change. With size 3 thread and a 2.25 mm hook, expect a runner roughly one third larger; reduce the number of arches or repeats if you want to keep it the same size.
Working back and forth with six increases per row makes a flat half-circle fan instead of a full disc, which is the shape you need to lay over the lace.
Stitch through all the layers at the base several times with the tail, then apply a light coat of fabric stiffener once the rose is sewn in place.
Hand wash gently in lukewarm water with mild soap, press the water out without wringing, and re-block it flat. Re-apply stiffener to the roses if needed.
The finished Rose Fan Crochet Table Runner Pattern