Red Flower Granny Squares
Beginner Friendly
Perfect for those just starting their crochet journey, with clear instructions and simple techniques
Single-Day Project
A satisfying project you can complete in a single afternoon or evening.
Handmade Gift
A beautiful keepsake — free forever. Read online or print at home.
About This Red Flower Granny Squares
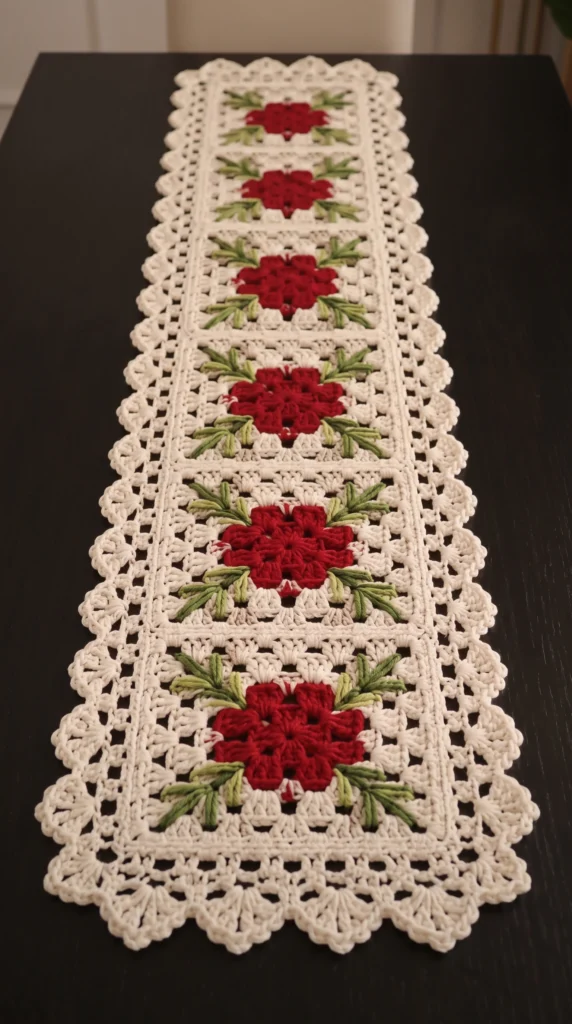
This crochet table runner pattern turns six cream granny squares, each with a deep red flower at its center, into a long runner with a scalloped shell border. Every square gets a few sprigs of green embroidery in the corners, which gives the red flowers a leafy frame. The finished runner suits a dining table, sideboard or console, and it looks especially good on a dark wood surface.
What makes this design distinctive is the way it mixes techniques. The squares are classic granny construction, but the red flower is worked in only two rounds and then surrounded by cream, so the flower reads as a bold cross shape. The leaves are embroidered rather than crocheted, which lets you control their length and angle. The border is a five-round lace edging with a large fan scallop, worked around the whole joined strip with exact stitch counts at the seams and corners.
Expect roughly 18 to 24 hours of work. The stitches themselves are basic, but the joining, the seam decreases and the border corners require care, so this pattern is best for crocheters who are comfortable reading round-by-round instructions and managing color changes. Cotton yarn is recommended because it blocks crisply and keeps the lace open.
Materials
- Worsted (#4) cotton yarn, cream about 275 m / 300 yd, buy a little extra
- Worsted (#4) cotton yarn, deep red about 40 m / 45 yd
- Worsted (#4) cotton yarn, dark green about 20 m / 22 yd
- Worsted (#4) cotton yarn, light green about 15 m / 17 yd
- 4.0 mm crochet hook
- Tapestry needle with a large eye
- Scissors
- Blocking mats and rust-proof pins
- Stitch markers optional, for marking corners
Abbreviations
chchainsl stslip stitchscsingle crochetdcdouble crochetsc2togsingle crochet 2 together (decrease)skskipspspacest(s)stitch(es)MRmagic ringBLOback loop onlyFlower Square (make 6)
- Round 1 (red): Make an MR. Ch 3 (counts as a dc here and throughout), 2 dc in the ring, ch 2, [3 dc in the ring, ch 2] 3 times. Pull the MR tight and join with a sl st to the top of the beginning ch 3. (12 dc, 4 corner ch-2 sps)
- Round 2 (red): Sl st in each of the next 2 dc and into the first ch-2 sp. Ch 3, (2 dc, ch 2, 3 dc) in the same sp. *Ch 1, (3 dc, ch 2, 3 dc) in the next ch-2 sp.* Repeat from * to * 2 more times. Ch 1, join to the top of the beginning ch 3. Fasten off red. (24 dc, 4 corner ch-2 sps, 4 ch-1 sps)
- Round 3 (cream): Join cream with a sl st in any corner ch-2 sp. Ch 3, (2 dc, ch 2, 3 dc) in the same sp. *Ch 1, 3 dc in the next ch-1 sp, ch 1, (3 dc, ch 2, 3 dc) in the next corner sp.* Repeat from * to * 2 more times. Ch 1, 3 dc in the last ch-1 sp, ch 1, join to the top of the beginning ch 3. (36 dc, 12 clusters: 8 corner halves and 4 side clusters)
- Round 4 (cream): Sl st in each of the next 2 dc and into the first corner sp. Ch 3, (2 dc, ch 2, 3 dc) in the same sp. *Ch 1, 3 dc in the next ch-1 sp, ch 1, 3 dc in the next ch-1 sp, ch 1, (3 dc, ch 2, 3 dc) in the next corner sp.* Repeat from * to * 2 more times. Ch 1, 3 dc in the next ch-1 sp, ch 1, 3 dc in the last ch-1 sp, ch 1, join to the top of the beginning ch 3. (48 dc, 2 side clusters per side)
- Round 5 (cream): Sl st in each of the next 2 dc and into the first corner sp. Ch 3, (2 dc, ch 2, 3 dc) in the same sp. *Ch 1, [3 dc in the next ch-1 sp, ch 1] 3 times, (3 dc, ch 2, 3 dc) in the next corner sp.* Repeat from * to * 2 more times. Ch 1, [3 dc in the next ch-1 sp, ch 1] 3 times, join to the top of the beginning ch 3. (60 dc, 3 side clusters per side, 5 clusters per side including the corner halves)
- Round 6 (cream, edging): Sl st in each of the next 2 dc and into the first corner sp. Ch 1, 3 sc in the corner sp. *Sc in each dc and in each ch-1 sp along the side (19 sc), 3 sc in the next corner sp.* Repeat from * to * 2 more times. Sc in each dc and ch-1 sp along the last side (19 sc), join with a sl st to the first sc. Fasten off, leaving a 50 cm (20 in) tail for joining. (88 sc: 4 sides of 19 sc plus 4 corners of 3 sc)
- Repeat for 5 more squares, then block all six squares to the same size, about 12 cm (4.75 in) across.
Embroidered Leaf Sprigs
- Embroider before joining. Thread the tapestry needle with a length of dark green yarn about 40 cm (16 in) long. Work one sprig in each of the 4 corners of every square, 24 sprigs in all.
- For each sprig, choose a base point inside the round 3 corner ch-2 sp, just outside the red petal. Every stitch of the sprig starts from this same point and fans outward toward the corner of the square.
- Stitch the center line first: one long straight stitch in dark green, about 2.5 cm (1 in) long, pointing straight toward the outer corner.
- Add one stitch of light green about 2 cm (0.75 in) long on each side of the center line, angled about 30 degrees away from it.
- Add one stitch of dark green about 1.5 cm (0.5 in) long on each outer side, angled about 60 degrees from the center line. Each sprig has 5 stitches.
- Pull each stitch gently so it lies flat without puckering the cream stitches. Tie off the ends on the wrong side, trim, and weave them into the green stitches.
Joining the Strip
- Lay out the six squares in a single column with every flower facing the same direction. Use the cream tail from Round 6 for each seam.
- Place two squares edge to edge, right sides facing up. Whipstitch them together through the back loops only, joining the 21 sts between the corner center sts: the last sc of one corner group, the 19 side sc, and the first sc of the next corner group. Do not stitch the corner center sc, because the border handles those.
- Keep your whipstitch tension as loose as the crochet itself, so the seam stays flexible and flat.
- Repeat to join all six squares into one long strip with 5 seams. Weave in all tails and block the strip flat before starting the border.
Scalloped Shell Border
- Round 1 (cream): Join with a standing sc in the center sc of a corner at one short end of the strip, then work 2 more sc in the same st (3 sc in the corner). Sc in each of the next 21 sts along the short end, 3 sc in the next corner center sc. Along the long side, sc in each of the next 21 sts of the first square, *sc2tog over the two corner center sc at the seam (one from each square), sc in each of the next 21 sts.* Repeat from * to * 4 more times. Work 3 sc in the next corner, sc in each of the 21 sts across the other short end, 3 sc in the next corner, then work the second long side the same way as the first. Join with a sl st to the first sc. (316 sc: 2 long sides of 131, 2 short ends of 21, 4 corners of 3)
- Round 2 (cream, arches): Join with a standing sc in the center sc of any corner (the middle of the 3-sc group), ch 4, sc in the same st. This is the first corner pair. *Ch 4, sk 4 sts, sc in the next st.* Repeat from * to * 26 times along a long side, then ch 4, sk 3 sts, (sc, ch 4, sc) in the center sc of the next corner. Along a short end, work the repeat 4 times, then ch 4, sk 3 sts, (sc, ch 4, sc) in the next corner center sc. Work the remaining sides the same way. On the last side, after the final repeat, ch 4, sk 3 sts and join with a sl st to the first sc. (68 sc, 68 ch-4 sps: 26 or 4 arches per side plus 1 approach arch per side, plus 4 corner arches)
- Round 3 (cream, shells): Sl st into the first ch-4 sp, which is the corner space. Ch 3, 6 dc in the same sp (7 dc). *Sc in the next sc, 5 dc in the next ch-4 sp.* Repeat from * to * around, working 7 dc instead of 5 in each of the 3 remaining corner ch-4 sps (the one between each corner pair of sc). After the last shell, sc in the first sc and join with a sl st to the top of the beginning ch 3. (416 sts: 64 shells of 5 dc, 4 corner shells of 7 dc, 68 sc)
- Round 4 (cream, open arches): Sl st in each of the next 3 dc to reach the center dc of the corner shell. Ch 1, (sc, ch 5, sc) in the same st. *Ch 5, sc in the center dc of the next shell (the 3rd dc of a 5-dc shell).* Repeat from * to * until you reach the next corner shell. Ch 5, (sc, ch 5, sc) in the 4th dc of the corner shell. Continue around the same way. After the last shell, ch 5 and join with a sl st to the first sc. (72 sc, 72 ch-5 sps)
- Round 5 (cream, fans): Sl st into the first ch-5 sp (the corner arch between the first pair of sc). Ch 3, 8 dc in the same sp (9 dc). *Sc in the next sc, 7 dc in the next ch-5 sp.* Repeat from * to * around, working 9 dc instead of 7 in each of the 3 remaining corner ch-5 sps (the one between each corner pair of sc). After the last fan, sc in the first sc and join with a sl st to the top of the beginning ch 3. Fasten off. (584 sts: 68 fans of 7 dc, 4 corner fans of 9 dc, 72 sc)
Finishing
Weave in all remaining ends, taking care to hide the red tails under red stitches and the green tails under the embroidery. Wet block the runner by soaking it in lukewarm water, pressing out the water in a towel, and pinning it to a blocking mat. Pin each fan of the final round into a rounded scallop and pin the corners square, then let it dry completely. Blocking opens the lace and evens out any small differences between squares.
If you want a crisper finish, spray the dry runner lightly with fabric starch and press the border flat with a cloth between the iron and the yarn.
Tips for Success
- Block each square to the same size before joining. Measure all six, because a difference of even half a centimeter makes the seams ripple.
- Mark the center stitch of every corner with a stitch marker before starting the border. The border counts depend on starting and ending each side exactly at those stitches.
- Count the border after Rounds 1 and 2. If Round 1 does not total 316 sc and Round 2 does not give 68 ch-4 spaces, find the error before moving on.
- Cut the embroidery yarn into short lengths. Long strands twist and tangle, and short ones keep the stitches smooth.
- Stitch a single sprig on a scrap square first and adjust its angle and length until you like it. Then copy that sprig onto the other squares.
Common Mistakes to Avoid
- Joining the squares too tightly. This pulls the strip into a curve. Whipstitch loosely and block flat to fix it.
- Skipping the sc2tog at the seams in Round 1. Without it the stitch counts in Round 2 will not work, so make the decrease at each of the 5 seams on both long sides.
- Working into the wrong stitch at the corners. If the corners look pointed or cup upward, check that you made exactly 3 sc in each corner center stitch in Round 1.
- Letting red yarn show through the cream. Weave in the red ends along the red stitches, not across cream stitches.
- Making the embroidered stitches too tight. This puckers the fabric. Stitch loosely and tug the stitch flat, not tight.
Ways to Customize This Pattern
- Change the number of squares. Each extra square adds about 12 cm. Update the long-side counts in the border by 22 stitches per square (21 plus one sc2tog), and the Round 2 arch repeats by 4 or 5 as the count requires.
- Use other flower colors, such as deep blue, mustard or pink, with the same green sprigs.
- Work the whole piece in a single color for a quieter look, and keep the embroidery tone on tone.
- Make a set of matching coasters from a single flower square with just the Round 6 edging.
- Use a thinner cotton and a smaller hook for a more delicate runner, but expect a smaller finished size.
Frequently asked questions
With worsted cotton and a 4.0 mm hook, each square measures about 12 cm and the border adds about 6 cm all around, so the runner is roughly 24 x 84 cm. Your gauge and blocking will change this, so make one square first and measure it.
Embroidery lets you place thin, pointed leaves exactly where you want them without adding extra rounds or color changes to the squares. It also keeps the red flower and cream background clean, and you can fix a bad stitch without ripping out crochet.
Yes, but cotton works best because it holds its shape and blocks crisply. Acrylic will work but will need gentler blocking, and wool will give a softer, less defined lace. If you change the yarn, make a swatch and adjust the hook size.
Hand wash in cool water with mild soap, then lay it flat to dry and re-pin the scallops. Starching lightly will help the lace stay crisp between washes.
The finished Red Flower Granny Squares