Red and Cream Flower Table Runner Crochet Pattern
Beginner Friendly
Perfect for those just starting their crochet journey, with clear instructions and simple techniques
Single-Day Project
A satisfying project you can complete in a single afternoon or evening.
Handmade Gift
A beautiful keepsake — free forever. Read online or print at home.
About This Red and Cream Flower Table Runner Crochet Pattern
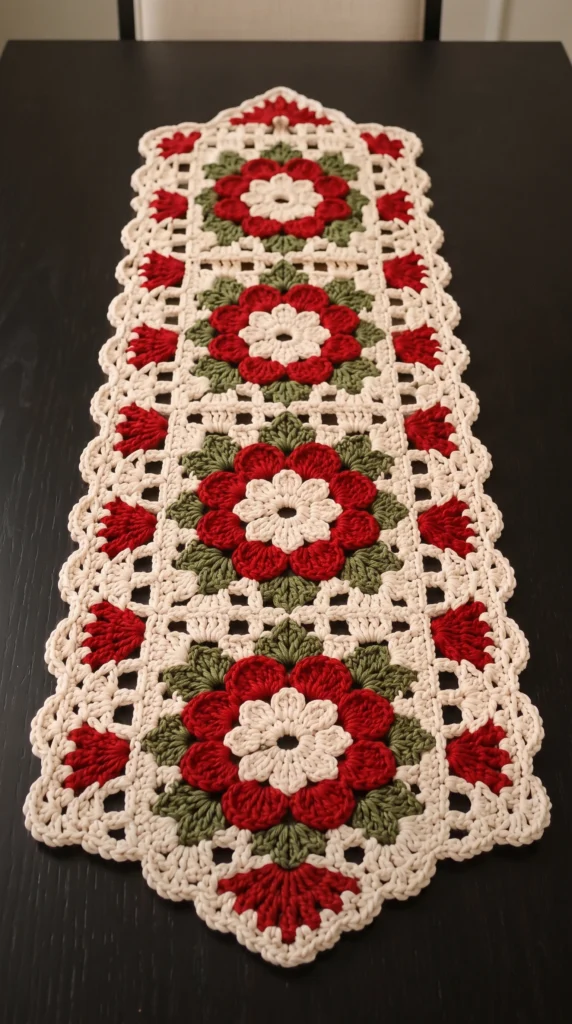
This crochet flower table runner pattern builds four square motifs, each with a cream center flower, a ring of red petals and eight green leaves, all set inside a cream lace frame. The motifs are joined into a long runner and finished with red fans and a scalloped edge. It is a heavy, textured piece that works on a dining table, sideboard or console all year round.
The flower is built in layers. You work the cream petals first, then crochet the red petals into the loops left behind them, and finally add the leaves into the gaps between the petals. Each motif takes roughly three to four hours, and the border adds a few more. Plan on 20 to 25 hours in total.
This pattern suits crocheters who are comfortable working into front and back loops, reading stitch counts, and joining motifs. Mercerized cotton gives the best definition and keeps the runner crisp when blocked.
Materials
- Worsted / aran mercerized cotton, cream about 300 g
- Worsted / aran mercerized cotton, red about 100 g
- Worsted / aran mercerized cotton, sage green about 50 g
- 3.5 mm crochet hook
- Yarn needle for joining and weaving in ends
- Stitch markers at least 4
- Blocking mats and pins
- Scissors
Abbreviations
MRmagic ringchchainsl stslip stitchscsingle crochethdchalf double crochetdcdouble crochetskskipststitchspspaceBLOback loop onlyFLOfront loop onlyCenter Flower (make 4)
- With cream, MR, ch 3 (counts as dc), 15 dc in ring. Join with a sl st to the top of the ch 3. (16 dc)
- Cream petals, working in FLO of Round 1: ch 1, sk st 1, *[sc, hdc, 2 dc, hdc, sc] in next st, sk 1 st*. Repeat from * to * until you have worked a petal in st 16 (8 petals). Sl st to the first sc and fasten off. The back loops of Round 1 stay free for the red round.
Red Petals (make 4)
- Join red with a sl st in BLO of st 1 of Round 1. Ch 1, sc in BLO of the same st and in BLO of each remaining st around. Join with a sl st to the first sc. (16 sc)
- Ch 1. Working in BLO of Round 3, *[sc, hdc, 3 dc, hdc, sc] in next st, sk 1 st*, starting in the same st as the join. Repeat until 8 petals are done (petals on odd sts, skipped sts are the even sts). Sl st to the first ch and fasten off. (8 petals)
Green Leaves (make 4)
- Hold the flower with the right side facing. Join green with a sl st in FLO of st 2 of Round 3 (one of the skipped stitches between red petals).
- Leaf: ch 5, sl st in 2nd ch from hook, sc in next ch, hdc in next ch, dc in last ch, sl st in the same FLO stitch as the anchor. Then sl st in FLO of each of the next 2 sts. You are now on the next even stitch.
- Repeat Step 2 until you have 8 leaves (the last leaf sits in st 16). Sl st in the next 2 sts to return to st 2, then fasten off. (8 leaves)
Lace Frame (make 4)
- Round 6: join cream with a sl st in the sl st at the tip of the leaf on st 2. Ch 1, sc in the same stitch. *Ch 5, sc in the middle dc of the next red petal, ch 5, sc in the next leaf tip*. Repeat from * to * 6 more times (7 total). Ch 5, sc in the middle dc of the last red petal, ch 5, sl st to the first sc. (16 sc, 16 ch-5 arches)
- Place a marker in the sc at the leaf tip on st 2, st 6, st 10 and st 14. These four stitches are your corners.
- Round 7: ch 3 (counts as dc), dc, ch 2, 2 dc all in the first marked sc. *[4 dc in next arch, dc in next sc] 3 times, 4 dc in next arch, then (2 dc, ch 2, 2 dc) in the next marked sc*. Repeat from * to * twice more. Work a final [4 dc in arch, dc in sc] 3 times, then 4 dc in the last arch. Join to the top of the ch 3. (92 dc and four ch-2 corners; 23 dc between corners on each side)
- Round 8: sl st to the first ch-2 corner sp. Ch 3, dc, ch 2, 2 dc in that sp. *Dc in the next dc, [ch 1, sk 1 dc, dc in next dc] 11 times, then (2 dc, ch 2, 2 dc) in the next ch-2 corner sp*. Repeat from * to * twice more, then work the last side the same way and join to the top of the ch 3. Fasten off. (Each side has 16 dc and 11 ch-1 sps between corner spaces; 64 dc in total plus corners)
- Weave in all ends. Pin each motif square and block lightly so all four are the same size.
Joining the Motifs
- Lay the four motifs in a column, right sides up, with a tidy corner meeting corner at each seam.
- With cream and a yarn needle, whipstitch the facing edges together through the back loops. Work one stitch into each dc and each ch-1 sp (27 stitches per seam), plus one stitch through each corner space at each end of the seam.
- Check that each seam has the same tension so the runner lies flat.
Border
- Round 9 (cream): join in any outer corner sp. Ch 1, 3 sc in the corner sp. Along each edge, sc in each dc and each ch-1 sp. At each seam, work 1 sc in each of the two meeting corner spaces. Work 3 sc in each outer corner sp. Join with a sl st to the first sc. (Each long side has 114 sc between corners and each end has 27 sc; 294 sc in total, including 12 corner sc)
- Round 10 (red fans), corners: sl st in each of the 3 corner sc.
- Round 10, long sides: *sk 4 sts, 9 dc in next st (fan), sk 4 sts, sl st in each of next 10 sts*. Repeat from * to * 6 times per long side. Each repeat uses 19 stitches.
- Round 10, ends: sl st in next 9 sts, sk 4 sts, 13 dc in next st (large fan), sk 4 sts, sl st in next 9 sts. (27 sts)
- Round 10: repeat Steps 2 to 4 around the entire runner, then join and fasten off. (294 sts)
- Round 11 (cream): join in the first st of a long side. Sc in each st around, but work 2 sc in the last st of each 19-st repeat on the long sides (20 sc per repeat, 120 per side). On each end, work 2 sc in the first st and 1 sc in each remaining st (28 sc per end). Work 1 sc in each of the 3 corner sts. Join. (308 sc)
- Round 12 (cream scallops), corners: sc in the first corner st, 5 dc in the second corner st, sc in the third corner st.
- Round 12, sides: *sk 1 st, 5 dc in next st, sk 1 st, sc in next st*. Repeat from * to * across each side (30 scallops per long side and 7 per end). Join to the first sc and fasten off.
Finishing
Weave in every end, working green and red tails through stitches of the same color so they do not show through the cream. Wet-block the runner flat on a mat, shape the scalloped edges with pins, and let it dry completely. Cotton holds its shape well after blocking and the petals will stand up nicely.
If the ends look rounded instead of pointed, pin the large end fan outward while blocking and let it set that way.
Tips for Success
- Use mercerized cotton. It keeps the petals defined and the mesh crisp, while soft acrylic tends to slump.
- Keep the cream petal round in FLO and the red round in BLO. Mixing them up will bury the red petals behind the cream ones.
- Mark the four corner leaf tips in Round 6 before starting Round 7 so every motif ends up square.
- Make all four motifs to the same size and block them together before joining. Even a few millimeters of difference shows at the seams.
- Use stitch markers at the start of each long side in the border so the 19-stitch repeats come out right.
Common Mistakes to Avoid
- Petals curling forward: this usually means the foundation round is too tight. Work Round 1 a little looser and the petals will lie flat.
- Leaves not showing: make sure each leaf is anchored in the FLO of a skipped even stitch of Round 3, not a stitch under a red petal.
- Wavy edges after joining: this happens when the motifs were blocked to different sizes. Re-block the smaller motif before joining.
- Border repeats not fitting: recount the 19-stitch repeats against the 114 stitches in Round 9. If you are off, check the seam corners for missed stitches.
- Red sl st line looking too bold: keep the sl sts in Round 10 loose, and work Round 11 into both loops so the cream covers most of them.
Ways to Customize This Pattern
- Swap the colors for a blue and white version, or a yellow and green spring palette.
- Make only two motifs for a shorter placemat or centerpiece mat.
- Add motifs to lengthen the runner, keeping the same border repeats and adjusting the long-side count by 29 stitches per extra motif.
- Work a single motif with its own Round 9 to Round 12 border as a coaster or small doily.
- Use fine cotton and a 2.5 mm hook for a lighter, more delicate lace look.
Frequently asked questions
With worsted cotton and a 3.5 mm hook, each motif is about 13 cm square after blocking. The finished runner is roughly 25 cm wide and 65 cm long, but your gauge may change that, so measure a blocked motif first.
Working the cream petals in the front loops leaves the back loops free. The red round then goes into those back loops, which puts the red petals behind the cream ones and makes the flower look layered.
Yes. Choose a hook that gives a firm but flexible fabric. Finer yarn gives a smaller runner, thicker yarn gives a larger one, and the stitch counts stay the same either way.
Yes. Each motif is made separately and joined afterwards with a whipstitch, which lets you block them evenly and keeps the seams neat.
The finished Red and Cream Flower Table Runner Crochet Pattern