Purple Flower Crochet Table Runner Pattern
Beginner Friendly
Perfect for those just starting their crochet journey, with clear instructions and simple techniques
Single-Day Project
A satisfying project you can complete in a single afternoon or evening.
Handmade Gift
A beautiful keepsake — free forever. Read online or print at home.
About This Purple Flower Crochet Table Runner Pattern
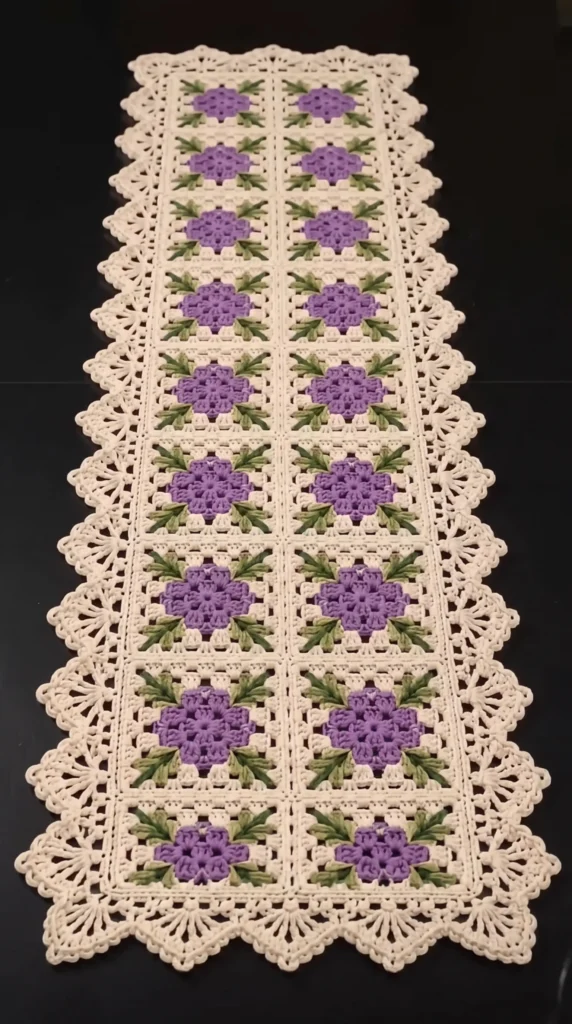
This purple flower crochet table runner pattern turns eighteen small granny squares into one long, lacy piece for your dining table. Each square has a violet flower at its center, a cream background, and two green leaves tucked into every corner. A deep scalloped fan border frames the whole runner and ends in pointed corners.
The runner is built from separate parts: eighteen flower squares, one hundred and forty-four small leaves, and a four-round border worked around the joined panel. Each part is simple on its own, but together they need patience, tidy tension, and careful sewing. Expect about 40 to 50 hours of work, which is easy to spread over several weeks because the squares are portable.
This pattern is a good fit if you already know granny squares and want a project that looks like heirloom lace. It works well as a gift, a wedding present, or a seasonal centerpiece. If you have never joined squares or shaped a border around corners, plan to read the whole pattern once before you begin.
Materials
- Cream DK mercerized cotton (background and border) approx. 450 g
- Purple DK mercerized cotton (flowers) approx. 100 g
- Green DK mercerized cotton (leaves) approx. 60 g
- 3.5 mm crochet hook go down a size if your fabric is loose
- Tapestry needle for sewing squares and leaves
- Stitch markers to mark corners
- Blocking mats and rustproof pins essential for this piece
- Spray bottle or starch optional, for a crisp finish
Abbreviations
chchainsl stslip stitchscsingle crochethdchalf double crochetdcdouble crochetspspaceskskipst(s)stitch(es)RSright sideFlower Center (make 18, purple)
- Round 1: With purple, ch 4 and join with a sl st to form a ring. Ch 3 (counts as a dc here and throughout), 2 dc in the ring, ch 2. *3 dc in the ring, ch 2*, repeat 2 more times. Join to the top of the beginning ch 3. (4 groups of 3 dc, 4 ch-2 corner sps; 12 dc)
- Round 2: Sl st across the next 2 dc and into the first ch-2 sp. Ch 3, (2 dc, ch 2, 3 dc) in the same sp, ch 1. *(3 dc, ch 2, 3 dc) in the next ch-2 sp, ch 1*, repeat 2 more times. Join to the top of the beginning ch 3. (4 corners of 6 dc, 4 ch-1 sps; 24 dc)
- Round 3: Sl st across the next 2 dc and into the corner sp. Ch 3, (2 dc, ch 2, 3 dc) in the same sp, ch 1, 3 dc in the next ch-1 sp, ch 1. *(3 dc, ch 2, 3 dc) in the next corner sp, ch 1, 3 dc in the next ch-1 sp, ch 1*, repeat 2 more times. Join and fasten off purple. (4 corners of 6 dc plus 4 side groups of 3 dc; 36 dc, 8 ch-1 sps)
Cream Background (same square)
- Round 4: Join cream with a sl st in any corner sp. Ch 3, (2 dc, ch 2, 3 dc) in the same sp. *Ch 1, 3 dc in the next ch-1 sp, ch 1, 3 dc in the next ch-1 sp, ch 1, (3 dc, ch 2, 3 dc) in the next corner sp*, repeat from * around, ending with ch 1 before the final join. Join to the top of the beginning ch 3. (4 corners, 2 side groups on each side; 48 dc)
- Round 5: Sl st across the next 2 dc and into the corner sp. Ch 3, (2 dc, ch 2, 3 dc) in the same sp. *Ch 1, 3 dc in each of the next 3 ch-1 sps, with ch 1 between the groups, then ch 1, (3 dc, ch 2, 3 dc) in the next corner sp*, repeat from * around. Join. (3 side groups on each side; 60 dc)
- Round 6: Sl st across the next 2 dc and into the corner sp. Ch 3, (2 dc, ch 2, 3 dc) in the same sp. *Ch 1, 3 dc in each of the next 4 ch-1 sps, with ch 1 between the groups, then ch 1, (3 dc, ch 2, 3 dc) in the next corner sp*, repeat from * around. Join, fasten off, and weave in the ends. (4 side groups on each side; 72 dc; 23 sts along each edge, counting the 3 dc from each corner, the 12 side dc and the five ch-1 sps)
- Block each square to 13 cm (5 in) square before you do anything else with it.
Leaves (make 144, green)
- With green, ch 8, leaving a 15 cm (6 in) tail for sewing.
- Top edge: In the 2nd ch from the hook work sl st, then sc in the next ch, hdc in the next ch, dc in the next ch, hdc in the next ch, sc in the next ch. (6 sts)
- Tip: Work 3 sc in the last ch. (3 sts)
- Bottom edge: Working into the unused loops on the other side of the chain, sc in the next ch, hdc in the next ch, dc in the next ch, hdc in the next ch, sc in the next ch, sl st in the next ch. (6 sts)
- Sl st in the base ch to join. Fasten off and leave a tail. (15 sts total per leaf)
- Each square needs 8 leaves, in 4 pairs. Make them in batches of 20 while watching TV so the count doesn’t feel endless.
Assembly of the Runner
- Lay out the squares in 2 columns of 9 rows, with every flower upright.
- Pin the squares together along their edges, matching the corner sps and the 23 sts on each edge.
- With cream and a tapestry needle, whipstitch through the back loops only. Sew all the squares in each column together first, then sew the two columns together.
- For each corner of each square, lay a leaf pair in a “V” that points toward the flower, with the leaf bases tucked into the Round 4 corner. Sew each leaf down with its tail, stitching along the center and the base so the tips stay free.
- Steam or wet-block the whole joined panel to about 26 x 117 cm (10 x 46 in) and let it dry completely.
Scalloped Border
- Round 1 (base): Join cream at any outer corner sp. Work sc evenly around the whole runner: 1 sc in each dc, 1 sc in each ch-1 sp, 1 sc at each seam where two squares meet, and 3 sc in each of the 4 outer corner sps. Each square edge gives 23 sc, and each seam adds 1, so a long side comes to about 215 sc and a short side to about 47. Join.
- Round 2 (fans): Ch 1. *Sk 2 sts, 5 dc in the next st, sk 2 sts, sl st in the next st*, repeat from * around. Each repeat uses 6 sts. Adjust by skipping 1 or 3 sts once or twice per side so the fans fall evenly and a fan center lands on each outer corner. Join.
- Round 3 (arches): Sl st to the center dc of the first fan. Ch 1, sc in that dc. *Ch 5, sc in the center dc of the next fan*, repeat around. At each of the 4 outer corners, work (sc, ch 5, sc, ch 5, sc) in the center dc of the corner fan. Ch 5 and join to the first sc.
- Round 4 (deep fans): Sl st into the first ch-5 sp. Ch 3, 6 more dc in the same sp (7 dc). *Sl st in the next sc, 7 dc in the next ch-5 sp*, repeat around, making sure each corner has two 7-dc fans meeting at the point. Sl st in the last sc and fasten off. (7 dc per arch)
- Weave in all the ends, then block the border points out firmly with pins.
Finishing
Block the finished runner one last time, pinning each fan scallop and each corner point so the lace opens fully. Let it dry flat for at least 24 hours before you move it. If you want it crisp, use a light fabric starch or sugar-water stiffener while it is still damp on the mat.
Check that all the leaf tips lie flat and that no seam puckers. Re-sew any leaf that curls. Your finished runner should measure about 40 x 130 cm (16 x 51 in), depending on your gauge and how hard you block it.
Tips for Success
- Wind the purple, cream, and green into separate balls from the same dye lots so the colors match across all eighteen squares.
- Block every square before joining. Unblocked squares curl and vary by a centimeter or more, which makes the seams ripple.
- Keep your tension relaxed on Round 1 of each flower so the ring stays flat rather than cupped.
- Pin the squares to a layout diagram and number them, so you can stitch the columns in order without mix-ups.
- Run a contrasting thread through the border base round every 20 stitches as a counting guide. It will help you place the fans evenly.
Common Mistakes to Avoid
- Skipping the swatch square. If it measures wider than 13 cm, the border won’t line up with the seams, so drop a hook size and redo it.
- Working into the ch-1 sp instead of around the 3 dc group, which loses a group and makes the square lopsided. Count the groups on every side after each round (2, then 3, then 4).
- Sewing the leaves on before the squares are joined. They get caught in the seams, so join first.
- Pulling the border base round tight. A tight base makes the edge cup inward, so work the sc loosely and block firmly.
- Ending the fans without a plan for the corners. Mark each corner and adjust the skipped stitches on the sides so a fan center lands exactly on the point.
Ways to Customize This Pattern
- Change the flower to pink, blue, or yellow to match your dishes or the season.
- Make a shorter version with 2 x 6 squares for a coffee table or sideboard.
- Work a table topper by making a 3 x 3 square block and adding the same scalloped border.
- Use size 10 crochet thread and a 1.75 mm hook for a finer, more delicate lace runner.
- Make the leaves two shades of green for more depth, or leave them off and add a plain cream border for a simpler look.
Frequently asked questions
Mercerized cotton in DK weight is the best choice. It holds sharp stitch definition, blocks well, and stays crisp after washing. Acrylic tends to go limp and will not keep the fan points.
This pattern uses 18 squares in a 2 x 9 layout. To change the length, add or remove rows of two squares. Remember the border stitch count changes too: each extra row adds about 23 sc per long side, plus 1 for the seam.
Yes. On the last round of each square you can join to the neighboring square with a slip stitch in the corner sps and ch-1 sps. It saves sewing time, but the seam is slightly thicker and the leaves still need to be sewn on afterward.
Hand wash in cool water with a mild soap, press out the water in a towel without wringing, and re-pin it to size on a blocking mat to dry. Do not put it in a machine, because the fan points will stretch out of shape.
The finished Purple Flower Crochet Table Runner Pattern