Heart Table Runner Crochet Pattern
Beginner Friendly
Perfect for those just starting their crochet journey, with clear instructions and simple techniques
Single-Day Project
A satisfying project you can complete in a single afternoon or evening.
Handmade Gift
A beautiful keepsake — free forever. Read online or print at home.
About This Heart Table Runner Crochet Pattern
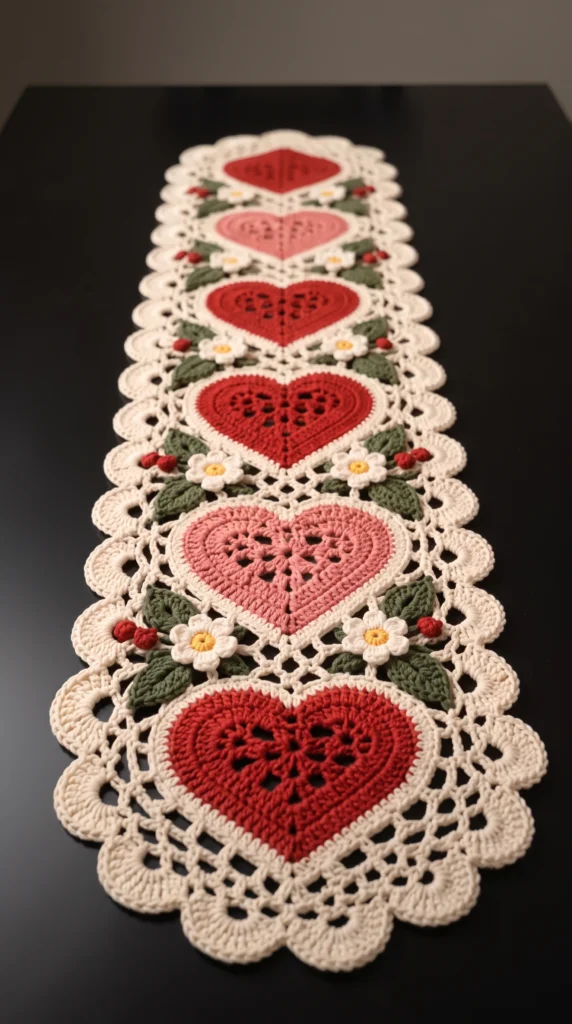
This heart table runner crochet pattern builds a long, lacy centerpiece from several separate pieces: a cream mesh panel, six shaped hearts, a scalloped edging, and a garden of tiny daisies, leaves and berries. The hearts are worked in the round with built-in shaping, so they come out with a real point and a soft dip at the top instead of a flat, rounded blob. Four hearts are cherry red and two are rose pink, set top to bottom in a repeating rhythm that reads well from across the room.
What makes this runner different from a plain doily is the layering. The hearts are made on their own, rimmed in cream, and then sewn onto the open mesh, so each one sits slightly raised against the lace. The daisies, olive leaves and red berry pairs are stitched beside each heart afterward. You can make all the small pieces in front of the TV and assemble everything at the end.
Plan on about 25 to 30 hours in total. It suits crocheters who are comfortable reading written rounds, working in rows of double crochet mesh, changing colors, and sewing pieces together neatly. It works well as a Valentine’s Day table piece, an anniversary gift, or a wedding shower present. You can also change the colors and keep it on the table all year.
Materials
- Cream / ecru DK cotton yarn about 330 m (360 yd)
- Cherry red DK cotton yarn about 90 m (100 yd)
- Rose pink DK cotton yarn about 40 m (45 yd)
- Olive green DK cotton yarn about 40 m (45 yd)
- Golden yellow DK cotton yarn scrap, about 10 m (11 yd)
- 3.5 mm crochet hook
- Stitch markers at least 2
- Tapestry needle
- Polyester fiberfill a small pinch for the berries
- Rustproof pins and a blocking mat for blocking and placing the hearts
Abbreviations
MRmagic ringchchainsl stslip stitchscsingle crochethdchalf double crochetdcdouble crochethdc2toghalf double crochet 2 together: yarn over, pull up a loop in each of the next 2 sts, yarn over and pull through all 3 loopssc2togsingle crochet 2 together: pull up a loop in each of the next 2 sts, yarn over and pull through all 3 loopsst(s)stitch(es)spspacePthe “point” stitch of a heart, marked with a stitch markerMesh Panel (cream)
- Ch 44. Dc in the 8th ch from hook. *Ch 2, skip 2 chs, dc in next ch; repeat from * across to the end. Turn. (13 ch-2 sps; the skipped starting chs count as the first dc and sp.)
- Row 2: Ch 5 (counts as dc + ch-2 sp). Skip the first dc and next ch-2 sp. Dc in next dc. [Ch 2, skip next ch-2 sp, dc in next dc] 11 times. Ch 2, skip last ch-2 sp, dc in the 3rd ch of the beginning ch 5 (for Row 2, the 3rd ch of the 5 unworked foundation chs at the start of Row 1). Turn. (13 ch-2 sps)
- Rows 3-57: Repeat Row 2, working the last dc of each row into the 3rd ch of the previous row’s ch 5. (55 more rows, 57 rows total.) Do not fasten off.
- Rotate your work to start the border. The panel should measure about 23 x 63 cm before the border.
Scalloped Border (cream)
- Round 1: Join cream in one bottom corner, in the first foundation ch. Ch 1, 3 sc in same ch (corner). Sc in each of next 42 foundation chs. 3 sc in the last foundation ch (corner). Work 2 sc in the edge of each of the 57 rows up the side. At the top, work 3 sc in the first dc (corner), *2 sc in next ch-2 sp, sc in next dc; repeat from * 11 more times, 2 sc in the last ch-2 sp, 3 sc in the last dc (corner). Work 2 sc in the edge of each of the 57 rows down the other side. Sl st to first sc. (320 sc: 48 bottom, 114 side, 44 top, 114 side)
- Round 2: Ch 1, sc in first st. *Skip 3 sts, 7 dc in next st, skip 3 sts, sc in next st; repeat from * 38 more times (39 total). Skip 3 sts, 7 dc in next st, skip 3 sts, sl st to first sc. (40 shells and 40 sc)
- Round 3: Ch 1, sc in first sc. *(Ch 3, sc in next dc) 7 times, ch 3, sc in next sc between shells; repeat from * 38 more times (39 total). (Ch 3, sc in next dc) 7 times, ch 3, sl st to first sc. (320 sts total: 40 sc between shells, 280 sc in dc, 320 ch-3 arches). Fasten off and weave in the end.
Heart (make 4 in red, 2 in pink)
- Round 1: Ch 2 (does not count). 12 hdc in MR. Sl st to first hdc and pull the ring closed. Place a marker in the first hdc: this is P, the point of the heart. (12)
- Round 2: Ch 2 (does not count). 3 hdc in P, hdc in next 2 sts, 2 hdc in next st, hdc in next 2 sts, skip next st, hdc in next st, 2 hdc in next st, hdc in each of last 3 sts. Sl st to first hdc. Move the marker to the middle hdc of the 3-hdc group. (15)
- Round 3: Ch 2. 3 hdc in P, hdc in next 3 sts, 2 hdc in next st, hdc in next 2 sts, hdc2tog over next 2 sts, hdc in next st, 2 hdc in next st, hdc in each of last 4 sts. Sl st to first hdc. Move the marker to the middle hdc of the 3-hdc group. (18)
- Round 4: Ch 2. 3 hdc in P, hdc in next 4 sts, 2 hdc in next st, hdc in next 3 sts, skip next st, hdc in next 2 sts, 2 hdc in next st, hdc in each of last 5 sts. Sl st to first hdc. Move the marker as before. (21)
- Round 5: Ch 2. 3 hdc in P, hdc in next 5 sts, 2 hdc in next st, hdc in next 3 sts, hdc2tog over next 2 sts, hdc in next 2 sts, 2 hdc in next st, hdc in each of last 6 sts. Sl st to first hdc. Move the marker as before. (24)
- Round 6: Ch 2. 3 hdc in P, hdc in next 6 sts, 2 hdc in next st, hdc in next 4 sts, skip next st, hdc in next 3 sts, 2 hdc in next st, hdc in each of last 7 sts. Sl st to first hdc. Move the marker as before. (27)
- Round 7: Ch 2. 3 hdc in P, hdc in next 7 sts, 2 hdc in next st, hdc in next 4 sts, hdc2tog over next 2 sts, hdc in next 3 sts, 2 hdc in next st, hdc in each of last 8 sts. Sl st to first hdc. Move the marker as before. Fasten off red or pink. (30)
- Round 8 (cream rim): Join cream with a sl st in P. Ch 1, 3 sc in P, sc in each of next 29 sts. Sl st to first sc. Fasten off and weave in the end. (32)
Daisy (make 12)
- Round 1 (yellow): 5 sc in MR. Sl st to first sc and pull the ring closed. Fasten off yellow. (5)
- Round 2: Join cream in any st. Ch 1, 2 sc in each st around. Sl st to first sc. (10)
- Round 3: *Sl st in next st, 5 dc in next st; repeat from * 4 more times. Sl st to first st and fasten off, leaving a 30 cm tail for sewing. (5 petals)
Leaf (make 24)
- With olive green, ch 8. Sc in 2nd ch from hook, hdc in next ch, dc in each of next 2 chs, hdc in next ch, sc in next ch, 3 sc in last ch. (9 sts worked up one side)
- Working along the other side of the foundation chain: sc in next ch, hdc in next ch, dc in each of next 2 chs, hdc in next ch, sc in next ch. Sl st in the first ch and fasten off, leaving a 20 cm tail for sewing. (15 sts total)
Berry (make 24)
- Round 1: With red, 6 sc in MR. (6)
- Round 2: 2 sc in each st around. (12)
- Round 3: Sc in each st around. (12)
- Round 4: Sc2tog 6 times. (6) Stuff lightly with a small pinch of fiberfill.
- Round 5: Sc2tog 3 times. (3) Fasten off, leaving a 20 cm tail for sewing, and close the opening with the tail.
Finishing
Weave in all ends. Pin the mesh panel with its border to a blocking mat, steam or wet-block it so the scallops lie flat, and let it dry fully. Block the hearts the same way, stretching each one gently so the point and the dip show clearly.
Lay the hearts along the center line of the mesh with points facing down. From the top, use red, pink, red, red, pink, red. Leave about 2 rows of clear mesh above the top heart and below the bottom heart, and about 1.5 cm between hearts. Pin each heart in place, then whip stitch around the cream rim with cream yarn, catching the mesh at every stitch so the hearts sit flat.
Sew a daisy on each side of every heart, level with the widest part of the heart, about 1 cm from the rim. Tuck two leaves behind each daisy, angled outward. Sew a pair of berries beside each daisy so they touch the leaves. Check from a few steps back that the left and right sides mirror each other before you secure the last stitches. Hand wash gently in cool water and dry flat.
Tips for Success
- Mark P in every round and move the marker right away. The whole heart shaping is counted from P, and a lost marker is the most common reason hearts end up lopsided.
- Keep your hdc tension even in the red and pink rounds. Tight stitches make the hearts cup instead of lying flat on the mesh.
- Block the mesh panel before sewing anything on. Mesh grows and relaxes when it is blocked, and sewing hearts onto unblocked mesh can pucker.
- Make every heart before you start sewing and lay them all out on the mesh. It is much easier to judge spacing with all six in view.
- Use the same cream yarn dye lot for the panel, border and heart rims. Cream cotton varies a lot between lots, and the difference shows against lace.
Common Mistakes to Avoid
- Skipping the wrong stitch at the dip. The skip or hdc2tog always goes at the center of the top section, directly opposite P. If the dip drifts to one side, count back from P and mark the stitch before you work the round.
- Changing the number of mesh rows by an odd number. The border has to total 320 stitches for the shells to land evenly. Add or remove rows in pairs only, and recount the border stitches if you change the width.
- Pulling the border sc too tight along the long sides. Two sc per row end is a snug count, so keep your tension loose or the edges will curl inward.
- Stuffing the berries too firmly. They should be soft little pillows, not hard beads, or they will pull the mesh out of shape when sewn on.
- Sewing the daisies on before the leaves. Put the leaves down first, then cover the leaf bases with the daisies so no stitches show.
Ways to Customize This Pattern
- Swap the palette: navy hearts with white lace, or all pink hearts on a pale grey mesh for a softer look.
- Use a mercerized cotton in size 10 thread with a 1.75 mm hook for a fine, heirloom-style runner. Work the same stitch counts and expect a much smaller piece.
- Make a longer or shorter runner by changing the mesh in pairs of rows, adding about 9 to 10 rows per extra heart. Keep the row total odd and add or remove hearts to match.
- Use one heart and its flowers as a coaster or small doily by sewing it onto a 9 x 9 space mesh square with the same border rounds.
- Make the berries in gold or white and the daisies in lavender to turn the runner into a spring or wedding table piece.
Frequently asked questions
Yes, but the size changes. The stitch counts stay the same, so thicker yarn gives a bigger runner and thinner yarn gives a smaller one. Cotton is recommended because it holds its shape when blocked, and wool or acrylic will not keep the mesh as crisp.
The heart is shaped by a few key stitches, with the point at the bottom and a dip at the top. Marking P keeps those spots in the right place every round, and all the other stitches are counted from there.
Hand wash in cool water with mild soap, press out the water in a towel without wringing, and pin it flat to dry. Re-pin the scallops and the hearts while it is damp so everything keeps its shape.
You can also join the hearts directly to each other through the cream rim and skip the mesh, but you will lose the lace background and the room for flowers. The mesh panel keeps the layout even and makes the runner lie flat.
The finished Heart Table Runner Crochet Pattern