Golden Dahlia Table Runner Crochet Pattern
Beginner Friendly
Perfect for those just starting their crochet journey, with clear instructions and simple techniques
Single-Day Project
A satisfying project you can complete in a single afternoon or evening.
Handmade Gift
A beautiful keepsake — free forever. Read online or print at home.
About This Golden Dahlia Table Runner Crochet Pattern
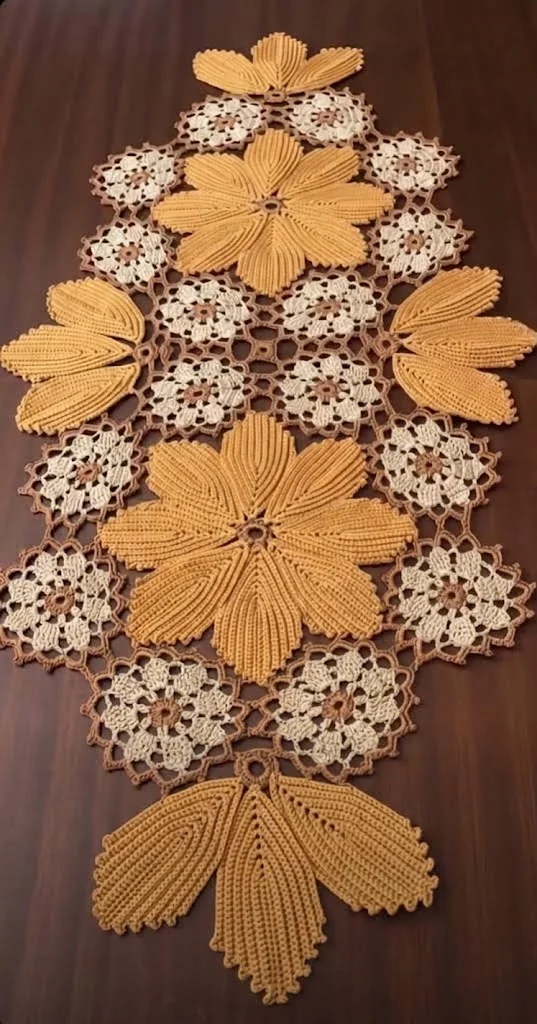
This crochet dahlia table runner pattern combines two motif styles — a plush, deeply ribbed flower and a light, lacy filler bloom — joined into one oval runner with fan-shaped leaf panels closing each end. The ribbed dahlias are worked as layered petals sewn onto a small base disc, so each flower has real dimension and a soft, velvety texture, while the lace flowers use an open picot round that lets the table color show through underneath. Expect somewhere around 12-16 hours from first motif to finished trim, spread over as many sessions as you like, since every piece is small and portable.
This is an advanced motif-joining project, not a fast weekend make. You’ll want to be comfortable working in the back loop only for the ribbed texture, making magic rings, and either joining motifs as you go or seaming a finished pile of pieces into a clean oval afterward. If you already enjoy dahlia-style flower motifs and granny-square joining, this is a natural next step; if you’ve never joined motifs before, make and join just three or four lace flowers first to get a feel for keeping the mesh flat before starting on the bigger ribbed dahlias.
The finished runner sits nicely down the center of a dining table or dresser, and because every motif is separate, you can shorten or lengthen it by adding or removing lace flowers between the dahlias without touching the rest of the design.
Materials
- DK weight cotton yarn, gold/mustard main color, for the 3 dahlia flowers and 2 leaf fan panels — roughly 250-300 m
- DK weight cotton yarn, cream/ivory for the 14 lace flower petals — roughly 150 m
- DK weight cotton yarn, brown/rust for lace flower centers, joining rounds, and outer edging — roughly 100 m
- 3.5 mm (E/4) crochet hook or size needed to match gauge
- Tapestry/yarn needle
- Stitch marker
- Scissors
- Blocking board and pins to open and flatten the lace flowers before joining
Abbreviations
chchainscsingle crochetdcdouble crochetsc2togsingle crochet 2 together (decrease)sl stslip stitchMRmagic ringBLOback loop(s) onlyreprepeatst(s)stitch(es)sp(s)space(s)RSright sideRibbed Petal (for Large Dahlia Flowers) — make 16 per flower, 48 total
- Row 1 (RS): Ch 2. Work 6 sc in 2nd ch from hook. Do not join; the petal is worked in turned rows. (6 sts)
- Row 2: Ch 1, turn. Working in BLO throughout, 2 sc in each st across. (12 sts)
- Row 3: Ch 1, turn. BLO, sc in each st across. (12 sts)
- Row 4: Ch 1, turn. BLO, *sc2tog, sc in next st; rep from * around. (8 sts)
- Row 5: Ch 1, turn. BLO, sc2tog around. (4 sts)
- Fasten off, leaving a long tail. Weave the tail through the remaining 4 sts and pull closed to form the pointed tip. Set aside; the starting tail will be used to sew the petal’s open base to the flower center.
Large Dahlia Flower Motif — make 3
- Round 1: With gold, work 8 sc in MR. Join with sl st to first sc. (8 sts)
- Round 2: Ch 1, 2 sc in each st around. Join. (16 sts) Fasten off, leaving a tail for sewing.
- Layer 1 (back layer): Whip-stitch 8 ribbed petals evenly around Round 2, spacing each petal’s base over 2 sts, tips facing outward.
- Layer 2 (front layer): Whip-stitch the remaining 8 ribbed petals directly on top of Layer 1, centering each new petal between two Layer-1 petals so the whole flower reads as one full, overlapping bloom.
- Weave in all ends on the wrong side. The center disc stays hidden beneath both petal layers.
Small Lace Flower Motif — make 14
- Round 1 (center, brown): MR, ch 1, 6 sc in ring. Join with sl st to first sc. (6 sts) Fasten off.
- Round 2 (petals, cream): Join cream with sl st in any st of Round 1. *Ch 3, (dc, ch 2, dc) in same st, ch 3, sl st in next st; rep from * around 5 more times (6 petals total), ending with sl st in same st as beginning. Fasten off.
- Round 3 (joining round, brown): Join brown with sl st in any ch-2 sp at a petal tip. *Ch 5, sc in next ch-2 sp; rep from * around 5 more times (6 loops total). Join with sl st to first ch of the round. Fasten off.
- Where two lace flowers sit side by side in the layout, join-as-you-go on this round: replace one ch-5 loop with ch 2, sl st into the corresponding loop of the neighboring flower, ch 2, sc into the next petal tip.
Ribbed Fan Leaf (for Leaf Fan End Panels) — make 5 per panel, 10 total
- Row 1 (RS): Ch 2. Work 6 sc in 2nd ch from hook. (6 sts)
- Row 2: Ch 1, turn. BLO, 2 sc in each st across. (12 sts)
- Row 3: Ch 1, turn. BLO, sc in each st across. (12 sts)
- Row 4: Ch 1, turn. BLO, sc in each st across. (12 sts)
- Row 5: Ch 1, turn. BLO, *sc2tog, sc in next 2 sts; rep from * around. (9 sts)
- Row 6: Ch 1, turn. BLO, *sc2tog, sc in next st; rep from * around. (6 sts)
- Row 7: Ch 1, turn. BLO, sc2tog around. (3 sts)
- Fasten off, leaving a long tail. Weave through the last 3 sts and pull closed to form the leaf tip. Keep the starting tail for joining.
Leaf Fan End Panel — make 2
- With gold, ch 6. This short chain becomes the base arc of the fan; do not fasten off.
- Lay the 5 ribbed fan leaves side by side along the chain, evenly spaced, tips fanning outward and each leaf’s base overlapping the edge of its neighbor by about a third.
- Working along the chain, whip-stitch each leaf’s foundation ring to the chain and to the adjoining leaf’s edge, keeping the fan flat and slightly curved to match the rounded end of the oval.
- Weave in all ends. One panel finishes the top of the runner and one finishes the bottom.
Joining the Motifs into the Runner
- Lay out the runner on a flat surface or blocking board in this order: 1 leaf fan panel, 1 large dahlia, a cluster of lace flowers on each side, the 2nd large dahlia at the center, another cluster of lace flowers, the 3rd large dahlia, a final cluster of lace flowers, and the 2nd leaf fan panel.
- Join neighboring lace flowers to each other using the join-as-you-go step built into their Round 3 (see Small Lace Flower Motif, step 4).
- Join each large dahlia to the surrounding lace flowers by working a short bridge of ch 3–5 from the dahlia’s Round 2 base sts into the nearest lace-flower loop, then sc back along the chain to anchor it, spacing 2–3 bridges evenly around each dahlia.
- Join each leaf fan panel to the nearest dahlia and lace flowers the same way, using the base chain of the fan as the anchor point.
- Check that the whole piece lies flat before moving on; adjust any bridge that’s pulling tight or leaving a gap.
Finishing
Once every motif is joined and the runner lies flat, join brown yarn anywhere along the outer edge and work a round of sc evenly all the way around the perimeter, working 3 sc into each outer flower or leaf tip and skipping a stitch at any inner corner so the edge doesn’t ruffle or cup. Join with a sl st to the first sc.
Work a second round for the trim: *sc in next 2 sts, ch 3, sl st in the first of these 3 chs to form a picot, sc in next st; rep from * around. Join with a sl st and fasten off. Weave in every remaining tail on the wrong side, then give the finished runner a light steam block, pinning the lace flowers open — keep the steam away from the ribbed dahlia petals and fan leaves so their texture doesn’t flatten.
Tips for Success
- Make one complete test dahlia — center plus all 16 petals — before batch-making the rest, so you can confirm your tension and yardage early.
- Leave petal and leaf tails long rather than trimming them short; you’ll need every one of them for sewing during assembly.
- Lay all finished motifs out on your actual table before joining, so you can add or remove lace flowers to match its length first.
- Mark the first stitch of every round on each dahlia’s base disc with a stitch marker — it’s easy to lose your place once petals start covering it.
- Work the Round 3 joining loops on the lace flowers a little loosely; tight loops are hard to join into later and can pucker the mesh.
Common Mistakes to Avoid
- Forgetting the BLO instruction after Row 1 on the petals and leaves, which produces flat, smooth pieces instead of ribbed ones — double-check you’re only picking up the back loop from Row 2 onward.
- Sewing the second layer of dahlia petals directly on top of the first instead of offset — this hides the layered look; always rotate the front layer by half a petal-width.
- Joining lace flowers with the chain loops pulled too short, which warps the oval shape — use the full ch-5 (or ch-2 when joining) called for in the pattern so motifs sit flat against each other.
- Choosing a fuzzy or heavily textured yarn for the dahlia petals, which buries the BLO ribbing — a smooth cotton or cotton-blend shows the ribs far more clearly.
- Working the outer edging round before pinning the joined runner flat, which lets the whole piece twist — block it to shape first, then edge it.
Ways to Customize This Pattern
- Swap the brown lace-flower centers and edging for a second accent color that matches your table linens.
- Work the last row of each ribbed petal in a slightly lighter gold for a subtle ombré tip on every dahlia.
- Make just one leaf fan panel and one dahlia surrounded by lace flowers for a round trivet instead of a full runner.
- Drop to a sport-weight cotton and a smaller hook for a finer, more delicate lace-weight version.
- Make a single lace flower plus one ribbed fan leaf edged in the Finishing trim as a matching coaster.
Frequently asked questions
Yes — add or remove pairs of lace flowers between the dahlias to change the length, while keeping both leaf fan panels and an odd number of dahlias so the center line stays balanced.
That’s expected — working in BLO on a tall, pointed piece naturally makes it cup slightly, which is what gives the sewn-on petal its scooped, dimensional shape. If it curls so tightly it won’t sew on flat, go up half a hook size.
A light steam block on the lace flowers helps open up the mesh, but skip steam on the ribbed dahlia petals and fan leaves, since heat will flatten their raised texture.
You can, but cotton is recommended here — it has more body and holds the runner’s oval shape and the openwork lace flowers better than acrylic, which tends to sag over time.
The finished Golden Dahlia Table Runner Crochet Pattern