Floral Lace Crochet Table Runner Pattern
Beginner Friendly
Perfect for those just starting their crochet journey, with clear instructions and simple techniques
Single-Day Project
A satisfying project you can complete in a single afternoon or evening.
Handmade Gift
A beautiful keepsake — free forever. Read online or print at home.
About This Floral Lace Crochet Table Runner Pattern
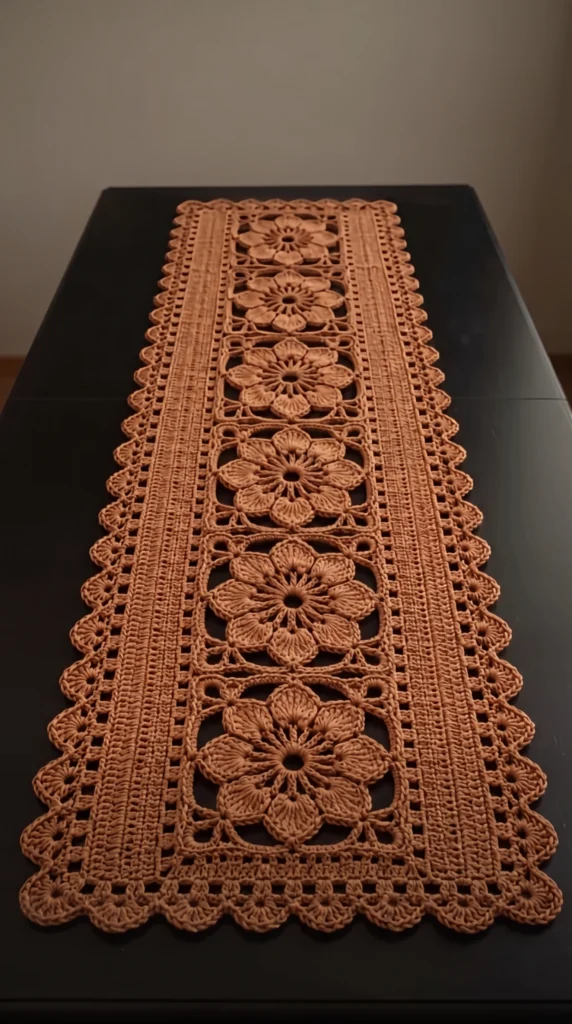
This crochet table runner pattern turns six eight-petal flower squares into a long lace runner with textured side panels and a scalloped edge. The finished piece is worked in a warm terracotta cotton that looks rich on a dark wood table and just as good on a pale linen one. Every motif is raised and dimensional, and the open squares around each flower let the table show through.
The runner is built from separate pieces: six flower squares, which are joined into a column, then two side panels worked directly onto the long edges, then a shell and loop border worked around the whole piece. Expect roughly 25 to 35 hours of crocheting, plus blocking. It suits crocheters who are comfortable with working into chain spaces, joining motifs as you go, and picking up stitches along an edge.
All stitch counts are given so you can check yourself at the end of every round. Work in US terms, read each round carefully, and block firmly at the end. Blocking is what makes the petals lie flat and the lace open up.
Materials
- DK weight mercerized cotton yarn, terracotta about 450 m / 490 yd (4 to 5 balls of 50 g), buy an extra ball
- 3.0 mm crochet hook go down a size if your fabric feels floppy
- Tapestry needle for weaving in ends
- Stitch markers to mark corners and the first stitch of each round
- Rust-proof pins and blocking mats essential
- Spray bottle or fabric stiffener optional, for a crisp finish
Abbreviations
chchainsl stslip stitchscsingle crochetdcdouble crochetspspacest(s)stitch(es)MRmagic ringbloback loop onlyRSright sideFlower Square (make 6)
- Rnd 1: Make an MR. Ch 3 (counts as dc), 15 dc in the ring. Join with a sl st to the top of the beginning ch-3 and pull the ring tight. (16 dc)
- Rnd 2: Ch 4 (counts as dc + ch 1). *Dc in next st, ch 1*, repeat 15 times. Join with a sl st to the 3rd ch of the beginning ch-4. (16 dc, 16 ch-1 sps)
- Rnd 3 (petals): Sl st in the first ch-1 sp (the 4th ch of the beginning ch-4). Ch 3 (counts as dc), 6 dc in the same sp. Sl st in next ch-1 sp. *7 dc in next ch-1 sp, sl st in next ch-1 sp*, repeat 7 times. The last sl st lands in the final ch-1 sp. Do not join. (8 petals of 7 dc each, 56 dc)
- Rnd 4: Ch 1. *Sc in each of the 7 dc of the next petal (the first petal’s first sc goes in the top of its ch-3), ch 3, skip the sl st*, repeat 8 times. Join with a sl st to the first sc. (56 sc, 8 ch-3 sps)
- Rnd 5 (square frame): Join yarn in any ch-3 sp. Ch 3 (counts as dc), 2 dc in the same sp, ch 3, 3 dc in the same sp (corner made). *Ch 7, 3 dc in next ch-3 sp (side). Ch 7, (3 dc, ch 3, 3 dc) in next ch-3 sp (corner)*, repeat 3 times. Ch 7, 3 dc in the last ch-3 sp, ch 7. Join with a sl st to the top of the beginning ch-3. (4 corners of 6 dc, 4 sides of 3 dc, 8 ch-7 sps, 4 ch-3 corner sps; 36 dc total)
- Rnd 6 (edge): Ch 1, sc in the top of the beginning ch-3 and in each of the next 2 dc (3 sc). (Sc, ch 3, sc) in the corner ch-3 sp. Sc in each of the next 3 dc. *7 sc in the ch-7 sp, 3 sc across the 3 side dc, 7 sc in the next ch-7 sp, sc in each of the next 3 dc, (sc, ch 3, sc) in the corner ch-3 sp, sc in each of the next 3 dc*, repeat 3 times. Work 7 sc in the ch-7 sp, 3 sc across the 3 side dc, then 7 sc in the last ch-7 sp. Join with a sl st to the first sc. Fasten off. (100 sc and 4 ch-3 corner sps. Check: there are 25 sc along each side between the corner sps.)
Joining the Squares
- Make Square 1 completely, finishing Rnd 6 as written. This is the top square of the runner.
- For Squares 2 to 6, work Rnd 6 as written until you reach the first corner on the side that touches the previous square.
- At each of the two corners on the shared side, work (sc, ch 1, sl st in the matching corner ch-3 sp of the previous square, ch 1, sc) instead of (sc, ch 3, sc).
- Between those two corners, work the 23 stitches as sl sts, each worked through the current stitch and the matching stitch of the previous square. Slip stitch loosely so the seam stays flexible. Then finish the rest of Rnd 6 as written.
- Repeat until all 6 squares form one column. Lay the column flat and check that no square is rotated, since the petals should all sit in the same direction.
Side Panels (make 2, identical)
- Row 1: With RS facing, join yarn in the top-left corner ch-3 sp of Square 1. Ch 1, sc in the same sp. Work 25 sc along the side of Square 1. At each of the 5 joins between squares, work 1 sc into the join, catching the ch-3 sp of the upper square, then work 25 sc along the next square’s side. After the last square, work 1 sc in the bottom corner ch-3 sp of Square 6. Turn. (157 sc: 1 + 6 x 25 + 5 + 1)
- Row 2: Ch 3 (counts as dc), dc in each st across. Turn. (157 dc)
- Row 3: Ch 1, sc blo in each st across, ending with the last sc in the top of the turning ch. Turn. (157 sc)
- Row 4: Ch 3 (counts as dc), dc in each st across. Turn. (157 dc)
- Row 5: Ch 1, sc blo in each st across. Turn. (157 sc)
- Row 6 (ladder row): Ch 4 (counts as dc + ch 1), skip the first 2 sts, dc in the next st. *Ch 1, skip 1 st, dc in next st*, repeat 77 times, so the last dc falls in the last st. Turn. (79 dc and 78 ch-1 sps = 157 sts)
- Row 7: Ch 3 (counts as dc), dc in each ch-1 sp and each dc across, with the last dc in the 3rd ch of the turning ch-4. Turn. (157 dc)
- Row 8: Ch 1, sc in each st across. Fasten off. (157 sc)
- Work the second panel the same way along the opposite long edge, starting in the matching corner of Square 1.
Scalloped Border
- Rnd 1 (base round): With RS facing, join yarn in the first st of Row 8 of one panel (a corner). Ch 1. Work 3 sc in this corner st, sc in each of the next 155 sts, then 3 sc in the last st of the row (the next corner). Across the end, work 2 sc in each dc-row end (rows 7, 6, 4 and 2) and 1 sc in each sc-row end (rows 5 and 3), which is 10 sts. Then work 1 sc in the corner ch-3 sp of the square, 25 sc across the square’s end, and 1 sc in the next corner ch-3 sp. Work 10 sc down the other panel’s row ends in the same pattern, rows 2 to 7. Repeat on the second long side and the second end. Join with a sl st to the first sc. (416 sc: 2 x 161 on the long sides + 2 x 47 on the ends. Count before continuing.)
- Rnd 2 (shells): Ch 1, sc in the same st. *Skip 3 sts, 7 dc in next st, skip 3 sts, sc in next st*, repeat 51 times. Skip 3 sts, 7 dc in next st, skip the last 3 sts and join with a sl st to the first sc. (52 shells of 7 dc, 52 sc; 364 dc)
- Rnd 3 (loops): Ch 1, sc in the same sc. [Ch 3, sc in next dc] 7 times, ch 3. *Sc in next sc, [ch 3, sc in next dc] 7 times, ch 3*, repeat 51 times. Join with a sl st to the first sc. Fasten off. (416 sc, 416 ch-3 loops)
Finishing
Weave in every end by running the needle through several stitches in two directions, then trim. Wet the runner or spray it until damp and pin it out on blocking mats. Pin the square corners first, then each shell point and each ch-3 loop on the border, so the scallops open evenly. Straighten the long edges with a ruler as you pin.
Let it dry completely, which usually takes a full day, before unpinning. If you want a crisper finish, apply a light fabric stiffener while the piece is damp and pinned. The petals will keep their shape through years of use, and the runner can be re-blocked after washing.
Tips for Success
- Use mercerized cotton. Wool and acrylic are too soft, and the petals and ch-7 spans will sag instead of holding their shape.
- Mark the four corner ch-3 spaces on every square with stitch markers. Rnds 5 and 6 depend on finding the right corner each time.
- Keep the ch-7 spans consistent. Make them the same length each time, since slightly tight ones will pull the square into a diamond.
- Join the squares loosely. A tight slip stitch seam shortens the column and makes the panel edge wavy.
- Work the panel Rows 2 to 8 in the order given, and count to 157 at the end of every row. A one-stitch error shows up quickly in the ladder row.
Common Mistakes to Avoid
- Working 8 petals in the wrong spaces in Rnd 3. Petals go in the odd ch-1 spaces and slip stitches in the even ones, so if you end up with 7 or 9 petals, rip back to Rnd 3.
- Putting the corner in the wrong ch-3 space in Rnd 5. Corners and sides alternate, so check that you finish with 4 corners and 4 sides before closing the round.
- Losing count of the panel row. If Row 1 is not 157 sts, check each square’s side for 25 sc and the 5 junction stitches.
- Skipping the blo rows or working them in both loops. The ridges are part of the texture, so rework any row where you used both loops.
- Forgetting the corner increases in border Rnd 1. Without 3 sc in each of the four outer corners, the border will cup and the runner will not lie flat.
Ways to Customize This Pattern
- Change the number of squares. Each extra square adds 25 + 1 = 26 sts to every panel row, so Row 1 becomes 157 + 26 for each square. Adjust the border counts to match, keeping Rnd 1 a multiple of 8.
- Make a doily or placemat from a single square plus the shell and loop border.
- Use ivory, sage green or charcoal cotton for a different mood, or use two colors with the flowers in a contrast shade.
- Use finer cotton, such as size 10 crochet thread, and a 1.75 mm hook for a delicate lace runner. The motif will be about half as wide, so the runner will be smaller.
- Repeat panel Rows 6 and 7 a second time for a wider panel and a wider runner.
Frequently asked questions
About 30 x 72 cm (12 x 28 in) after blocking, using DK cotton and a 3.0 mm hook. Each square is about 11 cm. Because the stitch counts are fixed, a looser or tighter gauge will change the size.
Plan on about 450 m (490 yd) of DK cotton, which is 4 to 5 balls of 50 g. Heavier hands or a larger hook use more, so buying an extra ball of the same dye lot is safest.
Yes. Finish all six with Rnd 6 as written, then whip-stitch or slip stitch them together from the back. The join-as-you-go method in this pattern avoids sewing and keeps the seams neat, but either way works.
That is normal before blocking. Wet the piece, pin out every petal and corner, and let it dry fully. If it still curls, your tension may be too tight, so try a hook half a millimeter larger.
The finished Floral Lace Crochet Table Runner Pattern