Fern Table Runner Crochet Pattern
Beginner Friendly
Perfect for those just starting their crochet journey, with clear instructions and simple techniques
Single-Day Project
A satisfying project you can complete in a single afternoon or evening.
Handmade Gift
A beautiful keepsake — free forever. Read online or print at home.
About This Fern Table Runner Crochet Pattern
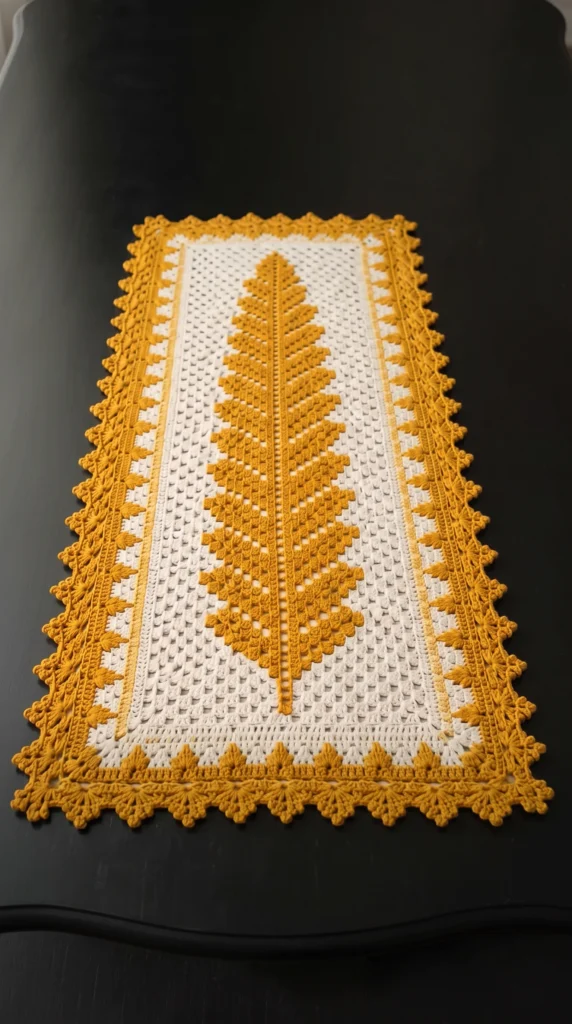
This fern table runner crochet pattern builds one long feather-shaped leaf out of granny clusters, worked in mustard on a soft white background. The leaf sits in the middle of the runner. A stem runs down the center, and leaflets angle up and outward on both sides, getting shorter toward the tip. A thin mustard line, a white band and a deep lace edging with picot points frame the panel.
The center panel is worked flat in rows, and the border is worked in rounds around it. Plan on roughly 25 to 30 hours, which suits several weekends or one cozy month of evenings. It is an advanced project because of the color changes. You will use small bobbins and change colors mid-row, and you will follow a written chart that stays symmetrical from stem to edge. If you are comfortable with granny stitch and want a first project in crochet colorwork, this one is very doable if you take it slowly.
The finished runner is about 36 x 72 cm (14 x 28 in) after blocking. It looks best on a dark table, where the mustard really glows, and it makes a lovely housewarming or autumn gift. The border rounds are written with exact stitch counts, so the corners stay flat and the points line up evenly.
Materials
- DK / light worsted mercerized cotton, white about 120 g (approx. 300 m)
- DK / light worsted mercerized cotton, mustard about 90 g (approx. 225 m)
- Crochet hook 3.0 mm
- Small bobbins or yarn clips 3 to 4, for the mustard sections
- Stitch markers 4, for the corners
- Row counter strongly recommended
- Tapestry needle
- Blocking mats and rustproof pins
- Gauge 5 CL = 7 cm (2 3/4 in) wide; 10 rows = 8.5 cm (3 3/8 in) tall, in granny stitch
Abbreviations
chchainsl stslip stitchscsingle crochetdcdouble crochetst(s)stitch(es)spspaceCLcluster: 3 dc in the same spacepicotch 3, sl st in 3rd ch from hookWwhiteMmustardRSright sideSpecial Stitches and Reading the Chart
- Cluster (CL): work 3 dc in the same space. In the panel, each CL goes in the space between two clusters of the row below.
- Edge stitches: the ch 3 at the start of a row counts as a dc. The last stitch of every row is a dc worked in the top of the previous row’s turning ch. These edge stitches are always white.
- Fern chart: every row has 15 clusters. The chart gives runs of clusters from left to right, for example “6 W, 3 M, 6 W”. The chart is symmetrical, so it reads the same on right-side and wrong-side rows.
- Color changes (intarsia): use a separate bobbin for each mustard section. Make the change on the last yarn over of the stitch before the new color. Always cross the old and new yarns on the wrong side so there are no holes. Do not carry mustard across white clusters.
- Picot: ch 3, then sl st in the 3rd ch from the hook.
Center Panel: Foundation and Lower Stem (Rows 1-14)
- Row 1 (RS): with white, ch 49. Work 2 dc in the 4th ch from hook (the 3 skipped ch count as the first dc, making the first CL). *Skip 2 ch, CL in the next ch; rep from * 14 times. Skip 2 ch, dc in the last ch. (15 CL and 1 dc = 46 dc)
- Rows 2-11: ch 3, turn. Work a CL in each of the 15 spaces between clusters, then dc in the top of the turning ch. (15 CL + 2 edge dc = 47 dc) All white.
- Rows 12-14: work as Row 2, following the chart: 7 W, 1 M, 7 W. This starts the stem. Join the mustard for the center cluster and keep that bobbin attached.
Center Panel: Fern Leaflets (Rows 15-58)
- Work every row as Row 2, following the chart for the 15 clusters. The mustard stem continues up the center until Row 58.
- Row 15: 6 W, 3 M, 6 W
- Row 16: 5 W, 5 M, 5 W
- Row 17: 4 W, 2 M, 1 W, 1 M, 1 W, 2 M, 4 W
- Row 18: 3 W, 2 M, 1 W, 3 M, 1 W, 2 M, 3 W
- Row 19: 2 W, 2 M, 1 W, 5 M, 1 W, 2 M, 2 W
- Row 20: 2 W, 1 M, 1 W, 2 M, 1 W, 1 M, 1 W, 2 M, 1 W, 1 M, 2 W
- Row 21: 3 W, 2 M, 1 W, 3 M, 1 W, 2 M, 3 W
- Row 22: 2 W, 2 M, 1 W, 5 M, 1 W, 2 M, 2 W
- Row 23: 2 W, 1 M, 1 W, 2 M, 1 W, 1 M, 1 W, 2 M, 1 W, 1 M, 2 W
- Row 24: 3 W, 2 M, 1 W, 3 M, 1 W, 2 M, 3 W
- Row 25: 2 W, 2 M, 1 W, 5 M, 1 W, 2 M, 2 W
- Row 26: 2 W, 1 M, 1 W, 2 M, 1 W, 1 M, 1 W, 2 M, 1 W, 1 M, 2 W
- Row 27: 3 W, 2 M, 1 W, 3 M, 1 W, 2 M, 3 W
- Row 28: 2 W, 2 M, 1 W, 5 M, 1 W, 2 M, 2 W
- Row 29: 2 W, 1 M, 1 W, 2 M, 1 W, 1 M, 1 W, 2 M, 1 W, 1 M, 2 W
- Row 30: 3 W, 2 M, 1 W, 3 M, 1 W, 2 M, 3 W
- Row 31: 3 W, 1 M, 1 W, 5 M, 1 W, 1 M, 3 W
- Row 32: 4 W, 2 M, 1 W, 1 M, 1 W, 2 M, 4 W
- Row 33: 3 W, 2 M, 1 W, 3 M, 1 W, 2 M, 3 W
- Row 34: 3 W, 1 M, 1 W, 5 M, 1 W, 1 M, 3 W
- Row 35: 4 W, 2 M, 1 W, 1 M, 1 W, 2 M, 4 W
- Row 36: 3 W, 2 M, 1 W, 3 M, 1 W, 2 M, 3 W
- Row 37: 3 W, 1 M, 1 W, 5 M, 1 W, 1 M, 3 W
- Row 38: 4 W, 2 M, 1 W, 1 M, 1 W, 2 M, 4 W
- Row 39: 4 W, 1 M, 1 W, 3 M, 1 W, 1 M, 4 W
- Row 40: 5 W, 5 M, 5 W
- Row 41: 4 W, 2 M, 1 W, 1 M, 1 W, 2 M, 4 W
- Row 42: 4 W, 1 M, 1 W, 3 M, 1 W, 1 M, 4 W
- Row 43: 5 W, 5 M, 5 W
- Row 44: 4 W, 2 M, 1 W, 1 M, 1 W, 2 M, 4 W
- Row 45: 4 W, 1 M, 1 W, 3 M, 1 W, 1 M, 4 W
- Row 46: 5 W, 5 M, 5 W
- Row 47: 5 W, 1 M, 1 W, 1 M, 1 W, 1 M, 5 W
- Row 48: 6 W, 3 M, 6 W
- Row 49: 5 W, 5 M, 5 W
- Row 50: 5 W, 1 M, 1 W, 1 M, 1 W, 1 M, 5 W
- Rows 51-52: 6 W, 3 M, 6 W
- Row 53: 7 W, 1 M, 7 W
- Rows 54-55: 6 W, 3 M, 6 W
- Rows 56-58: 7 W, 1 M, 7 W. Fasten off the mustard at the end of Row 58.
Center Panel: Top (Rows 59-68)
- Rows 59-68: work as Row 2, all white (15 CL + 2 edge dc = 47 dc per row). Do not fasten off after Row 68. The panel should now be 68 rows tall. Check your row count before moving on.
Border: Inner Line and White Band (Rounds 1-4)
- Round 1 (mustard, RS): join mustard in a top corner stitch. Ch 1, (sc, ch 2, sc) in the same st. Work down the first long side with 2 sc in each of the 66 row-ends between the corners (132 sc). Work (sc, ch 2, sc) in the bottom corner st. Across the bottom, work 1 sc in each of the 47 foundation ch between the corners, working 2 sc in the 24th ch (48 sc). Work (sc, ch 2, sc) in the corner. Work the second long side the same as the first (132 sc). Work (sc, ch 2, sc) in the top corner st. Across the top, work 1 sc in each of the 45 sts between the corners, working 2 sc in the 8th, 23rd and 38th sts (48 sc). Join with sl st to the first sc. (368 sc and 4 corner ch-2 sps)
- Round 2 (white): join white in any corner ch-2 sp. Ch 3 (counts as dc), dc in the same sp, ch 2, 2 dc in the same sp. *Dc in each sc to the next corner ch-2 sp, (2 dc, ch 2, 2 dc) in the corner sp; rep from * 2 more times. Dc in each remaining sc, join with sl st to the top of ch 3. (Between corner ch-2 sps: 138 dc on the long sides, 54 dc on the short sides.)
- Round 3 (white): sl st in the next dc and into the corner ch-2 sp. Ch 3, dc in the same sp, ch 2, 2 dc in the same sp. *Dc in each dc to the next corner ch-2 sp, (2 dc, ch 2, 2 dc) in the corner sp; rep from * 2 more times. Dc in each remaining dc, join with sl st to the top of ch 3. (Between corner ch-2 sps: 142 dc long sides, 58 dc short sides.)
- Round 4 (mustard): join mustard in any corner ch-2 sp. Ch 1, (sc, ch 2, sc) in the same sp. *Sc in each dc to the next corner ch-2 sp, (sc, ch 2, sc) in the corner sp; rep from * 2 more times. Sc in each remaining dc, join with sl st to the first sc. (Between corner ch-2 sps: 144 sc long sides, 60 sc short sides.)
Border: Mustard Fans (Round 5)
- Round 5 (mustard): sl st in the corner ch-2 sp. Ch 3, 2 dc in the same sp, ch 2, 3 dc in the same sp. *[Sc in next st, skip 2 sts, 5 dc in next st, skip 2 sts] 24 times along the long side (144 sts used). Work (3 dc, ch 2, 3 dc) in the corner ch-2 sp. [Sc in next st, skip 2 sts, 5 dc in next st, skip 2 sts] 10 times along the short side (60 sts used). Work (3 dc, ch 2, 3 dc) in the corner ch-2 sp. Rep from * once more for the other two sides, then join with sl st to the top of ch 3. (Between corner ch-2 sps: 150 sts long sides, 66 sts short sides.)
Border: Lace Edging (Rounds 6-7)
- Round 6 (mustard): sl st in the next 2 dc and into the corner ch-2 sp. Ch 1, (sc, ch 7, sc) in the same sp. *[Sc in next st, ch 5, skip 5 sts] 25 times along the long side. Work (sc, ch 7, sc) in the corner ch-2 sp. [Sc in next st, ch 5, skip 5 sts] 11 times along the short side. Work (sc, ch 7, sc) in the corner ch-2 sp. Rep from * once more for the other two sides. Join with sl st to the first sc. (25 arches on each long side, 11 on each short side, and 4 corner ch-7 arches.)
- Round 7 (mustard): ch 3 (counts as dc), then 3 dc, picot, 4 dc in the first corner ch-7 arch. *Sc in each sc up to the next arch, (3 dc, picot, 3 dc) in each ch-5 arch along the side, sc in each sc up to the corner arch, (4 dc, picot, 4 dc) in the corner ch-7 arch; rep from * 2 more times. Work the last side the same way, ending with sc in each sc. Join with sl st to the top of ch 3 and fasten off.
Finishing
Weave in all ends on the wrong side, following the direction of the stitches so the mustard tails do not show through the white. Wet block the runner. Soak it in lukewarm water, press out the water in a towel, then pin it flat to the finished size. Pin out every picot point so the edging stays crisp. Let it dry completely before moving it.
Cotton blocks very well and holds its shape after washing. A light spray of starch on the border is optional if you want sharper points. Lay the runner on a dark table to show off the fern.
Tips for Success
- Cut mustard lengths for each bobbin with room to spare. Short bobbins tangle less when you flip the work every row.
- Mark Row 12, where the stem starts, and Row 58, where it ends, with stitch markers. These two rows make it easy to catch a miscount.
- Tick off every chart row as you finish it. Most of the rows look alike, and it is easy to repeat or skip one.
- Place a stitch marker in each corner ch-2 space of the border so you can find the corners quickly.
- Keep your tension even in the edge stitches. Loose edges make the side stitch counts in Round 1 feel wrong, and the border will ripple.
Common Mistakes to Avoid
- Working into the clusters instead of the spaces between them. Every row’s clusters go in the gaps, so if your count drifts, check where you inserted the hook.
- Carrying mustard across the back of white clusters. It shows through the open stitches and pulls the fabric. Use separate bobbins instead.
- Making the panel more or fewer than 68 rows. The counts in Rounds 5 to 7 only line up at 68 rows, or after adding sets of 3 rows (see the FAQ).
- Skipping the blocking. The arches and picots curl in on themselves until they are pinned out.
Ways to Customize This Pattern
- Work the fern in rust, teal or deep green on cream for a different season.
- Use one more mustard round (Round 4 repeated) for a thicker line around the panel.
- Make a matching set of small doilies by working a short fern panel with the same border.
- Skip the mustard fans in Round 5 and go straight to Round 6 for a lighter, simpler edge. The counts still work out because both rounds are multiples of 6.
Frequently asked questions
Add white rows in sets of 3, either before Row 12 or after Row 58. Every set of 3 rows adds 6 stitches to each long side of the border, so the multiples of 6 in Rounds 5 to 7 still work. Each added set adds 1 arch to each long side in Round 6.
Yes, but the pattern will come out much smaller. Size 10 crochet thread with a 1.5 mm hook gives a runner around half the size, with the same stitch counts. If you want it larger again, add rows in sets of 3 and consider adding clusters in the width.
It is the cleanest way to get sharp color changes in an open granny-cluster fabric. Small bobbins, clothes pegs or even short balls of yarn work. Avoid carrying mustard across white clusters, because the strand shows through the open stitches.
Rippling is usually caused by too many stitches along the sides in Round 1. Make sure you work exactly 2 sc per row-end and not more. If the border is still wavy after that, a good wet block will flatten it.
The finished Fern Table Runner Crochet Pattern