Emerald Garden Table Runner Crochet Pattern
Beginner Friendly
Perfect for those just starting their crochet journey, with clear instructions and simple techniques
Single-Day Project
A satisfying project you can complete in a single afternoon or evening.
Handmade Gift
A beautiful keepsake — free forever. Read online or print at home.
About This Emerald Garden Table Runner Crochet Pattern
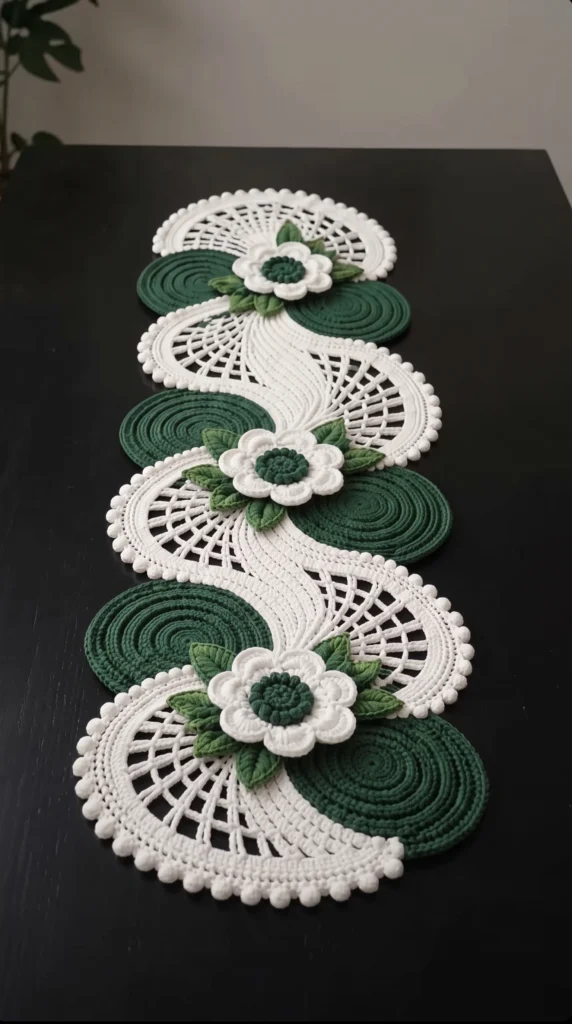
This crochet table runner pattern builds a long, winding centerpiece from separate pieces: four white lace fans with bobble edges, six flat emerald spiral discs, three layered flowers and fifteen leaves in two shades of green. The fans curve in alternating directions so the finished runner moves down the table in a gentle S shape, with a flower at each place where two fans meet.
Each fan is worked flat in rows around nine radiating spokes, so the lace opens up wider as it grows. The discs are worked in the round and tucked under the fans for the layered look in the photo. Because every piece is made separately, you can work on the runner a little at a time and see it come together only at the end.
Plan on 20 to 25 hours in total. This pattern is for crocheters who are comfortable reading lace charts-in-words, working popcorn stitches, and sewing a project together. Cotton yarn is a good choice here because it gives the lace crisp definition and blocks well.
Materials
- Worsted / aran weight cotton yarn, white approx. 220 m / 240 yd
- Worsted / aran weight cotton yarn, emerald green approx. 140 m / 150 yd
- Worsted / aran weight cotton yarn, light leaf green approx. 25 m / 27 yd
- 3.5 mm crochet hook go down a size if your lace looks floppy
- Tapestry needle
- Stitch markers at least 2
- Scrap yarn or fiberfill a tiny amount for the flower centers
- Blocking mats and rustproof pins
- Fabric stiffener or sugar-water spray optional, for extra crispness
Abbreviations
MRmagic ringchchainsl stslip stitchst(s)stitch(es)spspacescsingle crochethdchalf double crochetdcdouble crochetinc2 sc in the same stitchdecsingle crochet 2 together (invisible decrease)BLOback loop onlypcpopcorn: 5 dc in the same st, drop the loop, insert hook in the first dc, pick up the dropped loop and pull through, ch 1 to closeSpiral Discs (make 6, emerald green)
- Rd 1: 6 sc in MR. Work in a continuous spiral and mark the first stitch of each round. (6)
- Rd 2: inc in each st around. (12)
- Rd 3: (sc, inc) x 6. (18)
- Rd 4: (2 sc, inc) x 6. (24)
- Rd 5: (3 sc, inc) x 6. (30)
- Rd 6: (4 sc, inc) x 6. (36)
- Rd 7: (5 sc, inc) x 6. (42)
- Rd 8: (6 sc, inc) x 6. (48)
- Rd 9: (7 sc, inc) x 6. (54)
- Rd 10: (8 sc, inc) x 6. (60)
- Rd 11: (9 sc, inc) x 6. (66)
- Rd 12: (10 sc, inc) x 6. (72)
- Rd 13: (11 sc, inc) x 6. (78)
- Rd 14: (12 sc, inc) x 6. (84)
- Rd 15: (13 sc, inc) x 6. (90)
- Rd 16: (14 sc, inc) x 6. (96)
- Rd 17: sc in BLO of each st around for a ridged edge. (96) Sl st in the next st, fasten off and leave a 40 cm tail for sewing.
Lace Fans (make 4, white)
- Row 1: ch 3 (counts as dc), 12 dc in MR. Pull the ring snug. Turn. (13 dc)
- Row 2: ch 3 (counts as dc), dc in the same st, 2 dc in each of the next 11 sts, dc in the last st. Turn. (25 dc)
- Row 3: ch 3 (counts as dc), *ch 2, skip 2 sts, dc in next st*, repeat 8 times. Turn. (9 dc spokes, 8 ch-2 sps)
- Row 4: ch 3, *(2 dc, ch 1, 2 dc) in next ch-2 sp, dc in next dc*, repeat 8 times. Turn. (41 dc, 8 ch-1 sps)
- Row 5: ch 3, *ch 3, skip 2 dc, sc in ch-1 sp, ch 3, skip 2 dc, dc in next dc*, repeat 8 times. Turn. (9 dc, 8 sc, 16 ch-3 arches)
- Row 6: ch 3, *4 dc in next ch-3 arch, dc in next sc, 4 dc in next ch-3 arch, dc in next dc*, repeat 8 times. Turn. (81 dc)
- Row 7: ch 3, *ch 4, skip 4 dc, sc in next dc, ch 4, skip 4 dc, dc in next dc*, repeat 8 times. Turn. (9 dc, 8 sc, 16 ch-4 arches)
- Row 8: ch 3, *5 dc in next ch-4 arch, dc in next sc, 5 dc in next ch-4 arch, dc in next dc*, repeat 8 times. Turn. (97 dc)
- Row 9: ch 3, *ch 5, skip 5 dc, sc in next dc, ch 5, skip 5 dc, dc in next dc*, repeat 8 times. Turn. (9 dc, 8 sc, 16 ch-5 arches)
- Row 10: ch 3, *6 dc in next ch-5 arch, dc in next sc, 6 dc in next ch-5 arch, dc in next dc*, repeat 8 times. Turn. (113 dc)
- Row 11: ch 3, *ch 6, skip 6 dc, sc in next dc, ch 6, skip 6 dc, dc in next dc*, repeat 8 times. Turn. (9 dc, 8 sc, 16 ch-6 arches)
- Row 12: ch 3, *7 dc in next ch-6 arch, dc in next sc, 7 dc in next ch-6 arch, dc in next dc*, repeat 8 times. Turn. (129 dc)
- Row 13 (bobble edge): ch 1, sc in the first dc, *pc in next dc, sc in next 3 dc*, repeat 32 times. (129 sts, 32 popcorns) Fasten off and weave in ends.
Flower, Large Back Layer (make 3, white)
- Rd 1: 6 sc in MR, sl st to join. (6)
- Rd 2: ch 1, inc in each st around, sl st to join. (12)
- Rd 3: *ch 3, skip 1 st, sl st in next st*, repeat 6 times. (6 ch-3 loops)
- Rd 4: in each ch-3 loop work (sl st, hdc, 4 dc, hdc, sl st). (6 petals of 8 sts each) Fasten off and weave in ends.
Flower, Small Front Layer (make 3, white)
- Rd 1: 6 sc in MR, sl st to join. (6)
- Rd 2: ch 1, inc in each st around, sl st to join. (12)
- Rd 3: *ch 2, skip 1 st, sl st in next st*, repeat 6 times. (6 ch-2 loops)
- Rd 4: in each ch-2 loop work (sl st, hdc, 2 dc, hdc, sl st). (6 petals of 6 sts each) Fasten off and leave a 30 cm tail.
Flower Center (make 3, emerald green)
- Rd 1: 6 sc in MR. Work in a continuous spiral. (6)
- Rd 2: inc in each st around. (12)
- Rd 3: (sc, inc) x 6. (18)
- Rd 4: sc in BLO of each st around to make a raised ridge. (18)
- Rd 5: (sc, dec) x 6. (12) Stuff with a tiny ball of scrap yarn.
- Rd 6: dec x 6. (6) Fasten off, thread the tail through the front loops and pull closed. Leave a 25 cm tail for sewing.
Leaves (make 15: 9 in light green, 6 in emerald green)
- Ch 9. Starting in the 2nd ch from the hook: sl st, sc, hdc, dc, dc, hdc, sc. (7 sts down the first side)
- Work 3 sc in the last ch to turn the point. (3 sts)
- Working along the underside of the chain: sc, hdc, dc, dc, hdc, sc, sl st. (7 sts back up the second side, 17 sts total) Fasten off and leave a 20 cm tail.
- Optional veins: with a contrasting green, embroider a single straight stitch down the center of each leaf.
Finishing
Weave in all ends except the sewing tails. Wet-block every fan and disc, pinning each fan open so the arches stretch evenly and the bobbles sit along the edge. Let the pieces dry completely. A light spray of fabric stiffener at this stage helps the lace hold its shape on the table.
Lay the runner out on a flat surface. Place the six discs in two columns, three on the left and three on the right, offset so they alternate down the length. Lay the four fans over them in an S curve, with the point of each fan at a flower position and the curved bobble edges facing alternate sides. Each fan should cover part of the neighboring disc, as in the photo. Pin everything in place, then whip stitch the fans to the discs along the overlap with white yarn, stitching through the back loops of the disc so the stitches disappear.
For each flower, stack the small front layer on the large back layer, turning it so its petals sit between the large petals, then sew the green center in the middle. Sew each flower to the point where two fans meet. Tuck five leaves around each flower, using three light and two dark, and sew them down along the stem end only so the tips lift slightly.
Tips for Success
- Keep your tension relaxed on the ch-4, ch-5 and ch-6 arches. Tight chains pull the fan into a cone instead of letting it lie flat.
- Mark the first spoke dc of every row with a stitch marker. It makes counting the 9 spokes and finding the center sc of each gap much faster.
- Use the same ball of yarn for the bobble edge as for the rest of the fan, and test one popcorn first. Pull the closing loop firmly so the bobble stands up round.
- Block the fans harder than you think you need to. Cotton lace relaxes a lot when wet and the arches only open fully when pinned.
- Sew the discs to the fans last, after blocking, so the stitching does not distort the lace.
Common Mistakes to Avoid
- Miscounting the skips in Row 3. If you do not end with 9 spokes and 8 ch-2 spaces, every later row is off. Count before moving to Row 4.
- Working the arches into the wrong spot. Each dc cluster goes into the ch arch, not the sc below it, and the sc between them takes one dc only.
- Letting the disc ruffle. A wavy disc usually means a missed increase. Check that each round matches the stitch count in brackets.
- Sewing all the pieces together flat before blocking. Block first, otherwise the finished runner will not lie straight.
- Making the popcorn bobbles too loose. If they look floppy, close each one by pulling the dropped loop through firmly.
Ways to Customize This Pattern
- Change the colors, for example navy and cream or burgundy and ivory, to match your table setting.
- Make a longer runner by adding more fans and discs, keeping one flower at every join.
- Work a smaller version with only 2 fans and 4 discs to make a placemat or centerpiece mat.
- Skip the bobble edge and finish the fans with a simple picot edge for a quieter look.
- Leave off the flowers and leaves and use the fans and discs on their own as a modern geometric runner.
Frequently asked questions
Yes. A DK or sport weight cotton with a 3 mm hook works with the same stitch counts, but every piece will be smaller. Expect the finished runner to be about 70 cm long, and use less yarn.
Block them while wet and pin each curved edge flat. The bobbles add weight on the curved edge, so a light fabric stiffener helps keep the fans from curling after washing.
If you use cotton, hand wash it in cool water with mild soap and lay it flat to dry, pinning the fans open again if the arches have shrunk. Do not use a dryer, because it can distort the lace.
No, but matching discs look more balanced. If you want variation, make the top and bottom pair smaller by stopping at Round 14 (84 sts) and adjust where the fans overlap.
The finished Emerald Garden Table Runner Crochet Pattern