Dusty Rose Leaf Lace Table Runner Crochet Pattern
Beginner Friendly
Perfect for those just starting their crochet journey, with clear instructions and simple techniques
Single-Day Project
A satisfying project you can complete in a single afternoon or evening.
Handmade Gift
A beautiful keepsake — free forever. Read online or print at home.
About This Dusty Rose Leaf Lace Table Runner Crochet Pattern
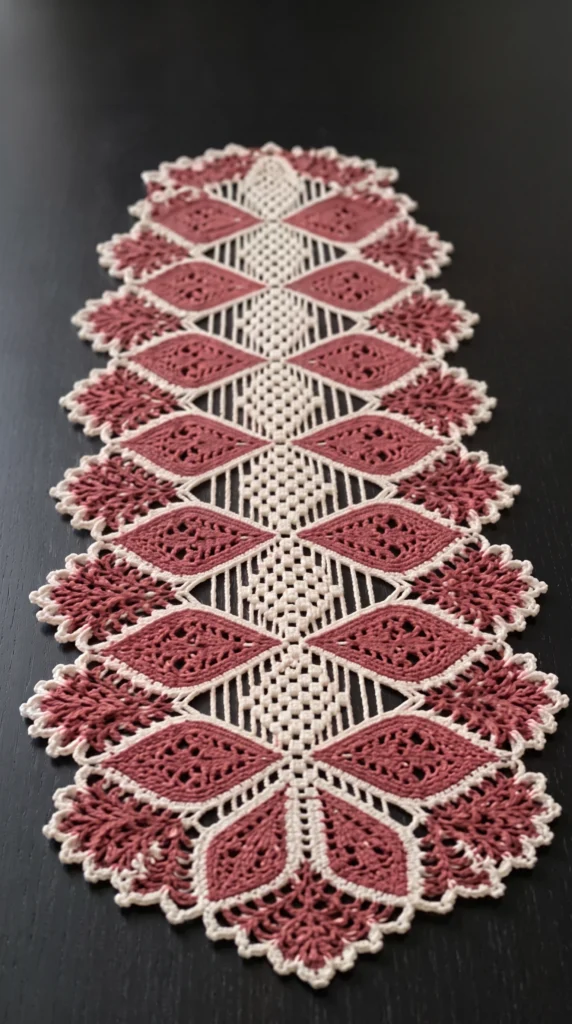
This crochet lace table runner pattern is built from three kinds of motif: pointed dusty rose leaves with an eyelet center, cream filet panels worked in a checkerboard of blocks and spaces, and feathery rose fans that frame the sides. The pieces are made separately, joined into a long runner, and finished with a cream shell border with picots.
The leaves are the heart of the design. Each one starts from a chain, grows into a pointed oval, and is outlined in cream so it stands out against the open mesh. Because everything is made in small pieces, you can work on one leaf or panel at a time and carry the project anywhere. Expect around 30 to 35 hours in total, including blocking.
This pattern suits crocheters who are comfortable reading stitch counts, working filet mesh and joining separate motifs. Mercerized cotton gives the cleanest result, because it keeps the leaf edges crisp and the mesh open after blocking.
Materials
- DK mercerized cotton, cream about 200 g
- DK mercerized cotton, dusty rose about 100 g
- 2.5 mm crochet hook
- Yarn needle for joining and weaving in ends
- Stitch markers at least 4
- Blocking mats and rustproof pins
- Scissors
Abbreviations
MRmagic ringchchainsl stslip stitchscsingle crochethdchalf double crochetdcdouble crochetskskipststitchspspaceBblock (filet panel)Sspace (filet panel)Leaf (make 14)
- Round 1 (rose): ch 15. Sc in the 2nd ch from hook and in each of the next 12 ch (13 sc). 3 sc in the last ch. Working along the other side of the chain, sc in each of the next 13 ch, then 3 sc in the last loop (the loop you started in). Join with a sl st to the first sc. (32 sc: 13 top, 3 tip, 13 bottom, 3 tip) Mark the center st of each 3-sc tip.
- Round 2: ch 1. Sc in each st around, working 3 sc in each marked tip stitch and moving the marker to the new center stitch of each tip. Join. (36 sc)
- Round 3: repeat Round 2. (40 sc)
- Round 4: repeat Round 2. (44 sc)
- Round 5: repeat Round 2. (48 sc: each tip now has 11 sts, with 23 sts between the two tip centers on each side)
- Round 6 (eyelets): ch 1. Sc in the marked st at the first tip. *[Ch 1, sk 1, sc in next st] 11 times, sc in next st, sc in the marked st at the next tip.* Repeat from * once more, but end by joining to the first sc instead of working the last tip stitch. (26 sc and 22 ch-1 sps) Fasten off rose.
- Round 7 (cream edging): join cream in any ch-1 sp. Ch 1. Sc in each sc and each ch-1 sp around, working 3 sc in each sc at the two tips. Join and fasten off. (52 sc)
- Weave in ends. Pin each leaf flat and block lightly so all 14 match.
Feathery Fan (make 14)
- Row 1 (rose): MR, ch 3 (counts as dc), 12 dc in the ring. Do not join. Pull the ring tight. (13 dc)
- Row 2: ch 3 (counts as dc), turn. Dc in the same st, then 2 dc in each of the remaining 12 sts. (26 dc)
- Row 3: ch 1, turn. Sc in the first st. *Ch 3, sk 1 st, sc in next st.* Repeat from * to * 12 times, then sc in the last st. (14 sc and 12 ch-3 loops, 26 sts used)
- Row 4: ch 1, turn. Sc in the first sc. *4 hdc in next ch-3 loop, sc in next sc.* Repeat from * to * 12 times, then sc in the last sc. (14 sc and 48 hdc, 62 sts) Fasten off and weave in ends.
Filet Panel (make 7)
- With cream, ch 18. Dc in the 4th ch from hook and in each of the next 14 ch. (16 dc, counting the turning chain as the first dc)
- In this panel, a block (B) is 2 dc (worked in the ch-2 sp if there is one, otherwise 1 dc in each of the next 2 dc) followed by 1 dc in the next dc. A space (S) is ch 2, sk the next 2 dc or the ch-2 sp, dc in the next dc. Each unit covers 3 sts, so a row is 1 turning dc plus 5 units.
- Row 2: ch 3 (counts as dc), turn. Work S, B, S, B, S across.
- Row 3: ch 3, turn. Work B, S, B, S, B across.
- Rows 4 to 12: repeat Rows 2 and 3, ending on Row 12 with a B, S, B, S, B row so the panel starts and ends with a block at each corner.
- Fasten off, weave in ends and block flat. Each panel is 16 sts wide and 12 rows tall.
Assembly
- Lay the 7 panels end to end in a column. With cream and a yarn needle, whipstitch each seam through both loops, one stitch per dc or ch-2 sp.
- Place the leaves in pairs on either side of the column, one pair for each of the first 6 panels. Each leaf sits horizontally with one pointed tip facing the panel. Sew the tip and the first 2 cm of the leaf edge to the panel side.
- Place the last 2 leaves beside the 7th panel, angled upward like petals, with their tips meeting at the center of the lower end.
- Sew one fan beyond the outer tip of each leaf, with the flat edge of the fan against the leaf. Sew the last 2 fans at the top and bottom ends of the column, centered on the end panels.
- Check that the runner lies flat before border work. If an area ripples, loosen the sewing in that spot.
Border
- Round 1 (cream): join in any outer edge. Ch 1. Sc evenly around the whole outline, with 1 sc in each stitch or ch-1 sp and 1 sc per row end, easing in at points. Add or skip a stitch in a few flat stretches so the total is a multiple of 6. Join.
- Round 2 (shells): ch 1. *Sk 2 sc, 5 dc in next sc, sk 2 sc, sl st in next sc.* Repeat from * to * around. (Each repeat uses 6 sts.) Join.
- Round 3 (picots): sl st into the first dc of a shell. In each shell: sc in dc 1, *ch 3, sl st in the first ch (picot), sc in the next dc*, and repeat from * to * 4 times so you finish with a sc in dc 5. Sl st in the sl st between shells. (5 sc and 4 picots per shell)
- Repeat the Round 3 shell around the entire runner, join and fasten off.
Finishing
Weave in every end, running rose tails through rose stitches and cream tails through cream stitches so nothing shows through the mesh. Wet-block the runner flat on a mat, shaping each leaf and pinning every picot, then let it dry completely before moving it.
A light spray of starch helps the filet panels keep their crisp checkerboard. Check the pins after an hour, since the fans tend to curl inward as they dry.
Tips for Success
- Mark both tip centers in Rounds 1 to 5. Every later round depends on those stitches.
- Block one leaf and one panel before making the rest, then check how well they fit together before committing to all 14 leaves.
- Make all 14 leaves with the same tension. A loose leaf shows up beside tighter ones once they are paired.
- Count each filet row. Every row should have 16 sts, so a count of 15 or 17 means a unit was missed or doubled.
- Do the border count in sections and place markers every 30 to 40 stitches, so you can spot a shell that will not fit.
Common Mistakes to Avoid
- Leaves with rounded ends: this happens when the 3 sc are placed beside the tip center instead of in it. Keep the marker in the center stitch of each tip.
- Filet panels that taper: you probably skipped the turning chain as a dc at the end of a row. Always work the last dc into the top of the turning chain.
- Fans that cup instead of lying flat: Row 3 loops are too tight. Use a larger hook for that row or chain the loops a little looser.
- Leaves that pucker after joining: the sewing is tighter than the leaf. Stitch with a relaxed tension and pin first.
- Shells that do not repeat evenly: the Round 1 count is not a multiple of 6. Add or skip a stitch in a flat stretch to fix it.
Ways to Customize This Pattern
- Swap dusty rose for sage green, navy or mustard for a different mood while keeping the cream mesh.
- Use only 4 panels and 8 leaves for a shorter runner or a centerpiece mat.
- Add extra panel and leaf pairs to lengthen the runner for a larger table.
- Make a single leaf with a cream border as a coaster, or join a ring of 6 leaves as a doily.
- Work the picots in rose instead of cream for a stronger edge.
Frequently asked questions
With DK cotton and a 2.5 mm hook, a leaf measures roughly 7 cm long and 3.5 cm wide after blocking. Your size will vary with gauge, so measure your first blocked leaf before you start sewing.
Yes. Crochet cotton thread with a 1.5 mm hook gives a finer lace runner. The stitch counts stay the same, but the finished runner will be smaller, so add more panels and leaf pairs to keep the length.
The cream outline separates each rose leaf from the open mesh behind it, so the shape stays clear on a dark table. It also stiffens the edge, which helps the leaf keep its point.
No. Make all pieces separately, block them, then sew. This keeps each piece the same size and lets you adjust the layout before committing.
The finished Dusty Rose Leaf Lace Table Runner Crochet Pattern