Daisy Crochet Table Runner Pattern Excerpt
Beginner Friendly
Perfect for those just starting their crochet journey, with clear instructions and simple techniques
Single-Day Project
A satisfying project you can complete in a single afternoon or evening.
Handmade Gift
A beautiful keepsake — free forever. Read online or print at home.
About This Daisy Crochet Table Runner Pattern Excerpt
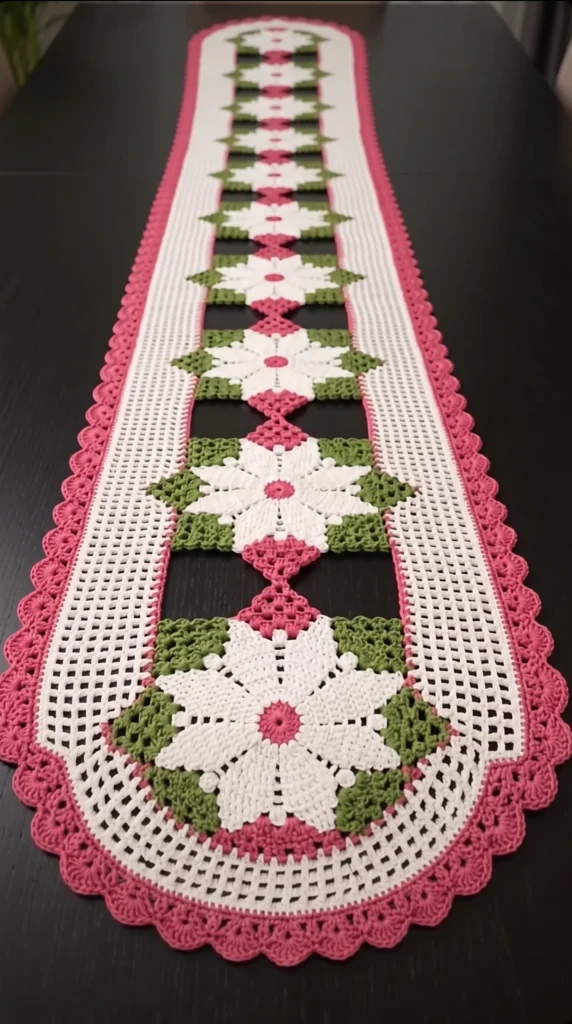
This daisy crochet table runner pattern builds a long, lace-edged runner from seven white flower squares with green corners, joined by small pink diamonds. A wide band of filet mesh frames the chain, and a pink scalloped shell edge finishes the curved ends. It looks like a piece from a heirloom collection, but every round is written out with exact stitch counts.
The design is made of three kinds of pieces: flower squares, diamond connectors and one continuous mesh border. The flower squares are worked in the round from a magic ring, the diamonds are small granny squares turned on their points, and the border is worked around the whole joined chain in rounds. The ends of the runner curve because the mesh grows by a set number of spaces at each end every round, so you never need to sew or shape anything by hand.
Plan on 22 to 28 hours of crochet. It suits crocheters who are comfortable with dc, hdc, magic rings and reading round-by-round counts. The mesh rounds are repetitive, which makes them good for evening TV crochet, while the squares and joins need your full attention.
Materials
- Mercerized cotton yarn, DK weight, white approx. 500 m
- Mercerized cotton yarn, DK weight, pink approx. 250 m
- Mercerized cotton yarn, DK weight, green approx. 100 m
- Crochet hook 3.0 mm
- Tapestry needle for weaving in ends
- Stitch markers at least 6
- Blocking mats and rustproof pins for blocking
- Scissors
Abbreviations
MRmagic ringchchainsl stslip stitchscsingle crochethdchalf double crochetdcdouble crochetsc2togsingle crochet 2 togetherst(s)stitch(es)spspacerndroundUnitdc in next dc, ch 1, skip next ch-1 spGrowdc in next dc, ch 1, dc in next ch-1 sp, ch 1Flower Square (make 7)
- Rnd 1 (pink): 8 sc in MR, join with sl st to the first sc. (8 sts)
- Rnd 2 (pink): 2 sc in each st around. (16 sts)
- Rnd 3 (white): *sc in next st, 2 sc in next st*, repeat 8 times. (24 sts)
- Rnd 4: *sc in next 2 sts, 2 sc in next st*, repeat 8 times. (32 sts)
- Rnd 5: *sc in next 3 sts, 2 sc in next st*, repeat 8 times. (40 sts)
- Rnd 6: *sc in next 4 sts, 2 sc in next st*, repeat 8 times. (48 sts)
- Rnd 7: *sc in next 5 sts, 2 sc in next st*, repeat 8 times. (56 sts) Keep each round’s increases directly above the last round’s so the 8 spokes read as petal veins. Fasten off white.
- Rnd 8 (green): Join green in any st. *sc in next st, hdc in next 2 sts, dc in next 3 sts, 2 dc in next st, ch 2, 2 dc in next st, dc in next 3 sts, hdc in next 2 sts, sc in next st*, repeat 4 times. Each repeat uses 14 sts, so you use all 56. Join. (4 corner ch-2 sps; 16 sts on each side between corner sps)
- Rnd 9 (green): Sl st in the next 2 sts and into the first ch-2 corner sp. Ch 3 (counts as dc), dc, ch 2, 2 dc in the same sp. *Dc in each of the next 16 sts, (2 dc, ch 2, 2 dc) in the next corner sp*, repeat 2 more times, then dc in each of the last 16 sts. Join with sl st to the top of ch 3. (80 dc plus 4 ch-2 sps; 20 dc on each side between corner sps)
- Fasten off and weave in the ends. Make 7 squares in total.
Pink Diamond Connector (make 6)
- Rnd 1 (pink): Ch 4 and join with sl st in the first ch to make a ring. Ch 3 (counts as dc), 2 dc in the ring, ch 2. *3 dc in the ring, ch 2*, repeat 3 times. Join with sl st to the top of ch 3. (4 clusters of 3 dc, 4 ch-2 sps)
- Rnd 2: Sl st in the next 2 dc and into the first ch-2 sp. Hold the piece with this corner pointing up; it is tip A. Do not work this round until you have set up the squares as described in the next card.
- Rnd 2, tip A: Ch 3 (counts as dc), 2 dc, ch 1, sl st in the space between the 10th and 11th dc of the lower square’s bottom side, ch 1, 3 dc, all in the same corner sp.
- Rnd 2, tip B: Ch 1, (3 dc, ch 2, 3 dc) in the next corner sp (the right side point).
- Rnd 2, tip C: Ch 1, 3 dc, ch 1, sl st in the space between the 10th and 11th dc of the next square’s top side, ch 1, 3 dc, all in the next corner sp.
- Rnd 2, tip D: Ch 1, (3 dc, ch 2, 3 dc) in the last corner sp, ch 1, join with sl st to the top of ch 3. Fasten off. (4 corner groups of 6 dc, with ch-1 sps between)
Assembling the Chain
- Lay Squares 1 and 2 right side up in a column, with the bottom side of Square 1 facing the top side of Square 2 and about 6 cm of space between them. Pin them so they cannot drift.
- Work Diamond 1 into the gap, joining tip A to Square 1 and tip C to Square 2 as written above.
- Add Square 3 below Square 2 and work Diamond 2 the same way. Continue until all 7 squares are joined by 6 diamonds.
- Check that the chain is straight and that every square faces the same way before you start the border.
Mesh Border: Foundation Rounds (B1 to B3)
- B1 (pink): Join pink with a sl st in the top-left corner sp of Square 1, the top square. Work 3 sc in that corner sp, sc in each of the 20 dc across the top side, 3 sc in the top-right corner sp. (26 sc across the top end)
- B1, right side: Sc in each of the 20 dc down the right side of Square 1, then 1 sc in the bottom-right corner sp (21 sc). Ch 12 to bridge the gap. For Squares 2 to 6, work 1 sc in the top-right corner sp, 20 sc down the side and 1 sc in the bottom-right corner sp (22 sc), then ch 12. For Square 7, work 1 sc in the top-right corner sp and 20 sc down the side (21 sc). (152 sc and 72 ch on this long edge, 224 sts)
- B1, bottom end: Work 3 sc in the bottom-right corner sp of Square 7, sc in each of the 20 dc across the bottom, 3 sc in the bottom-left corner sp. (26 sc)
- B1, left side: Work up the left side in the same way. Sc in the 20 dc of Square 7, then 1 sc in its top-left corner sp (21 sc). Ch 12, then for Squares 6 to 2 work 1 sc in the bottom-left corner sp, 20 sc, 1 sc in the top-left corner sp (22 sc), ch 12. For Square 1, work 1 sc in the bottom-left corner sp and 20 sc up the side (21 sc). Join with sl st to the first sc. (500 sts total: 356 sc and 144 ch). Fasten off pink.
- B2 (white): Join white in the first sc of B1. Top end: ch 3 (counts as dc in the join st), *dc in next 3 sts, 2 dc in next st*, repeat 6 times, dc in next st. (26 sts become 32 dc)
- B2, right side: Dc in each of the next 224 sts, working one dc in every sc and every ch of the bridges. (224 dc)
- B2, bottom end: *Dc in next 3 sts, 2 dc in next st*, repeat 6 times, dc in next 2 sts. (26 sts become 32 dc)
- B2, left side: Dc in each of the last 224 sts. Join with sl st to the top of ch 3. (512 dc total)
- B3: Sl st into the top of the first ch 3 of B2 to stay at the same stitch. Ch 3 (counts as dc in the join st), ch 1, skip next st. *Dc in next st, ch 1, skip next st*, repeat around. Join with sl st to the top of ch 3. (256 dc and 256 ch-1 sps. That is 16 at each end and 112 on each long edge)
Mesh Border: Growing the Ends (B4 to B7)
- Each round starts with ch 4 (counts as dc and ch 1, and counts as the first Unit). Skip the next ch-1 sp after it, then continue. Each round ends with a sl st in the 3rd ch of the starting ch 4.
- B4 (white): Top end: [Unit 4 times, Grow] 3 times, Unit once. (16 spaces become 19). Long edge: Unit 112 times. Bottom end: [Unit 4 times, Grow] 3 times, Unit once. (19). Long edge: Unit 112 times. (262 units)
- B5: Top end: [Unit 5 times, Grow] 3 times, Unit once. (19 spaces become 22). Long edge: Unit 112 times. Bottom end: same as the top end. Long edge: Unit 112 times. (268 units)
- B6: Top end: [Unit 6 times, Grow] 3 times, Unit once. (22 spaces become 25). Long edge: Unit 112 times. Bottom end: same as the top end. Long edge: Unit 112 times. (274 units)
- B7: Top end: [Unit 7 times, Grow] 3 times, Unit once. (25 spaces become 28). Long edge: Unit 112 times. Bottom end: same as the top end. Long edge: Unit 112 times. (280 units) Fasten off white.
- Place a marker at the start of each end section and at the start of each long edge so you can check the counts as you go.
Pink Edging (B8 and B9)
- B8 (pink): Join pink in any dc. Sc in every dc and every ch-1 sp around. (560 sc). On each long edge, once, work sc2tog over the next dc and ch-1 sp instead of two single sc. (558 sc)
- B9 (pink, shell edging): *Sc in next st, skip next 2 sts, 5 dc in next st, skip next 2 sts*, repeat 93 times. Each repeat uses 6 sts, so you use all 558. Join with sl st to the first sc. (93 shells)
- Fasten off and weave in the end.
Finishing
Weave in all ends, working them through stitches of the same colour so the white mesh does not show dark yarn tails. Pin the runner out wet on blocking mats, squaring the squares and rounding the ends with the shells pulled out evenly, and leave it until it is fully dry. Cotton holds blocking well, and a light spray of starch makes the mesh crisp and the flowers stand out. Once dry, check that the bridge chains lie flat. The mesh edge should be straight without puckering at the gaps.
Tips for Success
- Use mercerized cotton rather than acrylic. It blocks sharply, shows the mesh grid clearly and hangs flat on a table.
- Count the total units after B3 (256) and again after B7 (280). A wrong count is much easier to fix before the next round buries it.
- Keep your chain-1 spaces the same size as your dc stitches. Pulling them tight turns the grid into rows of slanted lines.
- Wash and block one finished square before you commit to the full runner, so you can see how the yarn and colours behave.
- Join diamonds with the squares already pinned in place, with the same gap between each pair. Joining one pair at a time without pins is how the chain ends up bowed.
Common Mistakes to Avoid
- Bridge chains that do not match the gap. If the mesh edge is wavy, the chain is too long; if it pulls the squares together, too short. Change it by 2 chains at a time so the mesh counts stay even.
- Increasing the flower squares unevenly. Stack the increases on the same 8 spokes every round, or the petals twist and the square will not lie flat.
- Forgetting the end-section growth in B4 to B7. Without the 3 Grows per end, the ends cup in and ruffle the border.
- Working the 3 sc corner sets in B1 into the wrong sps. They belong in the outer corner sps of the end squares only. Inner corners get 1 sc each.
- Skipping the sc2tog in B8. The shell round needs a multiple of 6 stitches, and 560 is not one.
Ways to Customize This Pattern
- Change the colours. A yellow flower centre with a navy border makes a modern version of the same design.
- Add a ring of small bobbles around each flower on Rnd 7 for a more textured petal edge.
- Make the runner shorter or longer. Six squares need no sc2tog in B8 (492 sts, 82 shells). Five squares need 4 sc2tog (420 sts, 70 shells). Eight squares need 4 sc2tog (624 sts, 104 shells).
- Work only one flower square with the border rounds, enlarged by adding more mesh rounds, to make a round or square doily.
- Add more mesh rounds before the pink edging for a wider runner. Keep the end growth at 3 Grows per round.
Frequently asked questions
About 130 cm long and 28 cm wide after blocking, with DK cotton and a 3.0 mm hook. Your gauge, the bridge chains and how hard you block will change this by a few centimetres.
Yes, but the bridge chain length and the number of mesh rounds will change. Work one square first, measure it, and then adjust the bridge so it spans your gap without puckering.
The chain gives a straight mesh edge from top to bottom, so the grid stays aligned from end to end. The diamonds sit in the gap without being pulled by the border.
Hand wash in cool water with mild soap, press the water out in a towel, and re-pin it to shape to dry. Cotton can be starched again lightly if the mesh softens.
The finished Daisy Crochet Table Runner Pattern Excerpt