Autumn Maple Leaf Table Runner Crochet
Beginner Friendly
Perfect for those just starting their crochet journey, with clear instructions and simple techniques
Single-Day Project
A satisfying project you can complete in a single afternoon or evening.
Handmade Gift
A beautiful keepsake — free forever. Read online or print at home.
About This Autumn Maple Leaf Table Runner Crochet
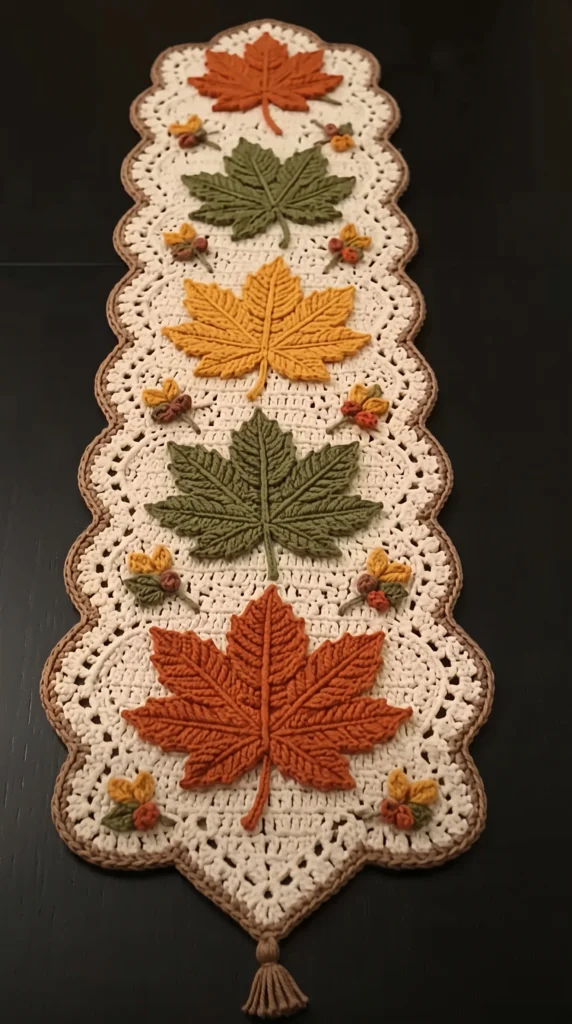
This autumn leaf table runner crochet pattern turns a long strip of cream lace into a fall centerpiece. Five textured maple leaves in rust, olive and mustard march down the center, each one built from separate lobes and shaped with surface slip stitch veins. Tiny berry sprigs sit between the leaves, a scalloped tan edge frames the whole piece, and a tassel hangs from the pointed end.
The runner is worked flat in half double crochet with a row of eyelets every sixth row, which gives it a soft, lacy look without any complicated stitch charts. The leaves, sprigs and stems are made separately and sewn on, so you can work them in short sessions and place them exactly where you like. Expect roughly 20 to 25 hours in total, and the leaves are the slowest part.
This pattern is best for crocheters who are comfortable with working around a foundation chain, sewing on appliqué, and counting stitches while shaping. If you have made a few blankets or doilies and want a project that looks impressive on the table, this is a good next step.
Materials
- Worsted / aran cotton blend yarn, cream about 320 g (600 m)
- Same yarn, tan or taupe about 50 g, edging and tassel
- Same yarn, rust about 40 g
- Same yarn, olive green about 35 g
- Same yarn, mustard yellow about 30 g
- Same yarn, dusty rose a small scrap, for berries
- 4 mm crochet hook
- Yarn needle
- Stitch markers
- Piece of card about 12 cm long for winding the tassel
- Pins and a flat surface for blocking
Abbreviations
chchainsl stslip stitchscsingle crochethdchalf double crochetdcdouble crochetMRmagic ringst(s)stitch(es)sc2togsingle crochet two together (decrease)hdc2toghalf double crochet two together (decrease)Leaf Lobes
Every leaf is made from five separate lobes in one of three sizes. Each lobe starts at the tip and works down one side of the chain, around the base, and back up the other side. Stitch counts below are for the whole lobe.
- Large lobe (L): ch 10. Starting in the 2nd ch from the hook, work along the chain: sl st, sc, hdc, dc, dc, hdc, sc, sl st (8 sts, in chs 2 to 9). Work 3 sc in the last ch (3 sts). Continue along the bottom of the chain: sl st, sc, hdc, dc, dc, hdc, sc, sl st (8 sts). Total 19 sts. Join with a sl st to the first stitch and fasten off, leaving a 25 cm tail.
- Medium lobe (M): ch 8. Starting in the 2nd ch from the hook: sl st, sc, hdc, hdc, sc, sl st (6 sts, in chs 2 to 7). Work 3 sc in the last ch (3 sts). Along the bottom of the chain: sl st, sc, hdc, hdc, sc, sl st (6 sts). Total 15 sts. Join and fasten off, leaving a 25 cm tail.
- Small lobe (S): ch 7. Starting in the 2nd ch from the hook: sl st, sc, hdc, sc, sl st (5 sts, in chs 2 to 6). Work 3 sc in the last ch (3 sts). Along the bottom of the chain: sl st, sc, hdc, sc, sl st (5 sts). Total 13 sts. Join and fasten off, leaving a 25 cm tail.
- Lobes needed per leaf. Leaf 1, small, rust (top of runner): 1 M and 4 S. Leaf 2, medium, olive: 1 L, 2 M and 2 S. Leaf 3, large, mustard: 3 L and 2 M. Leaf 4, large, olive: 3 L and 2 M. Leaf 5, large, rust (bottom of runner): 3 L and 2 M. Also make 10 extra S lobes for the sprigs, 5 in mustard and 5 in olive.
Leaf Assembly and Veins
- Lay the lobes of one leaf out with all the base ends together. Put the largest lobe in the center pointing straight up. Place the next two largest at about 45 degrees on either side, and the two smallest pointing outward and slightly down at about 100 degrees from the center lobe.
- Overlap the base ends by about 1 cm and sew them together with the tails, going through all five lobes several times so the hub is firm and flat.
- Stem: with the same color as the leaf, ch 13. Sl st in the 2nd ch from the hook and in each ch across (12 sl sts). Fasten off, leaving a tail, and sew the stem to the hub so it points straight down from the center lobe.
- Veins: with the yarn held at the back of the leaf, work a line of surface sl sts from the base to the tip of each lobe, finishing with the center lobe. Keep the slip stitches loose enough that the lobe does not pucker. Run a second line of surface sl sts along the center lobe only, to make the midrib stand out.
- Weave in all ends on the wrong side and set the leaves aside.
Berry Sprigs (make 10)
- Berry (make 20: 10 rust, 10 dusty rose). Round 1: 6 sc in MR (6).
- Round 2: sc in each st around (6).
- Round 3: sc2tog 3 times (3). Fasten off, leaving a tail. Pull the tail through the 3 remaining sts and cinch. The berry is small enough to stay firm without stuffing.
- Stem: with olive, ch 9. Sl st in the 2nd ch from the hook and in each ch across (8 sl sts). Fasten off, leaving a tail.
- Assemble each sprig: sew 1 mustard S lobe and 1 olive S lobe to the top of the stem so they sit at an angle like a V. Sew 1 rust berry and 1 dusty rose berry at the base of the V, touching each other.
Runner Body
- With cream, ch 40.
- Row 1: sc in the 2nd ch from the hook and in each ch across (39). Turn.
- Rows 2 to 5: ch 2 (does not count as a st), hdc in each st across (39). Turn.
- Row 6 (eyelet row): ch 2, *hdc in the next 2 sts, ch 1, skip 1 st*, repeat from * to * 13 times (26 hdc and 13 ch-1 spaces, 39 positions). Turn.
- Row 7: ch 2, hdc in each hdc and in each ch-1 space across (39). Turn.
- Rows 8 to 73: repeat rows 2 to 7 eleven more times (72 rows after Row 1, a total of 12 eyelet rows). You should have 39 sts on every row. Do not fasten off.
Pointed End
- Row 74: ch 2, hdc2tog twice, hdc in each st to the last 4 sts, hdc2tog twice (35). Turn.
- Row 75: repeat Row 74 (31).
- Row 76: repeat Row 74 (27).
- Row 77: repeat Row 74 (23).
- Row 78: repeat Row 74 (19).
- Row 79: repeat Row 74 (15).
- Row 80: repeat Row 74 (11).
- Row 81: ch 2, hdc2tog twice, hdc in the next 3 sts, hdc2tog twice (7). Do not turn or fasten off; go straight on to the edging.
Scalloped Edging
- Round 1 (cream): ch 1, sc around the whole runner. Work 1 sc in each st across the ends and 1 sc in each row end along the sides. Work 3 sc in each outer corner. You will have roughly 210 to 220 sts. Adjust by adding or skipping a sc evenly along a side so that the total is divisible by 4, then write that number down. Join with a sl st to the first sc.
- Round 2 (change to tan): ch 1, sl st in the same st. *Skip 1 sc, 5 dc in the next sc, skip 1 sc, sl st in the next sc*, repeat from * to * around. Each repeat uses 4 sc, so the round should close evenly. Join to the first sl st.
- Round 3 (tan): ch 1, sc in each dc and each sl st around (6 sc per scallop). Join with a sl st and fasten off. Weave in the ends.
- Block the runner, pinning out the scallops. Steam or wet-block it until it is flat.
Tassel
- Wrap tan yarn around the 12 cm piece of card about 40 times.
- Slip a 30 cm strand under the loops at one end, tie it tightly, and cut the loops at the opposite end.
- Wrap another strand around the bundle about 2 cm below the knot, tie it off, and trim the ends even.
- Use the top tie strand to sew the tassel to the tip of the pointed end.
Finishing
Lay the blocked runner flat and arrange the five leaves down the center in this order from the top: rust small, olive medium, mustard large, olive large, rust large. Leave about 3 to 4 cm between each leaf so the stems have room. Pin them in place and check the spacing from a distance before you sew anything.
Sew each leaf to the runner with a yarn needle and cream yarn, using small stitches through the edge of each lobe and along the stem. The lobes should lie flat without pulling the lace. Then sew a pair of berry sprigs between each pair of leaves, one on the left and one on the right, angling the stems toward the leaf above. Place the final pair at the base of the last leaf. Weave in any remaining ends and give the whole piece a light steam from the wrong side.
Tips for Success
- Swatch a few rows of hdc first. If your gauge is much looser than 14 sts per 10 cm, go down a hook size, or the runner will end up wider than the leaves can balance.
- Use a stitch marker in the first stitch of every row, since hdc edges are easy to miscount, and the eyelet repeats depend on 39 sts exactly.
- Make all lobes for one leaf in a single sitting, and sew them together before moving on, so the lobe sizes stay consistent.
- When adding veins, keep the yarn behind the work and use a slightly looser tension than usual, so the lobes stay flat.
- Pin the leaves to the blocked runner and photograph it before sewing. Seeing it flat is the best way to spot uneven spacing.
Common Mistakes to Avoid
- Counting the turning ch 2 as a stitch. This adds one stitch every row and the runner flares out. Fix: ch 2, then work the first hdc into the very first stitch.
- Forgetting to work into the ch-1 spaces on the row after an eyelet row. The count drops from 39, so always recount before turning.
- Sewing lobes too loosely at the hub. The leaf sags and the lobes flop. Sew through all five layers at least three times.
- Edging stitch count not divisible by 4, so the scallops do not meet. Count Round 1 and add or skip a sc before starting Round 2.
- Pulling the surface slip stitches tight, which puckers the leaf. Loosen your tension, or go up a hook size for the veining.
Ways to Customize This Pattern
- Swap the colors for a winter set in deep red, gold and evergreen, or for a soft pastel spring version in blush, sage and butter.
- Add 6 more eyelet block repeats (6 rows each) to make a longer runner for a dining table. Keep the repeat count in whole blocks so the eyelets stay aligned.
- Make a single leaf and its sprigs into a coaster by working a small circle of hdc in cream, adding the scalloped edge, and sewing one leaf in the center.
- Leave off the tassel and finish the pointed end with a loop of ch 12 so the runner can hang on the wall as a seasonal banner.
- Swap the berries for tiny acorns by making the berry in tan and adding a top cap of a few sc in brown.
Frequently asked questions
Yes, but the size changes. With DK cotton and a 3.5 mm hook, the runner will be about 5 cm narrower and the leaves smaller. Keep the stitch counts the same and check that the edging scallops still close evenly.
A cotton blend can be washed gently by hand or on a delicate cycle in cool water. Lay it flat and re-pin the scallops while it dries, and do not wring it, or the leaves will distort.
Small differences between lobes are normal and look natural. If a lobe is clearly too short or too wide, check that you worked the right number of stitches along each side and use the 19, 15 or 13 stitch totals as a guide.
Add stitches in multiples of 3 so the eyelet row still works. Chain 3 more for each extra repeat, add 3 stitches to every row count, and add 4 decreases to the point as needed so it still ends at about 7 stitches.
The finished Autumn Maple Leaf Table Runner Crochet